
Exporting to Video
Exporting to Video
Your movie is now ready for exporting. You have the right aspect ratio, frame rate, and colors, and everything is on the main Timeline or set as Graphic symbols. You’re good to go.
You have more than one option when you export your video, and there are slight differences depending on whether you are authoring in Mac OS or Windows.
Basically it comes down to three different options: AVI (Audio Video Interleave), Apple QuickTime, or an image sequence. Formerly your choice of platform dictated your format. Macintosh users exported to QuickTime and Windows users exported to AVI. Now both formats are compatible across platforms.
AVI and QuickTime Export Settings
Mac users have the option of exporting to QuickTime video, which results in a true pixel-based video file. Exporting to QuickTime on Windows produces just a Flash movie in QuickTime Player; it is not a pixel-based video file. The only way to export to a true pixel-based video format in Windows is to purchase QuickTime Pro (currently US$29.99 from Apple Computer), open the exported movie from Flash in QuickTime Pro, and then export it again as a QuickTime movie.
When you export from Flash to AVI or QuickTime, you will have a few options from which to choose. Typically it is a good practice to keep your movie as uncompressed as possible and at the highest color bit available.
QuickTime Export Settings
There are many settings you can make in the Export QuickTime dialog box (see Figure 13):

- Dimensions: Enter a width and height in pixels for the exported QuickTime video, or select Match Movie to make the QuickTime video the same size as the Flash SWF file and keep its aspect ratio.
-
Alpha: Control the transparency mode of your movie, as follows:
- Alpha Transparent makes the Flash background transparent, allowing content behind it to be visible
- Copy makes the Flash track opaque and masks all content in tracks (layers within the QuickTime wrapper) behind the Flash track
- Auto makes the Flash track transparent if it’s on top of any other tracks and opaque if it’s the bottom (or only) track in the SWF file
-
Layer: Select where in the stacking order the Flash movie resides, as follows:
- Top places the Flash track always on top of other tracks in the QuickTime video
- Bottom positions the Flash track behind other tracks
- Auto positions the Flash track in front of other tracks if any Flash objects are in front of video objects in the Flash application, and behind all other tracks if Flash objects are not in front
- Streaming Sound: Export all streaming audio used in the Flash project to a QuickTime soundtrack.
- Controller: Specify the QuickTime controller style used to play the exported video: None, Standard, or QuickTime VR.
- Loop: Repeat the video when it reaches the last frame.
- Paused at Start: Pause the video until some user interaction occurs.
- Play Every Frame: Play every frame of the movie without skipping (sound is disabled).
-
File Flatten (Make Self-Contained): Combine the Flash content and imported video content into a single QuickTime video file, making it easy to distribute and archive.
Deselecting this option links the QuickTime file to whatever external files compose it. This keeps the QuickTime file size consequently smaller. It’s also useful if you ever want to edit one or more of the dependant files individually. Once you update them, the QuickTime movie reflects your changes because it references them externally. Of course, if you ever move, delete, or corrupt any referenced file, the QuickTime movie will not be able to show it.
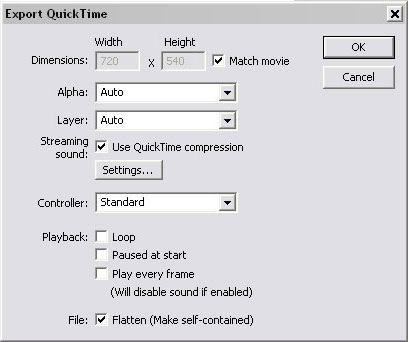
Figure 13. Export to QuickTime options
AVI Export Settings
There are not as many settings to make in the Export Windows AVI dialog box as there are for QuickTime (see Figure 14):
- Dimensions: Enter a width and height in pixels for the exported AVI video. Check the Maintain Aspect Ratio option to keep the same aspect ratio as your Flash movie.
- Video Format: Select 18-bit, 16-bit, 24-bit color or 32-bit with Alpha format. An 18-, 16-, and 24-bit color represents eight bits for every RGB color value. A 32-bit color is the same, with the addition of eight more bits representing the transparency of the color value.
- Compress Video: Display a dialog box allowing you to select from a list of standard AVI compression options.
- Smooth: Apply anti-aliasing to the exported AVI movie.
- Sound Format: Set the sampling rate and size of the soundtrack (if sound is present) and whether to export it in mono or stereo.
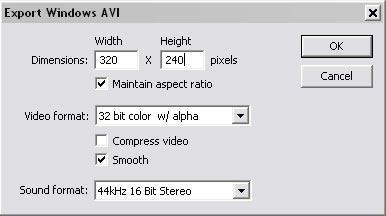
Figure 14. Export to Windows AVI options
Comments