
Exporting Dynamic Content with SWF2Video
Exporting Dynamic Content with SWF2Video
I know I said earlier that when you author content for video, avoid dynamic content completely, but when it comes to exporting a Flash movie with dynamic content—anything that requires user input or that goes beyond just time-based animation (for example, using ActionScript)—you do have solutions.
One such solution is SWF2Video by Flashants, a powerful utility that converts SWFs published from Flash to AVI format. This includes movie clips, ActionScript events, human interactions, and audio.
The SWF2Video interface is surprisingly simple. Select File > Open and navigate to the SWF movie published from Flash and choose File > Create AVI. After naming your AVI file, you will be presented with the AVI Export Setting dialog box. From here you can select how the sequence is exported as well as edit the dimensions, apply compression or leave as uncompressed, set audio options (if any), and more.
The SWF2Video IDE is amazingly simple. Upon launch there’s little more than a window with the familiar File, Control, Options, and Help menus. Select File > Open and navigate to your SWF. Open the File menu again and select Create AVI (see Figure 15) or Create Image Sequence. SWF2Video even supports batch processing of files.

Figure 15. Converting a Flash file to an AVI file using SWF2Video

When you select Create AVI, the AVI Export Setting dialog box opens, allowing you to refine your movie considerably further (see Figure 16).

Figure 16. AVI Export Setting dialog box
The Sequence settings are as follows:
- Skip “goto backward frame” in main timeline: If the Flash movie contains a loop in the main Timeline by using the
gotoAndPlay(0);command, select this option to break the loop by ignoring the ActionScript code. - Frame by frame in main timeline: Convert the main Timeline animation into a keyframe sequence.
- Normal: Convert with the movie’s normal playback sequence, including movie clips and ActionScript events.
For the Duration setting, specify the start and end points during export by entering the exact frame numbers.
There are several Video settings to make as well:
- Frame rate: Default is the original setting of the movie. If you modify this value, the output video will be faster or slower than the original movie.
- Color Depth: Select 24 bits RGB or 32 bits RGB with Alpha format. The 24-bit color setting represents eight bits for every RGB color value. The 32-bit color setting is the same as 24 bits with the addition of eight more bits representing the transparency of the color value.
Clicking Select in the Video section opens the Video Compression dialog box (see Figure 17). Here you can choose the appropriate compressor to apply to your video. Leave this set to Full Frames (Uncompressed) because this is always best when working with high-quality video. People do not generally compress this because otherwise loss of quality will occur.
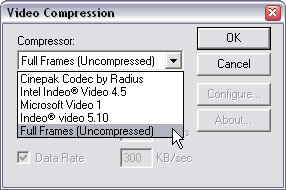
Figure 17. Compressor settings in the Video Compression dialog box
Other video compression settings are as follows:
- Compression quality: Select from 0 to 100 to adjust the amount of compression.
- Key frame interval: If you select a compressed format, you will have the option of setting a keyframe interval (see Figure 18). This setting determines how frequently a full frame of the source video is preserved in the Timeline. A smaller value results in more keyframes, and subsequently a larger file size. A greater value results in fewer keyframes and a smaller file size. Animation with little motion (such as a talking head) may be suitable with a larger keyframe interval value, while a movie with an abundance of animation may benefit from a smaller keyframe value.
- Data rate: Specify the data rate of the converted video.
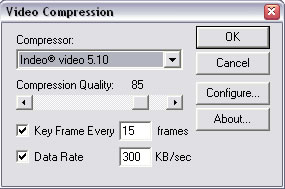
Figure 18. Compression, key frame, and data rate settings
If you have any audio in your Flash project, you’ll want to make the following Audio settings:
- Record from current SWF file: Record audio from the current SWF file and then merge it with the video.
- Recording volume: Adjust the volume level of the waveform recording device.
- From WAVE file: Use an external WAVE file to create your audio by clicking Browse to choose the WAVE file. The audio data of this WAVE file is merged with the video data; the audio in the original SWF file is ignored.
The final two settings are important to consider too:
- Split file when exceeding: Specify the file size limit before the file is split into two different files.
- Play after creating: Open the output AVI file with your preferred default media player when export is complete.
SWF2Video is the perfect companion to Flash for anyone wanting to convert dynamic Flash files to a time-based video format.
Once you export your Flash project to your preferred video format, you can import it into a video editing program such as Premiere or Final Cut Pro, or a compositing and motion graphics program like Adobe After Effects, for further editing, special effects, and color correction.
Where to Go from Here
My Flash career began with authoring content for broadcast video. At the time I was the director of creative development for an animation studio in the Boston area. Part of my job was to research and implement graphics and animation software into the production process. We produced and animated content for Comedy Central, ABC, and The Cartoon Network, and were completely desperate to find the right tool to replace the animation program we were rapidly outgrowing.
When I discovered Flash, I knew right away that this tool would allow us to grow as an animation studio. It had all the features we were looking for, including support for QuickTime and AVI formats.
I hope this article successfully conveys some of my experience. It should help answer at least some of your Flash-to-video questions. Future articles will cover using After Effects to add some cool visual effects to your movies and burning video content to DVD using Adobe Premiere.
Comments