
Exploring the Video Player Interface
Exploring the Video Player Interface
This section explains the structure of the finished player and walks you through creating the interface. You also create a very simple custom component that displays your dynamic thumbnails within the playlist.
The video player is a relatively simple interface, consisting of an embedded video object for playback and a List component for the video (see Figure 2).
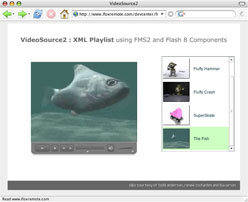
Figure 2. Video player interface
The List component is populated automatically from the contents of your XML file. You can extend the List object class to include an automatically generated thumbnail of the video for each list item. Each item links to the appropriate Flash video (FLV) file, which plays in the FLVPlayback component when clicked.
Follow these steps to create your interface:

- Open the Flash Professional 8 authoring environment and create a new Flash file.
- Save the file as VideoSource2.fla.
- Add an instance of the List component to the Stage and give it the instance name of list.
-
Open the ActionScript panel and add code to call the external ActionScript file you’ll be creating:
#include "VideoSource.as"
- Create a new movie clip symbol called VideoHolder.
- Within this symbol, add a new instance of the Video component to the Stage.
- Click the menu on the Library tab and choose New Video. Name the instance video.
- Draw a box with an empty fill and an outside rule of 1 pixel that’s the same size as your video component (160 x 120 pixels). Place it directly on top of your video component to give you a nice frame around your thumbnail videos.
-
Create the VideoThumb component as follows:
- Go back up to the main Timeline and create a new symbol called VideoThumb.
- Within the symbol, add a
stop();action to the first frame. - Create a new layer and add a blank keyframe at Frame 2. In this frame, add an instance of the VideoHolder movie clip. Call this instance VideoHolder. Change its size to 5 x 5 pixels, at x,y coordinates 0,0.
-
Go back up to the main Timeline and select VideoThumb in the Library panel. Choose Component Definition from the Library menu. In the Component Definition dialog box, set the AS 2.0 Class to VideoThumb and add the following parameters (see Figure 3):
- enabled, enabled, true, Boolean
- visible, visible, true, Boolean
- minHeight, minHeight, 0, Number
- minWidth, minWidth, 0, Number
- Save the file as VideoSource2.fla.
Make sure that both the “Parameters Are Locked in Instances” and the “Display in Components Panel” options are checked.
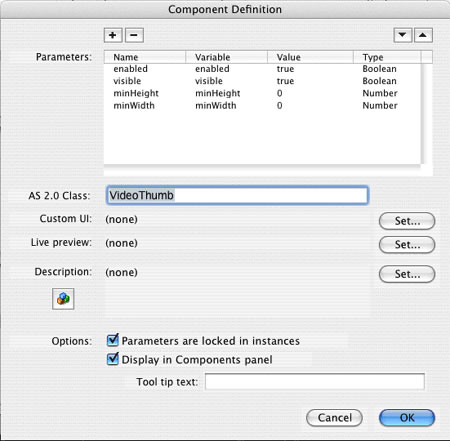
Figure 3. Component Definition dialog box
That’s all there is to the interface. Provided that you don’t decide to change your layout, you won’t need to edit the file again. You just make all future updates in your XML file. It’s truly a thing of beauty.
The next section shows you how to set up the application on your server.
Comments