
Exploiting Filters part 2
Placing a Lens Flare Precisely
The Lens Flare filter lets you simulate flares caused by light sources shining directly into the camera lens. You can place the lens flare pretty accurately by moving the crosshair in the filter’s proxy window (Figure 18-2). However, if you need to place it more precisely, take the following steps:
1. Place the pointer where you would like to center the lens flare and make a note of the X, Y readings in the Info Palette.
2. Select the layer you wish to apply the filter to and then choose Filter>Render>Lens Flare.
3. When the Lens Flare dialog box opens, hold down Alt (Windows), Opt (Mac OS) and click anywhere in the Lens Flare proxy window to access the Precise Flare Center dialog box (Figure 18-2).
4. Enter the X and Y coordinates that you noted earlier.
5. Click the OK button to exit the Precise Flare Center dialog box.
6. Click the OK button in the Lens Flare dialog box. After you exit the Lens Flare dialog box, you will see the lens flare placed precisely where you specified.

FIGURE 18-2: Lens flare pop-up dialog box used to place a flare precisely.
Creating Seamless Patterns
Need to make seamless patterns for tiling Web page backgrounds or for filling in areas when repairing photographs? You can do it painlessly in Photoshop by using the often-overlooked Pattern Maker filter.To create a seamless pattern, just take the following steps:
1. Use a marquee tool to select a portion of your image (this will form the basis of the pattern) and then copy it onto the clipboard.
2. Create a new layer (if you don’t, the new pattern will replace the content of the currently active layer).
3. Choose Filter>Pattern Maker.
4. In the Pattern Maker dialog box, check the box Use Clipboard as Sample. 5. Next, click the Use Image Size button and then the Generate button. You can click the Generate button as many times as you like to generate another random pattern based on the current settings.
6. When you’re satisfied with the pattern, click the OK button to fill the currently active layer with the pattern.
The dialog box contains a number of settings that you can work your way through. The Offset setting determines the amount of offset for each tile; the Smoothness determines the smoothness of the tile edges; the Sample Detail setting determines the size of the image sampled for each tile (the higher the setting, the more detail included in the tile). The video buttons at the bottom of the Tile History section allow you to view all the iterations. The Save button is very useful. Any tiles you save are added to the Pattern Picker palette and may be used by any tool or command that can make use of a pattern, such as Pattern Stamp tool or Layer Style.
Working with the Lighting Effects Filter
The Lighting Effects filter adds depth to an image. It does this in two ways: by varying the lighting intensity and its quality across the image’s surface and by adding a bevel and emboss effect using the information in an alpha channel. The filter works only on RGB images in 8-Bits/Channel mode.
The filter dialog box (Filter>Render>Lighting Effects) is divided into five sections (Figure 18-3):
– In the Style section, you can select from a number of preset styles from the pop-up menu. You can also add your own by saving customized settings, or delete the current style.
– In the Light Type section, you can choose between a spotlight, directional, or omni type from the pop-up menu and specify its intensity and focus by using the sliders. You can change the color of the light by clicking the color box (white by default) and then selecting a color in the Color Picker dialog box.
– In the Properties section, you can modify the quality (how the light reflects off surfaces), the exposure, and the ambience (whether the light source is diffused by ambient light and to what extent). As with Light Type, you can modify the color by clicking the color box and then choosing a color in the Color Picker dialog box.
– In the Texture Channel section, you can elect to apply a surface texture by selecting a channel and vary the depth and height by using the Height slider.
– To the left is a small proxy window for previewing and, below that, a button for adding new lights and the Trash icon for deleting lights by dragging them onto it (you can’t select a light and click to delete; that method for deleting isn’t available).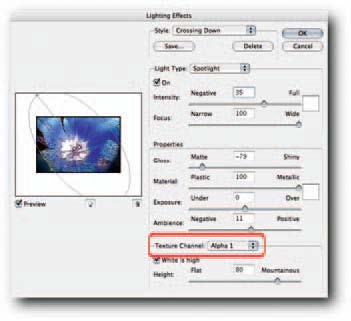
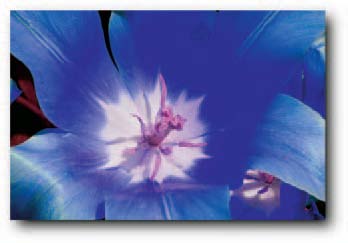

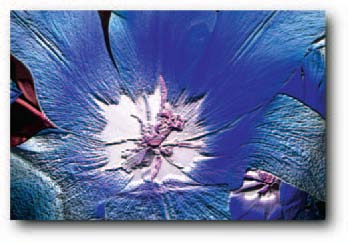
FIGURE 18-3: The Lighting Effects dialog box. Left. Original image. Right. The image copied into a new alpha channel and then selected from the Texture Channel pop-up menu in the Lighting Effects dialog box.
Bear the following pointers in mind when you work in the dialog box:
– To add a new light source, click the light bulb icon and then drag it into the preview window, or press Alt (Windows), Opt (Mac OS), click an existing light, and then drag to make a copy.
– To delete a light, click it and then press Backspace (Windows), Del (Mac OS), or drag it onto the Trash icon.
– You can reposition a light source by clicking the point in the center of the beam and then dragging to a new position.
– To widen, narrow, or rotate a beam, click the square gray handles on the side and then drag outwards or inwards.
– To jump from one light source to another, press Alt+Tab (Windows), Opt+Tab (Mac OS).
The Smart Way to Find Edges
If you use the Find Edges filter to create selection edges for sharpening images or for creating watercolors, you may want to investigate the possibilities of Smart Blur. Contrary to what the name may imply, the Smart Blur filter can be used to find the edges and can sometimes produce better results than the Find Edges filter (it also contains options whereas Find Edges is a takeit- or-leave-it filter).
To find the edges in an image, open the filter dialog box (Filter>Blur>Smart Blur), click the Mode pop-up menu and choose Edge Only, or Overlay Edge, and then select a Quality level from the pop-up above it. As the names imply, choosing Edge Only creates edges and replaces the image detail with black, which can be knocked out quite easily by changing the blend mode to screen or by using the Blend If sliders in Blending Options; if you want to play with the edges, you may wish to work on a duped layer. Choosing Overlay Edge superimposes the edges on the image (Figure 18-4).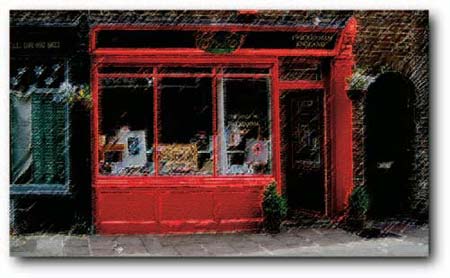
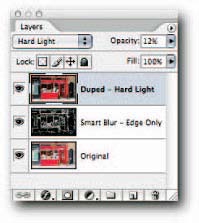
FIGURE 18-4: In this example, the image layer was duped, the Smart Blur filter applied (Radius 3.0; Threshold 25.0; Quality: High; Mode: Edge Only). Next, the Rough Pastels filter was applied and the layer blend mode set to Darken. The image layer was duped and positioned at the top of the stack, its opacity reduced to 12% and Blend mode set to Hard Light.
Comments