
Ensuring Title and Action Safety
Ensuring Title and Action Safety
Televisions do not generally display the entire width and height of your movie. They show a smaller portion of the true display size. Cropping a bit on all four sides will almost guarantee that what you create in Flash shows up in its entirety on a TV set.
Any good video editor will take this discrepancy into account. There’s nothing worse than finding out too late that the title sequence you labored over for 10 hours appears on most TVs with several characters cropped, or is even completely invisible. To prevent this, you need to define which area is considered the safe zone within the dimensions of your movie.
There are two safe zones to consider: the action-safe zone and the title-safe zone. The action-safe zone lies 10 percent in from the absolute edge of the video. You can assume that everything falling within this zone will appear on a television screen.
The title-safe zone is smaller than the action-safe zone (see Figure 2) because it is much more important to ensure that all titles are clearly legible without any chance of a single letter being cropped. For this reason, the title-safe zone lies 20 percent in from the absolute edge of the video. When you add titles to your movie, make sure they are positioned entirely within this safer title-safe zone to avoid being cropped.
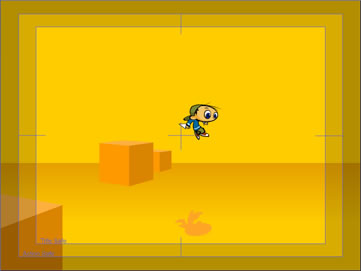
Figure 2. Stage showing the title- and action-safe zones

Place the title-safe zone in your Flash project on its own layer above all other content. This way when you are ready to export to video, you can delete this layer to prevent it from being included in the video file.
Tip: If you convert the safety layer to a guide layer, it will not be exported with the rest of the movie’s contents. Because a guide layer is not included upon export, it’s a cool way to retain the assets in your movie that you otherwise would not want to delete from the Stage. To convert a layer to a guide layer, right-click the area containing the layer name and select Guide in the context menu (see Figure 3).
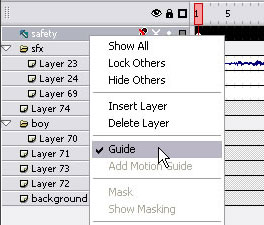
Figure 3. Converting an ordinary layer to a guide layer
Comments