
Editing, Transforming, and Retouching Images part 1
Extracting Image Content from Backgrounds
Every day, content is extracted from its background on thousands of workstations around the globe so that it can be imposed over a different background. Therefore, it should come as no surprise to learn that Photoshop contains no fewer than three eraser tools and one filter to help you carry out this mundane but necessary task. They are, in ascending order of sophistication, the basic Eraser tool, the Magic Eraser tool, the Background Eraser tool, and the Extract filter. The next sections look at all four in detail.
The Eraser Tool
The Eraser tool has three modes: Block, Pencil, and Brush. In Block mode, the only control you have is to erase to history or to alter the size of the block by changing the magnification of the document.
– To erase, select the tool and then drag in the document. If the layer is a normal layer, pixels are erased to transparency; if you drag on a Background layer or a layer with locked transparency, pixels are painted with the background color.
– To erase to history, select Erase to History on the options bar and then choose a history state as the source in the History palette. You can also switch between normal Block mode and Erase to History by holding down Alt (Windows), Opt (Mac OS).
– To increase the block size, zoom out; to decrease it, zoom in.
– To change from Block to either Pencil or Brush mode, right-click (Windows), Ctrl-click (Mac OS) and select a mode from the contextual menu.
In Pencil mode, you can use any one of the available brush presets, control the opacity of the strokes, and Erase to History. However, the brush tips cannot be softened, nor can the strokes be anti-aliased to provide smooth edges. In Brush mode, you have access to all the following options: Opacity, Flow (the latter controls how quickly or slowly the paint is applied), Airbrush,
and Erase to History.
The Magic Eraser Tool
The Magic Eraser tool works in a similar fashion to the Magic Wand tool. The difference is that rather than create a selection based on the sampled color, it erases the pixels to transparency. Furthermore, unlike the Eraser tool, if you use the Magic Eraser on a Background layer, rather than paint it with the background color, it converts it to a normal layer and then erases the pixels to transparency. The settings on the options bar let you modify the tool’s behavior. They include:
– Tolerance—Higher settings erase more shades of the sampled color. For example, if you have a low setting and you click a red color, all instances of that red go to transparency. If you increase the settings, for example, from 32 to 64, any shades leaning toward orange on one side and purple on the other are also deleted.
– Anti-alias—Ensures a smooth edge for the area that you have extracted.
– Contiguous—Forces the tool to erase only adjacent pixels that fall within the tolerance
value.
– Sample All Layers—Uses data from merged layers to determine what data to erase.
– Opacity—Controls the level to which the erased pixels are opaque or transparent.

The Background Eraser Tool
The Background Eraser tool offers more options for controlling what is erased and what is not than the Eraser and Magic Eraser tools. The tool works by erasing the sampled color under the brush tip. It also protects any color that matches the foreground color set in the Toolbox.
– Sampling Continuous, Once, or Background Swatch—In Continuous sampling mode, the tool samples the color under the brush tip constantly as you drag. In Sample Once mode, the sample is taken only once when you click. In Background Swatch sampling mode, whatever color is set as the background color in the Toolbox is erased under the brush tip.To change the background color quickly, press X to switch the foreground and background color boxes, hold down Alt (Windows), Opt (Mac OS), sample, and then press X again to switch the color boxes back to default.
– Limit: Contiguous, Discontiguous or Find Edges—When the Limits option is set to Contiguous or Discontiguous, the erasure affects only pixels that fall within the Tolerance setting and are either adjacent to each other or disconnected, respectively. The Find Edges option ensures that the integrity of the edge detail is better protected while the sampled color is being erased from continuous areas.
– Tolerance—Lower settings ensure that only the sampled color is erased, whereas higher settings erase more shades of the sampled color.
– Protect Foreground Color—When this setting is selected, whatever color is set in the foreground color box in the Toolbox is protected from erasure. You can alter this color at any stage by holding down Alt (Windows), Opt (Mac OS) and clicking in the document.
The Extract Filter
For extracting content that contains fine, wispy detail, such as glass or hair, the Extract filter is the ideal tool of all the extract tools in Photoshop. Using it requires a little more care, but by doing multiple extractions, you can achieve results that can surpass even some of the expensive plug-ins on the market (Figure 11-12).
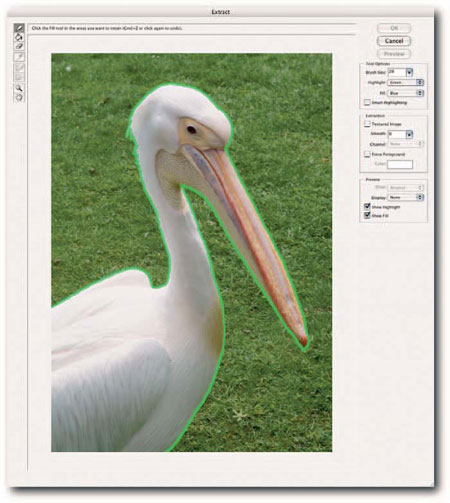
FIGURE 11-12: The Extract filter in action.
To extract content:
1. Copy the layer: Layer – New – Layer via Copy, or Ctrl+J (Windows),Ф+J (Mac
OS). It’s always a good idea to work on a copy because the filter will erase pixels to
transparency.
2. Choose Filter>Extract, or Ctrl+Alt+X (Windows),Ф+Opt+X (Mac OS).
3. In the dialog box, draw an outline with the default Highlighter tool (B) around the area you want to extract. Make sure that the highlight straddles the background and the outline of the object you wish to extract.
4. Next, select the Bucket tool (G) and click inside the highlighted border to fill it (clicking a filled area again with the Fill tool removes the fill).
5. Click the Preview button to see the extraction and then use the Cleanup tool (C) or the Edge Touchup tool (T) to refine the extraction’s outline.
6. Click the OK button to commit the extraction and exit the dialog box.
If you are still unhappy with the extraction, use the History brush or the other extraction tools to do any refining. For example, use the Background Eraser tool to remove any stray color around the fringes of the extracted object by using the tool’s options to protect foreground color while extracting background color (if need be, refer to the previous section in this chapter, “The Background Eraser Tool”).
Although some of the options in the Extract dialog box, such as Show and Brush Size, are obvious, others are not so obvious and have an extra kick that you can use to improve the extraction.
– Smart Highlighting—This option changes the brush tip’s behavior from that of a freewheeler to one that follows a well-defined edge closely. If it strays when it sees two well-defined edges, decrease the brush size so that the sampling area is reduced.
– Channel—Before entering the Extract dialog box, you can define an edge by creating a selection outline, creating an alpha channel, stroking the selection, applying a slight Gaussian Blur to the stroke, and, finally, inverting the alpha channel so that the stroke sits on a white background.When you select the alpha channel from the Channel
pop-up, the edge highlights automatically.
– Force Foreground—This option is particularly useful for extracting wispy objects that have no clear interior, such as a dragonfly with its transparent wings or a glass half filled with liquid. You may need to use it several times and then combine the extractions to get good results. For example, select the highlights on the first pass, midtones on the next, and so forth.
– Preview—After you have seen a preview, you can toggle between it and the original view from the Preview section of the dialog box by choosing Original from the Show pop-up menu.
Comments