
Editing a page in Contribute
Editing a page in Contribute
Macromedia designed Contribute to function as a browser and editor at the same time. In the Contribute browser/editor, the TrioNet site displays. To navigate to a page you want to edit, simply click links in the site, browsing to the page exactly as you would in a browser. When you are ready to edit it, you click the Edit Page button to open the page in the Contribute editor.
- Ensure that the TrioNet home page displays in the main window. If it doesn’t, click the Home Pages button in the toolbar and select the Trio Supply Project. This is the Contribute browser, and the toolbar should look like Figure 4.

The toolbar has an Edit Page button, which switches the interface to the Contribute editor, so you can edit the page you’re browsing. The New Page button opens a New Page dialog box, where you can create a new page in Contribute or from a Dreamweaver MX template.
Since the interface typically stays in the Contribute browser, there are also Back and Forward buttons that you can use to move through the browsing history, and Stop and Refresh buttons. Use the Home Pages button to select a home pages for each connection you’ve set up or imported.
Use the Choose button and the Address bar to enter or browse pages that may not be linked directly from your home pages. In Figure 4, the site is set to “hermes” which is the name of my computer. In your window, replace the Address with your machine name, or with 127.0.0.1, which is the local address for your web server on your machine.
- Click the Edit Page button to change to the Contribute browser; note that the toolbar switches to edit options (see Figure 5).

- Select different parts of the page.
When you edit in Contribute, you don’t get a Property inspector to change attributes as you do in Dreamweaver MX; you get a toolbar that works similarly to those in Microsoft Word or Excel, or in other office applications.
Select the “News” text. You are going to change this to a Heading 1 in the next step.
- With “News” selected, click the left-side blank pop-up menu in the Edit toolbar as shown in Figure 6. This pop-up gives you HTML paragraph style choices. Select Heading 1.
div align=”center”>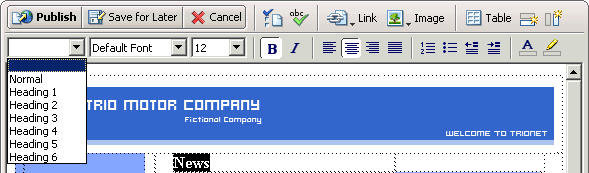

- Explore the other options on the toolbar.
Contribute limits the set of available options to those a contributor would most commonly want to do. In part two, the Administration tutorial, you will learn how to change these options, or limit them more—if you don’t want a contributor to have all the editing options available by default. You can also choose to enforce particular editing rules, such as enforcing accessibility information (for instance, adding alt text to image files) in inserted objects.
When you are done editing, click the Publish button. This saves the page on the server.
Note: In this case, since you are connected locally, the page will be saved to your local machine.
If you click the Save for Later button, this will save the page, but not on the web server. When you are working on a remote server, this allows you to keep the draft locally and continue working on until you are ready to publish it.
Comments