
Editing a Captivate File
Editing a Captivate File
When you are returned to Captivate you will be placed in the Storyboard view. The thumbnails you see are called slides. Along the left side of the window are the slide tasks; above the slide tasks are two tabs: Storyboard and Edit.
To edit a Captivate file, follow these steps:
-
If you are in the Edit view, click the Storyboard tab to open the Storyboard view (see Figure 6).

Figure 6. Use the Storyboard view to perform global tasks such as rearranging, adding, or deleting slides
- Select Slide 1 and drag it to another position in the storyboard. Notice how the slides renumber when you release the mouse. Drag it back to its starting position. As you can see, the Storyboard panel can be used to rearrange slides.
- Select the last slide and select Insert > Blank Slide. The blank slide will open in the Edit view.
-
Right-click the last slide and select Delete Slide from the context menu that appears. A dialog box opens asking you if you really want to delete the slide. Click OK to delete the slide. Click the Storyboard tab to return to the Storyboard view.

Tip: Blank slides are a useful transition between sections of the presentation. For example, in this project I will be showing a demo and then moving into a simulation. A blank slide gives me the opportunity to stop the demo and say to the student, “Now you try it.”
-
Select Slide 1 and click the Properties button on the main toolbar just below the menus. The Slide Properties dialog box opens (see Figure 7).
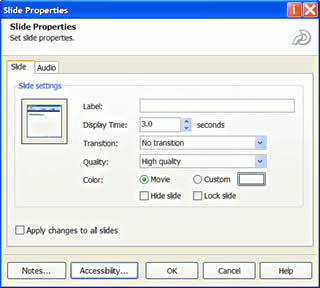
Figure 7. The Slide Properties dialog box enables you to do everything from name a slide to edit the audio attached to the slide
- Click once inside the Label text box and enter Start.
-
Click OK. The dialog box will close and the label you entered will appear in the slide’s thumbnail (see Figure 8).

Figure 8. Labeling a slide
Comments