Drawing in Flash: The Drawing Tools
The Drawing Tools
The Pen Tool
Now that you’ve found the Tools panel, you’re ready to begin. The first tool you’ll use is called the Pen tool (shown below).
![]()
Figure 3. The Pen tool
The Pen tool is used to draw precise paths, straight lines, and curved lines. When you draw using the Pen tool, you click and drag to create lines and points. You can adjust line segments by adjusting points on the line and can convert points to form curved lines, and vice versa.
Remember those (somewhat cheesy) sailboat string art “drawings” people created back in the 70s and early 80s? You might think of using the Pen tool as similar to stringing yarn or wire around nails—just like in those pictures. However, the Pen tool takes this “string and nail” concept a step further, letting you create, remove, or convert anchor points (or “nails”) to alter the shape and to create curved line segments. You can add or remove any number of anchor points to mold the shape at any time. You can also use the Pen tool to adjust shapes drawn by other tools. The Pen tool is great for tweaking shapes you’ve drawn until they’re perfect.
The Oval Tool
The Oval tool is exactly what you’d assume. It helps you to draw ovals and circles.
![]()
Figure 4. The Oval tool
If you click the Oval tool and draw an oval, you will notice that it’s not uniform. If you want to draw a perfect circle, hold down the Shift key, and it constrains the shape. Play with this a bit more so you can get the feel for it. You’ll notice that if you stop pressing the Shift Key mid-draw, the perfect circle pops back into an oval shape. Similarly, the opposite happens if you press down on the Shift key mid-draw. You can use this technique for the Rectangle tool as well.
The Rectangle Tool
The Rectangle tool is also used to accomplish exactly what it boasts.
![]()
Figure 5. The Rectangle tool
Take a look at the lower right side of the Rectangle tool section of the Tools panel. Notice the black arrow. The arrow means that this tool has one or more subtools associated with it. Click the Rectangle tool and hold down, and another option appears.

Figure 6. The PolyStar tool, a subtool of the Rectangle tool
Nested beneath the Rectangle tool is the PolyStar tool, which you can use to draw octagons, pentagons, and hexagons (and any-number-of-sides-agons). You can adjust the number of sides using the Property inspector.
The Pencil Tool
Next up, you have the Pencil tool.
![]()
Figure 7. The Pencil tool
Drawing with the Pencil tool is a lot like drawing with a real pencil. However, in Flash, you can adjust the stroke weight and the line quality with the touch of a button. Here’s how:
- Select Window > Properties. The Property inspector opens and appears at the bottom of your screen.
- Click the Pencil tool in the Property inspector.
Notice that the Property inspector changes depending on which tool you’re using. Take a look at Figure 8; when you have Pencil tool selected, you can adjust the color of your stroke, the line weight (note that it’s set for 1 pixel in Figure 8), and whether or not you’d like a solid line, a dashed line, or a dotted line.

Figure 8. Property inspector for the Pencil tool, showing stroke color, weight, and style
It’s important to remember to use the Property inspector because it gives you specific options for every tool you have learned about thus far. Remember this as you continue learning about and using the drawing tools.
Remember when I said you could change the number of sides on the PolyStar tool using the Property inspector? I’d like you to try that now. Open a new Flash document. Click the Rectangle tool and select the PolyStar tool. Notice the Property inspector at the bottom of your window. You should see something like this:

Figure 9. Property inspector for the PolyStar tool
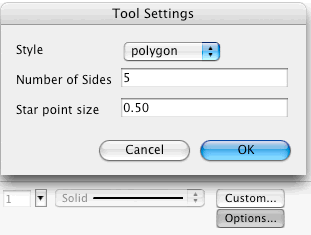
Now, take a look at the buttons on the right, the Custom and Options buttons. Click Options. The Options box appears.

Figure 10. Changing number of sides of a polygon using the Polygon options settings
Here, you can select polygon or star and type in the number of sides you’d like it to have. Play with this a few times. I suggest drawing a few different shapes to get the hang of it. Say you have a client who, for some reason, wants you to put a starburst into your design. The Options palette is where you would build it.
The Paintbrush Tool
Next up is the Paintbrush tool.
![]()
Figure 11. The Paintbrush tool
This Paintbrush tool is like the Pencil tool, only the line quality is a bit more like using paint rather than lead or ink. If you haven’t already done so, I suggest opening a new document and exploring the tools. Compare how it feels to draw with the Pencil tool to how it feels to draw with the Paintbrush tool. Again, the Property inspector has changed to accommodate the Paintbrush tool.
The Fill and Stroke Color Controls
Below the other tools in the Tools panel are the Fill and Stroke Color controls. There’s an image here for your reference (see Figure 13), however, after I am done going over this, I’d like you to open the program and explore them. After all, applying color to your artwork brings everything to life.

Figure 13. Fill Color and Stroke Color controls
The top image, the black box next to the pencil, is the Stroke Color control. The control with the paint bucket is the Fill Color control. There are some differences between these two color controls that are important to understand. I’m going to walk you through them now.
- Open a new Flash document window.
- Click the Circle tool and draw a circle on your main stage.
- Now, click the Selection tool (the black arrow).
- Click the center of your circle.
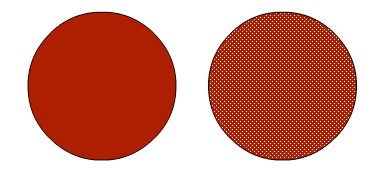
Notice that only the color inside the object is selected. An object that is selected looks like the one at the right of Figure 14.

Figure 14. Selecting your fill
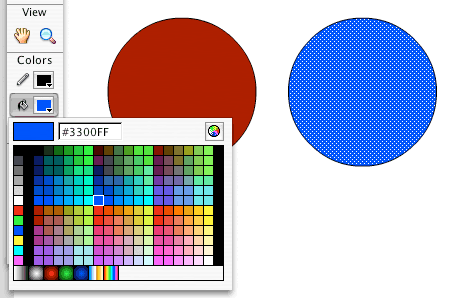
Return to the Tools panel and select a fill color; you may edit the inside of the circle by selecting any color of your choice.

Figure 15. Changing your fill color
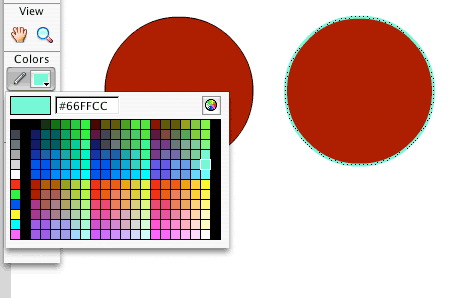
Now click outside the circle and select its stroke. Once you’re safely over the stroke, notice that the Selection tool changes slightly. A curved line appears next to it, meaning that, if you’re ready, Flash is prepared to select your stroke. After clicking the stroke to select it, you can edit the stroke color.

Figure 16. Changing the stroke color
Say you don’t want a stroke at all. You can easily turn stroke off or fill off at any time while drawing an object.
- Select File > New to create a new document.
- Select the Oval tool.
- Click the Stroke Color control.
- Notice a button on the right side of your color palette that looks like a white box with a red line drawn diagonally through it. Click the button. From this point on, any shape you draw will not have a stroke.
Excellent. You should be in great shape to begin using the tools. In the next section, you’ll use them to draw a house and very basic landscape.


Comments