
Drawing in Flash MX 2004 and Flash 8
Drawing in Flash MX 2004 and Flash 8
Numerous drawing features in Flash 8 can help you create drawings that are more complex and detailed than in earlier versions of Flash—such as the gradient and stroke features. The new drawing model enables you to draw shapes in a new way. The following sections describe these new and changed features in Flash 8.
New Features for Creating Strokes and Fills
Joins and caps on strokes are now drawn more cleanly and precisely. A join is the place where two strokes come together; a cap is the end point of a stroke that does not join with another stroke. In addition, the maximum size of a stroke has been increased from 10 pixels in Flash MX 2004 to 200 pixels in Flash 8, and you can now color strokes using a gradient fill. Using ActionScript code, you can use the Drawing API to control the line style of strokes that you draw as well as create complex gradient fills.
In both Flash MX 2004 and Flash 8, you can select the degree of smoothing to apply to curves that you draw with the Pencil and Brush tools. However, Flash 8 introduces a new algorithm that optimizes these shapes. By increasing the amount of smoothing, you can reduce the number of points used to calculate the curve, which results in smaller SWF files.
New controls also enable you to apply complex gradients to your drawings. You can add up to 15 colors to a gradient, precisely control the location of the gradient focal point, and apply other parameters to the gradient (see Figure 6). The Fill Transform tool now includes an editable focal point that enables you to position the focal point (center) of a gradient fill applied to an object shown.

Figure 6. Even fancier gradients are possible in Flash 8.

Two Drawing Models
Previously in Flash, all shapes in the same layer on the Stage could affect the outlines of other overlapping shapes. If you drew two circles that were different colors and then selected one of those circles and moved it, it would remove any underlying content (see Figure 7).

Figure 7. Drawings that are a different color cut away from other drawn shapes that overlap. In this image, the dark yellow cuts away the light yellow that it overlapped.
This drawing model is preserved in Flash 8 but is now called the merge drawing model because it merges shapes that you draw when they overlap. To draw using the merge drawing model, select a drawing tool and then turn off Object Drawing under Options in the Tools panel (see the Options area in Figure 7).
In previous versions of Flash, to work around the merging, you would typically have to draw shapes on stacked layers on the Timeline. You can now create shapes directly on the Stage that do not interfere with other shapes on the Stage. When you create a shape with the new object drawing model, it does not cause changes to other shapes that exist underneath the new shape. To draw using the object drawing model, select a drawing tool and then select Object Drawing under Options in the Tools panel (as shown in the Options area in Figure 8). Each shape is created as a separate entity; they do not merge when you overlap them.

Figure 8. Drawings don’t have to merge in Flash 8. In this image, the light yellow shape remains intact, even though the dark yellow shape overlaps the light yellow shape on the same layer.
When you select a shape you create using the object drawing model, a bounding box appears around that shape. Remember that the shape is not an instance or grouping—it is a shape.
The Rectangle and Oval Tool Settings Dialog Box
The new Rectangle Settings and Oval Tool Settings dialog boxes enable you to specify the width and height of ovals and rectangles. Also, you can set the corner radius of rectangles from the Rectangle Settings dialog box to create rounded-corner rectangles (which was also possible in Flash MX 2004). To activate the dialog box, select the Oval or Rectangle tool and then Alt-click (Windows) or Option-click (Macintosh) to open the Oval and Rectangle drawing tools. When you click OK to verify your settings, Flash draws an oval or rectangle at the specified size where you clicked the Stage.
Filters, Bitmaps, and Blend Modes
Filters, bitmaps, and blend modes in Flash 8 are exciting new features designed specifically to enable greater expressiveness in the look and feel of your designs, animations, and applications. In Flash MX 2004 and earlier, you would often have to import bitmaps that contained the effects you needed, such as blurs and drop shadows. Or you would have to use complex ActionScript code or drawing techniques to mimic certain expressive effects. In Flash 8, you can apply many of these effects directly in Flash. You can even animate them in the Flash workspace, or at runtime.
Note: Filters and blend modes are available only in the Flash Professional 8 user interface. However, you can apply filters and blend modes using ActionScript in both Flash Basic 8 and Flash Professional 8.
Filters enable you to create more compelling designs by applying visual effects to movie clips and text (see Figure 9). With these filters, you can make objects glow, add drop shadows, and apply many other effects and combinations of effects. Filters are natively supported and rendered in real time by Flash Player 8, which means a reduction in file size (although they still affect performance). You can also apply filter effects using ActionScript code.

Figure 9. Filter effects range greatly in Flash 8, but you’ll recognize these filters as some of the most industry standard and wanted effects by designers. You can even animate filters using motion tweens or ActionScript.
You can achieve a variety of compositing effects by using blend modes to change the way the image of one object on the Stage is combined with the images of any objects beneath it (see Figure 10). Flash offers runtime control over blend modes, enabling you to composite graphical effects that are dynamic and can react to user interactivity.
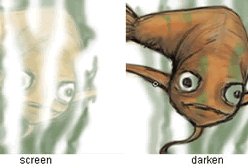
Figure 10. Blend modes let you dramatically change the appearance of your images.
Another improvement in Flash 8 compared to previous editions is that bitmap images now look much better on the Stage when severely enlarged or reduced. Also, when you compare the appearance of these bitmaps in the Flash authoring tool and in Flash Player, you’ll find that they are now much more consistent.
For advanced bitmap image handling, you might want to look into the BitmapData class. This class enables you to create and manipulate bitmaps using ActionScript. The bitmaps can be opaque or transparent, and you can even apply unique effects that are not available using other means. You might create simple shapes to complex animations, such as fire, explosions, raindrops, and more. You can also combine the BitmapData class with filters to create even more complex effects at runtime.
Finally, another notable improvement is the runtime performance of complex vectors in Flash. In Flash 8, you can store complex vectors as a cached bitmap, sometimes called a surface.
Comments