
Drawing in Flash: Completing the Scene
Completing the Scene
Making sure you’re on the Windows layer of your timeline, draw a few windows. Hold the Shift key down to make them perfect squares. At this point, since you’re working on layers, you can change the colors of your graphics as much as you’d like. Layers, like grouping, preserve whatever lies below or above them.
I made my windows white (see Figure 23). If you’re worried about affecting your House layer, you can lock it. That way you can select only your windows and preserve your house. You can lock and unlock a layer by clicking the padlock icon. The padlock icon is above each layer and below the word “Timeline.” This is what your file should look like:
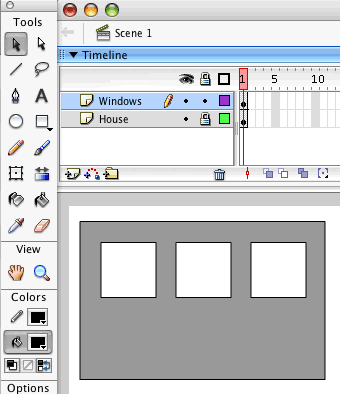
Figure 23. Drawing your windows
Now, I want you to add a new layer and put on a door. When you add a new layer, that layer appears above the layer you are on. That being said, make sure you’re on your Windows layer so your Door layer appears above it.
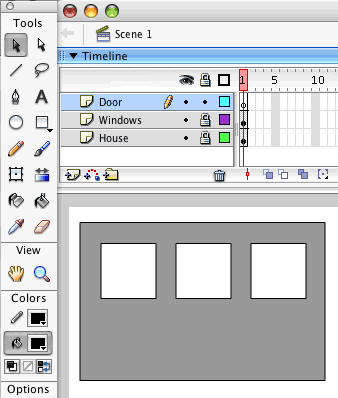

Figure 24. Adding your Door layer
By now, you’re probably getting the hang of it. Notice that I have locked all layers I am not using for now. This helps you edit only what you’re expecting to edit; restricting you from editing content on other layers. Notice that when something is locked you can’t move it or change its color. It’s basically set in stone until you unlock it again. I can’t stress how useful this is for an illustrator, especially when you start working with files that have many layers.
At this point, I’m getting tired of looking at this gray house. And since I have always enjoyed the Red House Painters, I’m going to paint my house red. How do I do this? Remember when you grouped the gray rectangle? Well, you need to ungroup it to change its color. First, however, you need to unlock your House layer. After unlocking your House layer, select your gray house. Then, select Modify > Break Apart.
I have highlighted the three areas to pay attention to in Figure 25. First, make sure you’re on the right layer (the House layer); second, make sure your gray house is selected. Finally, I highlighted the Break Apart command.
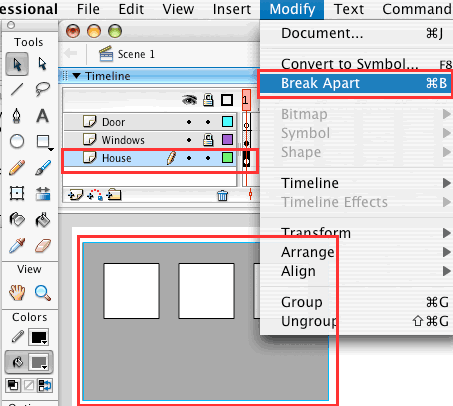
Figure 25. Breaking apart a grouped object
After the gray house breaks apart, you can change its fill color to be any color you wish.
Now you’re ready to finish your door. Using your Rectangle tool, draw a door. This time, if you just want a rectangle, pressing the Shift key is not necessary. After I have drawn my door, I’ll use the Oval tool to draw a doorknob. This time, however, I want my doorknob to be black. So before proceeding, I am going to change the fill color to black. You can keep this all on the Door layer; using extra layers isn’t necessary.
Your file should look something like this:
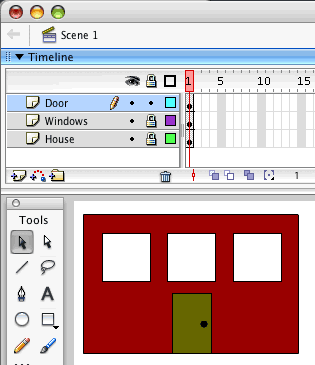
Figure 26. Drawing your door and changing your house color
Next, add some hills. For this part, I suggest using the Pen tool. The Pen tool takes a little getting used to, so don’t get frustrated if you don’t get the hang of it right away. Just practice a few times on a new layer called Hills—that way you can always delete the layer if you wish. I’m going to make my hills green because I live in San Francisco, and right now they’re brown! I’m going to keep my stroke black. Remember, you need to move your Hill layer to the back behind your House layer, so that it doesn’t cover up the house.
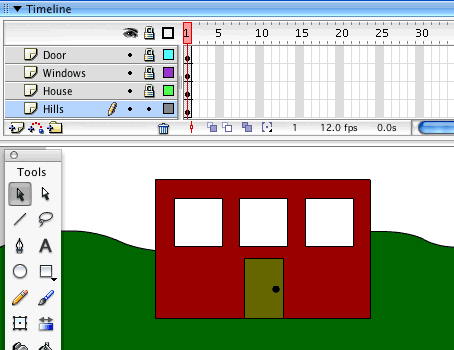
Figure 27. Using the Pen tool to draw your hills
Now the house has a landscape. You can add to it by drawing a tree. For this, I suggest using the Pencil tool.
Make the trunk first. Create a new layer called Trunk. Then, using your Pencil tool, draw a trunk. Using the Paint Bucket tool, fill the trunk to be any color you’d like. I made mine brown. Click inside the shape with the Paintbrush tool selected, and you’re ready to fill it with whatever fill color you choose. I have identified the four things in red that you might pay attention to below in Figure 28.
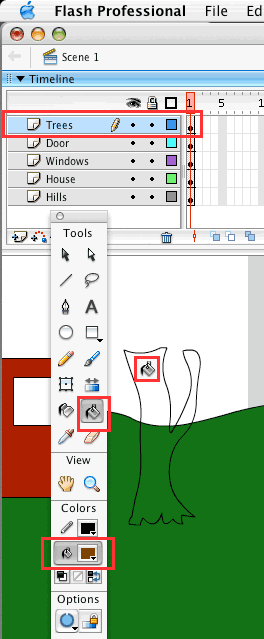
Figure 28. Using the Paint Bucket to add color
After you have filled the tree trunk with color, you’re ready to add some leaves to your tree. I’m going to use the Brush tool for this. Again, fill the shape using your Paint Bucket tool. Remember to pay attention to your options area in the Tools panel and the Property inspector. You can use these to adjust the size of your brush and the style. In the end, you should have something that looks like what you see in Figure 29.
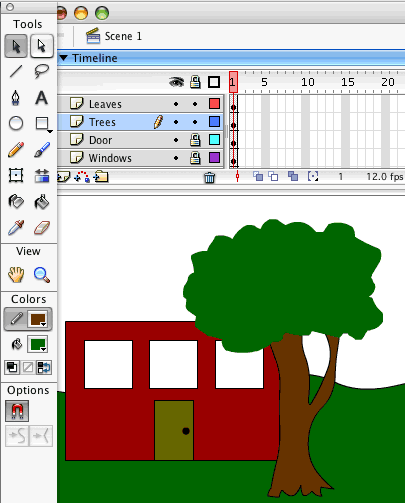
Figure 29. Finishing the tree
Lastly, I am going to show you how to change your background color, so you can give your landscape a sky.
- Select Modify > Document. The Document Properties dialog box pops up.
- Notice the Background Color control box. (It’s probably set to white.)
- Click the white box and choose any color you’d like.
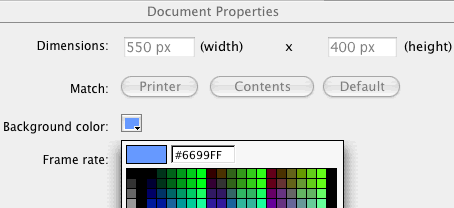
Figure 30. Changing the background color in the Document Properties dialog box
You background color is now the color you selected. I chose blue, as shown in Figure 30.
At this point, feel free to draw some clouds in the sky, maybe sun as well. If you’re feeling really adventurous, I suggest trying to draw a walkway leading up to your door. You can use your Pen tool to do this. Just remember to use a new layer for each and lock whatever layers you’re not currently using. This lets you easily update, delete, or change any artwork at anytime.
In the end, you might have something that looks like this:
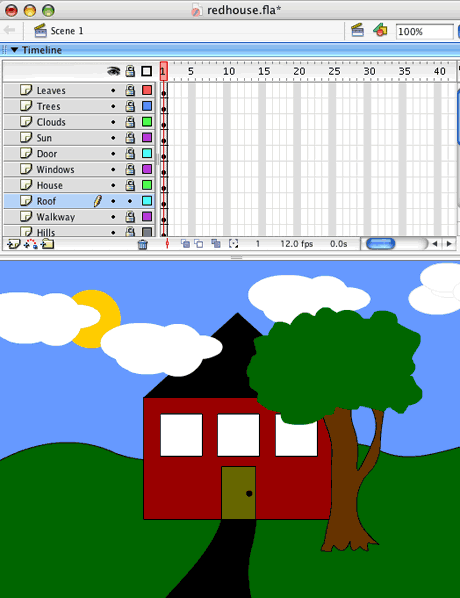
Figure 31. Final drawing
If you enjoyed this exercise, and you wish to draw some more, I suggest recreating an existing photograph or hand-rendered drawing. Sometimes tracing an image can give you a better grasp on how to use the tools. I have traced over photographs, and I’ve scanned in drawings of my own and traced those.
Remember, it’s important to explore using any new program. So don’t get discouraged and just keep at it. I promise, you won’t be let down. You’ll be able to get some great results in Flash.
Comments