Drawing in Flash
Drawing in Flash
Macromedia Flash offers several drawing tools for creating cool characters and more. Each tool differs from the others and yields different stylistic results. Some tools create larger file sizes while other tools result in smaller files. As you become more familiar with these tools, you will learn to choose the tool that best suits the artistic style you want and any file size requirements you may have to abide by. It’s simply a trade-off between file size and download times and playback performance. In this section, I’ll take a look at each of the Flash drawing tools and discuss its pros and cons.
Brush Tool
The Brush tool, shown in Figure 1, is probably the most versatile of all the tools, especially when combined with a pressure-sensitive tablet.
![]()
Figure 1. Brush tool
Drawing with the Brush tool is the same as drawing with shapes. It’s the tool that feels the most natural when used due to the support of pressure sensitivity and tilt features. Wacom makes a series of popular tablets that differ in size, include a cordless and battery-free pen called a stylus, and work great with Flash. Since a Wacom tablet can work in conjunction with your existing mouse, or replace your mouse completely, its use goes far beyond that of Flash alone. Many digital designers use a tablet with any number of graphics editors and animation programs, including Adobe Photoshop, Adobe Illustrator, and Macromedia FreeHand. But fear not: If you do not currently own a tablet, you can still use the Brush tool with one exception—both the tilt and pressure sensitivity features will not be available.
If you do have a pressure-sensitive tablet installed, selecting the Brush tool will provide you with two subselections that affect your line quality. At the very bottom of the toolbox you will notice the pressure sensitivity and tilt options (see Figure 2). With one or both of these options selected, varied results occur when you use the Brush tool in Flash.

Figure 2. Pressure sensitivity and tilt options
Figure 3 shows what happens when you draw with the Brush tool. The result on the left is a shape—meaning, it has vector points on all sides. The more points an object has, the bigger the file size. I drew this particular shape using a pressure-sensitive tablet. Notice the tapered ends and inconsistent line weight that result with varied amounts of pressure applied to the stroke. I also drew the shape on the right with the Brush tool; in this case, however, I turned off the pressure sensitivity setting.
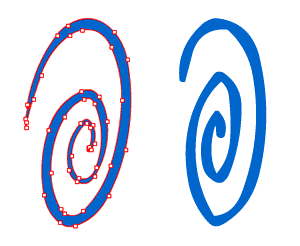
Figure 3. Shape drawn using the pressure-sensitivity setting turned on (left) and off (right)
The Brush tool offers several subselections to help you draw certain effects (shown in Figure 4):
- Paint Normal: Paints over lines and fills on the same layer
- Paint Fills: Paints inside a fill color and outside of a shape (on the Stage)
- Paint Behind: Paints behind existing fills and strokes
- Paint Selection: Enables you to paint inside a selected fill only
- Paint Inside: Keeps you from going outside the lines after you start painting inside a fill

Figure 4. Bush tool effects
Object Drawing
Object Drawing is a new feature in Flash 8. It enables you to draw shapes as individual objects that remain independent of each other. Gone are the days when you had to draw each shape on a separate layer to avoid one shape “cutting” into another. With Flash 8 you can simply turn Object Drawing on or off as a subselection of any of the drawing tools (Brush, Pencil, Pen, Oval, and Rectangle) under Options (see Figure 5). For those of you familiar with Macromedia FreeHand or Adobe Illustrator, this is a familiar and welcome addition to Flash.

Figure 5. Object Drawing subselection button
As you can see in Figure 6, drawing a shape over an existing shape without Object Drawing merges the shapes together, causing one to cut into the other. This is called Merge Drawing mode. This mode can be useful for cutting into shapes to create new shapes.
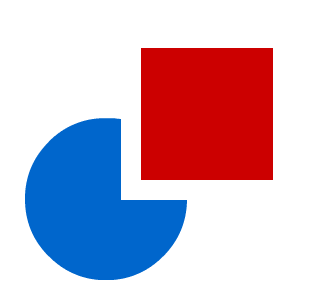
Figure 6. Merge Drawing mode
When you draw a shape in Object Drawing mode, it automatically becomes an Object Drawing and cannot be merged with other shapes. You can overlay Object Drawings without fear of cutting into them (see Figure 7). This is useful in situations where you may want to reposition objects or simply need to keep them independent.
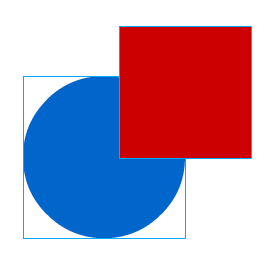
Figure 7. Object Drawing mode
I created my trademark boy character (see Figure 8) entirely with the mouse and the rectangle and oval tools. I never had to use my Wacom tablet in combination with the Brush tool. I could have easily chosen the Brush tool, but using the shape tools resulted in the ultra-clean line quality I was trying to achieve. Often times the Brush tool can create several unnecessary points that bloat file sizes and create headaches when trying to edit the shapes later on. For the boy graphic, I was looking for simple shapes and as small a file size as possible.
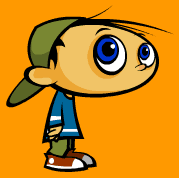
Figure 8. Character created using the shape tools
Pencil Tool
The Pencil tool, shown in Figure 9, is the perfect tool if you want a consistent line weight throughout your image and if you need to keep the file size as small as possible.
![]()
Figure 9. Pencil tool
Lines drawn with the Pencil tool consist of fewer vector points. A perfectly straight line has only two points, one on either end. A curved line has three points or more depending on the number of curves (see Figure 10).
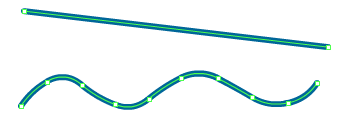
Figure 10. Lines drawn with the Pencil tool
The Pencil tool also offers several line quality modes (see Figure 11):
- Straighten: This is a great option if you want to draw very straight lines by freehand. Even with a shaky hand, your lines will “snap” straight after you finish drawing your stroke.
- Smooth: If you use this option, your lines will automatically be smoothed while retaining the basic shape you intended to create.
- Ink: This option leaves your line quality unaffected. This is great for freehand or loose-style drawings.

Figure 11. Quality modes of the Pencil tool
Shape Tools
The shape tools—Oval and Rectangle—create primitive fills and strokes (see Figure 12). Holding down the Shift key in combination with a shape tool creates a perfect circle or square.

Figure 12. Shape tools: Oval and Rectangle
You can select the fill and stroke color through the Property inspector (see Figure 13). Clicking either swatch opens the color panel and enables you to edit the stroke or color choice.

Figure 13. Property inspector for the Rectangle tool
You can even specify no color for the stroke or fill by selecting the square with the red diagonal line through it (see Figure 14).
![]()
Figure 14. Select this square to draw without color
Pen Tool
To draw precise paths as straight lines or smooth, flowing curves, you can use the Pen tool (see Figure 15). Create straight or curved line segments and adjust the angle and length of straight segments and slope of curved segments.

Figure 15. Pen tool
With the Pen tool, you click to create points on straight line segments, and click and drag to create points on curved line segments. You adjust straight and curved line segments by adjusting points on the line. You can convert curves to straight lines and the reverse.
When creating curved lines you will notice that Flash creates tangent handles for each anchor point. The lines can be edited later with the subselection tool (White Arrow) by selecting an anchor and dragging the tangent handles (see Figure 16). Moving the handles in relation to the anchor point reshapes the curve.
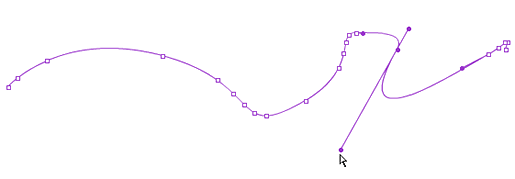
Figure 16. Line segment drawn with the Pen tool and in the process of being edited with the subselection tool
Onion Skin Tool
The Onion Skin tool is located at the bottom of the Timeline panel (see Figure 17).
![]()
Figure 17. Onion Skin tool
When you select the Onion Skin tool, the application adds Onion Skin markers to the playhead indicator of the Timeline (see Figure 18). You can drag these markers to expand the number of frames before and after the current frame.
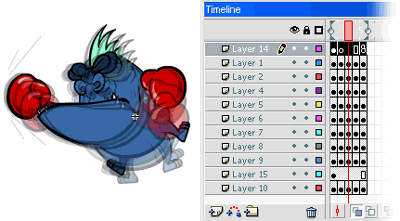
Figure 18. Onion skinning effect
Flash provides two flavors of onion skinning:
- Normal onion skinning: The current frame is shown in full color while the previous and future frames are dimmed progressively. This gives an impression of a series of drawings created on semi-transparent paper and then stacked on top of each other (see Figure 18).
- Onion skinning in outline mode: The current frame is shown in full color while previous and future frames are shown as outlines (see Figure 19). This is easier on the eyes when working with several different keyframes before and after the current frame.
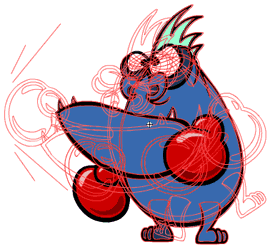
Figure 19. Onion skinning in outline mode


Comments