
Designing with CSS in Dreamweaver MX 2004 – Part 4: Organizing the Columns
Organizing the Columns
At the moment you have the two columns roughly in position, although you still have some work to do to give them a proper look and feel. Aligning the two columns can be a little tricky but with your colored backgrounds in place you can see clearly where each of the two divs—leftcol and content—sit on the page.
Let’s summarize the problems we have at the moment:
- Point 1: The leftcol div sits higher than the content div. The margin setting on the
h1element within the content div controls this. You need to match that margin and apply it to the top of the leftcol div. - Point 2: The leftcol div needs to move away from the edge of the wrapper div. A div contains no default margins, so if you want to use margins to move a div away from an adjacent element, you must declare them explicitly.
- Point 3: The content div runs underneath the leftcol div. Because there is no width or margins set on this div, it assumes by default the width of its container, the wrapper div. You need to control the position of the content div.
- Point 4: There aren’t two distinct columns. This is because the lower section of the content div wraps below the leftcol div. This is to be expected. The div is not constrained by margins or width settings so it flows to suit its container. When you correct Point 3, you will fix this issue.
Let’s fix Point 1 first. To correct the top alignment of the leftcol div, give the selector a top margin of 20px to match the top margin of the h1 selector in the content div:
- Open the basiclayout.css file and locate the
#leftcolselector. - Place the cursor after the opening
{and press Enter. - Type margin-top: 20px; (remember to watch the code hints as you type).
- Save your work.
-
Preview your page in the browser (see Figure 5).
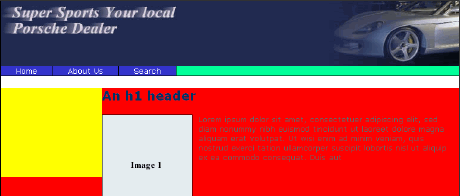
Figure 5. The yellow leftcol div taking up its position vertically

Next let’s fix Point 2. To move the leftcol div away from the edge of the wrapper div, follow these steps:
- Locate the
#leftcolselector. - Place the cursor after the opening
{and press Enter. - Type margin-left: 10px; (remember to watch the code hints as you type).
- Save your work.
-
Preview your page in the browser (see Figure 6).

Figure 6. A space of 10 pixels added to the left of the yellow leftcol div
Now you are left with Points 3 and 4 to correct, both of which involve modifying the #content selector. However, fixing Point 3 also fixes Point 4. Your first task requires moving the content div out from underneath the leftcol div. To do this you need to set a left margin within the #content selector, but by how much? A little addition quickly tells you how much margin you need:
- From the edge of the wrapper to the leftcol div you have 10 pixels
- The leftcol div is 170 pixels wide
- You want 20 pixels of space on the right of the leftcol div before you see your content in the content div
From this you can easily deduce that you need a margin of 10 + 170 + 20 (or 200) pixels. This gives you enough distance to clear the leftcol div and allows enough room to keep your content a nice distance away from the leftcol div’s right edge. These margins are, of course, personal preferences. Change them to suit your requirements.
To set the left margin on the content div, complete the following steps:
- Locate the
#contentselector. - Place the cursor after the opening
{and press Enter. - Type margin-left: 200px; (remember to watch the code hints as you type).
- Save your work.
-
Preview the page in your browser (see Figure 7).
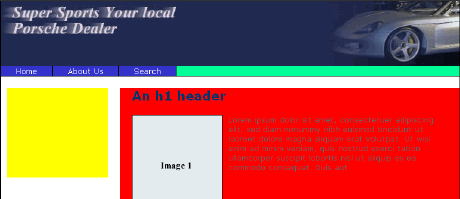
Figure 7. The content div’s left margin properly set—things are now taking shape!
Everything looks great. As you can see, you now have two distinct columns—which was the aim of this tutorial. However, there’s a pitfall waiting just around the corner to trip you up. Locate the leftcol div in your basiclayout.html code and place the cursor between the opening and closing div tags (see Figure 8).
Figure 8. Placing your cursor between the div tags
Insert some dummy content into the leftcol div. Hold down the Shift key and press Enter. This inserts a line of
tags into the leftcol div. The idea here is to make the contents of the leftcol div longer (or taller) on the page than the contents of the content div. Add enough
tags to the leftcol div to make that happen. Before you preview your page, go to the basiclayout.css file and complete the following steps:
- Locate the
#leftcolselector. - Within this selector locate the
heightproperty and value pair. It should look like this:height: 150px; - Delete it.
- Save your CSS file.
Note: Just to make things quite clear, I added a background color to the #wrapper selector. As you can see in the following figures, I colored the selector orange. Follow the steps you already completed for giving the #leftcol selector a background color and apply them to the #wrapper selector.
Now preview the basiclayout.html page in your browser (see Figure 9). I added a non-breaking space into the clearing divs set in Part 3 of this tutorial and colored them green so you could see them easily.
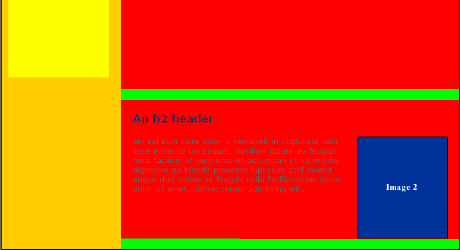
Figure 9. The top clearing div clearing the leftcol div—but dropping out content
This is not what we wanted at all. What is going on here?
The problem occurs because I didn’t clear the divs: Although they may look like they are inside the content div, they are not. They force the content div down until they can occupy a line in the browser window on their own. The position of the first clearing div is above the h2 header; below the left column, the second clearing div drops into the layout immediately below Image 2. Clearing the content in this manner will no longer work in this scenario.When you clear a float, you clear all floats—consequently all content below the first clearing div moves down beyond the floated left column.
On the next page you will see how to correct this problem.
Comments