
Designing with CSS in Dreamweaver MX 2004 – Part 4: Floating the Content
Floating the Content
Your first job here is to locate the the two clearing divs in the basiclayout.html page and delete them. Do that now.
To correct this problem, you will have to encase your content sections in a containing div. Because you will be using this selector more than once on your page, make it a class:
- Open the basiclayout.css file and create some empty space at the bottom.
- Type .container{ and press Enter.
- Type width: 99%; and press Enter.
- Type float: right; and press Enter.
- Type background-color: #6633CC; and press Enter.
- Type }.
- Save your work.
In Step 4 you float to the right the containers to which you apply this class. By doing this you avoid the problems caused by the clearing divs moving your content down below the left column. In Step 3 the width of 99% opens up the containers to almost the complete width of the content div. By not using a full width of 100% you avoid any possibility of the main content dropping down to find room to open to the given width. This scenario can occur if the browser introduces rounding errors into the page width.
Because you now have elements floated both left and right, make an adjustment to the footer div:
- Open the basiclayout.css file.
- Locate the
#footerselector. - Place the cursor immediately after the opening
{and press Enter. - Type clear: both;
- Save your work.
The clear: both property/value ensure that your footer is moved down below the content and leftcol divs, no matter which of these two elements is longer. (After you complete this tutorial, try changing the clear value to left and preview your page. Then, change it to right and preview your page again. This will give you a great visual example of how the clear value works.)
Now that you have created your class for the containing div, open basiclayout.html in the Code view. Take time to study the code shown in Figure 10. I entered a new div with the container class around each section of content (you will need to hand-code these two divs).

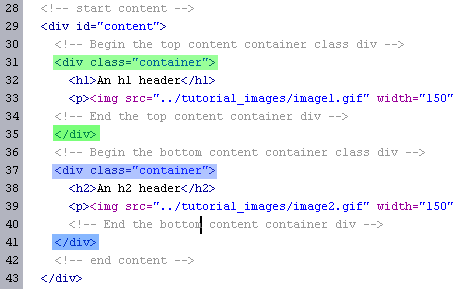
Figure 10. One div highlighted green, the other blue
Once you make these changes to the basiclayout.html file, preview it in your browser (see Figure 11).
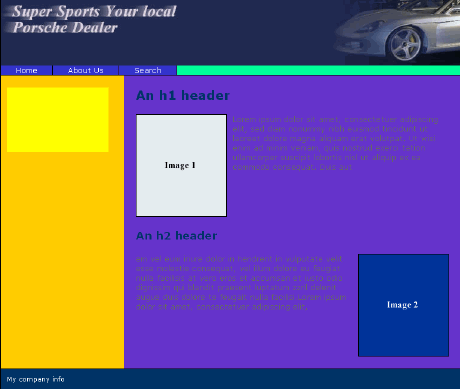
Figure 11. The footer div moved below the content div—you’re all done!
You can add a string of <br /> tags to force the height of the left column (see Figure 12).
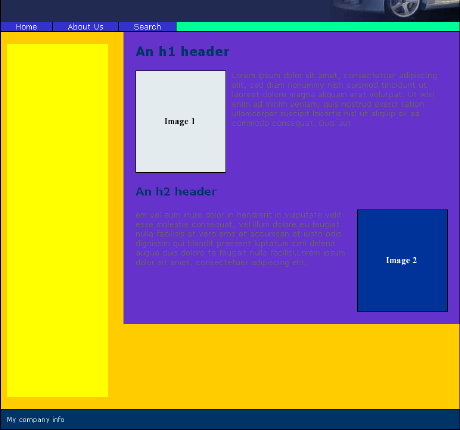
Figure 12. The footer div moved below the leftcol div
Exercise
Remove all the <br /> tags from the leftcol div and create content that is specific to that div by using a descendant selector. Create h1 and p selectors for that div and make sure your new selectors do not affect the content in the main area of your layout.
In Part 5, I show you how to remove the horizontal navigation and move it to the leftcol div. Best of luck implementing your h1 and p elements in the leftcol div. I’m sure you will do just fine.
Comments