
Designing with CSS in Dreamweaver MX 2004 – Part 3: Clearing Elements
Clearing Elements
The following property (and value) makes an element appear below all the content that is above it within the flow of the div:
clear: both;
Follow the steps below to place a horizontal rule immediately after each closing <p> tag:
- Open basiclayout.html in Dreamweaver and switch to the Code view.
- Find the closing </p> tags.
- Immediately after the closing </p> tags, add the following code: <div></div>
- Preview the page in your browser.
The structure of the page has not been altered at all, despite the addition of the new div. The new div will do what you require of it soon enough; you just need to write a new selector for it so it behaves differently.
Before you do this, however, let’s examine the clear value, which you can set to the following:
- None is the default
- Left clears all elements to the left
- Right clears all elements to the right
- Both clears all elements to the left and right
If you look at the top set of content, it becomes immediately apparent that you must clear Image 1. That is, you want to move h2 below Image 1. Because Image 1 appears to the left of the horizontal rule, applying the property clear: left; brings the horizontal rule below Image 1.

This is fine for the top section but what about the bottom section? Image 2 appears to the right in this instance, so you need to set the property as clear: right; instead. To avoid creating two classes to meet two different scenarios, use the both value on the clear property.
To add this selector to the basiclayout.css file, complete the following steps:
- Open basiclayout.css in Dreamweaver.
- Press Shift+F11 to open the CSS Styles panel.
- Click the New CSS Style button at the bottom of the panel.
- Click the Class option in the Selector Type area of the New CSS Style dialog box.
- Type clearit in the Name text box.
- Click OK. This opens the CSS Style Definition dialog box.
- Select the Box option in the Category list.
- From the Clear pop-up menu select Both.
- Select the Block option in the Category list.
- From the Display pop-up menu select Block.
- Click OK to close the dialog box.
The newly added selector for clearit class looks like the code below:
.clearit{
 clear: both;
 display: block;
 }
Once you add the clearit class to the basiclayout.css file, you can apply it to the two divs you added immediately after the closing </p> tags. To do this accurately, switch to the Code view, locate your opening div tag, and place your cursor between the v and the closing > of the opening div tag. Press the Spacebar and start typing class. The code hints will kick in, from which you can select a class.
Internet Explorer 6 has some float bugs that are beyond the scope of this article. Although these bugs will not break your page, they will prevent it from being pixel-perfect.
Now preview basiclayout.html in your browser (see Figure 17).
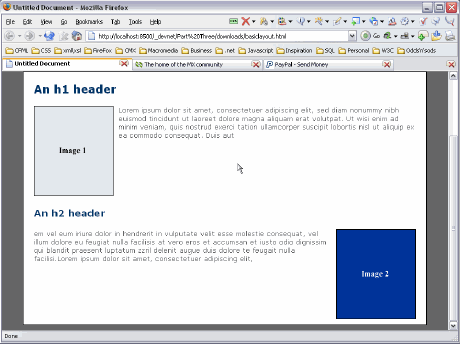
Figure 17. A clearly defined page structure
On the next page you will finish this design by adding a footer below the content div.
Comments