
Designing with CSS in Dreamweaver MX 2004 – Part 1: Semantic Markup
Semantic Markup
“The Semantic Web approach develops languages for expressing information in a machine processable form” (W3C)
The line above is a quote, so it resides in a pair of <p> tags. This tag lets a screen reader know that the text is a quote and not just another paragraph. Screen readers are machines that enable visually impaired people to surf the web. Creating a semantically correct document in its simplest form is just one case of using the XHTML elements supplied with the specification to lay out your document correctly.
Each element provided in the XHTML specification has been designed to be used in a specific way and each has a specific meaning. An h element is a title and any text between title tags is instantly recognized as a title by a machine reader, just as text within <p> tags is recognized as being a paragraph. Not all tags are semantic in their makeup. Take the <span> tag, for instance. A <span> tag has no meaning associated with it; it is simply a container element. If you were using a <span> tag and styled it to emphasize text within a paragraph, you would be better off using the <em> tag. This is what it was designed to do. It says to the machine reader this text should be emphasized; in turn, the machine reader emphasizes the text within the <em> tags.
Semantic Improvements in Dreamweaver MX 2004
This is another area in which Dreamweaver MX 2004 has progressed greatly. In earlier versions of Dreamweaver, pressing Control+I or clicking the I button in the Property inspector inserted a pair of <i> tags to italicize the text. While this looked fine to the human eye, the <i> tag means absolutely nothing to a machine reader. Dreamweaver MX 2004 now inserts <em> tags when you press Control+I or click the I button in the Property inspector. A machine reader understands that the <em> tag means to emphasize. In much the same way, the Control+B shortcut (or B button in the Property inspector) now inserts <strong> tags rather than <b> tags. The resetting of these keyboard shortcuts in Dreamweaver MX 2004 was a move in the right direction for creating semantically correct documents.
Hierarchical Structure
Creating text in a p element and then using font tags—or CSS for that matter—to increase the text size so it looks like a heading and then applying a bold tag to it does not make it a header. The finished result might look like a header to the human eye. However, that’s where the association of the text with a header ends.
If you want to create a header, you should use one of the header elements. The header element you use depends on where you are in your document. The main heading on your page would be an h1. Subheadings would be h2, and so on. You have no need to use all the headings within your document but they are available if you require them:

h1h2h3h4h5h6
Each header element is hierarchical in nature, with h1 being the most important header and h6 being the least important header. All of them have a natural place within your documents. Commonly you will see designers typing text directly into a <td> tag set within a table—not good. This practice gives machine readers no indication at all as to how to read the text. If you are dealing with copy text below a header, then you should probably set it within a p element. Once the text is set within the <p> tags, machine readers know what type of content they are looking at and how it should be read. The idea is to set your document out in a hierarchical manner that is easily read not only by humans but by machine readers (see Figure 4).
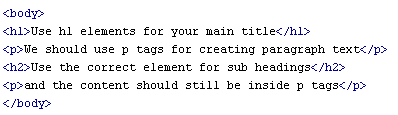
Figure 4. Structuring your document correctly
I can hear you saying, “OK, that sounds fine but h1 elements are huge! I understand how making semantically correct documents is a good thing to do but I also want my documents to look good.”
Enter CSS
CSS provides you with the ability to redefine elements to take on the appearance you specify. This is cool because you can set the size of h1 to whatever you want. You can set the font face, margins, padding, color, background color, and a whole list of other properties all from within a single CSS rule. This keeps your document semantically correct.
Not only can you redefine the h1 element, but once its rule is safely in your style sheet and the pages in your website are linked to that style sheet, you can change its appearance globally from a single location in a matter of seconds. The demo below walks you through adding an h1 element and demonstrates the ease with which you can control your documents from an external style sheet.
Here are the steps reviewed in the demo:
- Click the New CSS style button in the CSS Styles panel. The New CSS Style dialog box opens.
- Ensure that the Tag Selector Type option is selected.
- Select h1 from the Tag pop-up menu.
- Select external.css from the Define In pop-up menu.
- Click OK.
- Select “Georgia, Times New Roman, Times, Serif” from the Font pop-up menu.
- Enter 100 in the Size text box and select % from the unit of measure pop-up menu.
- Enter #003366 in the Color text box.
- Select the Box category.
- Click the Same for All option in both the Padding and Margin sections.
- Enter a value of 0 for both the Margin and Padding.
- Click OK.
- Open external.css. You can see your newly added
h1rule. - Select File > Save to save the external.css file.
As you can see in the CSS Styles panel, your h1 rule is now shown with the body element in the external.css tree.
Comments