
Designing with CSS in Dreamweaver MX 2004 – Part 1: Creating a Cascading Style Sheet
Creating a Cascading Style Sheet
First, I’d just like to touch on the outmoded use of font tags. By default, Dreamweaver MX 2004 uses styles rather than font tags to redefine the appearance of your text content. This is such a good move in the right direction that it is tantamount to sacrilege to make the changes to revert back to font tags. Let me explain why—you can see the argument in process in a little while.
To begin with, font tags are deprecated, which means they may not be supported by browsers in the future. They are no longer a part of the XHTML specification. That is a good enough reason not to use them.
The real problem with font tags begins when your design client requests changes. Maybe the font color needs to be changed or perhaps the font face needs to change from Verdana to Arial. If the content has been generated using font tags, making these changes can take a huge amount of time. By contrast, you can make changes such as these—and indeed far more complicated ones—in a very short time by editing an external style sheet because it applies the changes on a sitewide basis instantly. You also get easier document manipulation and lighter, faster-loading pages. The benefits are many.
Taking the time to learn CSS, even if you wish to use it only for redefining elements rather than full-fledged page layout, is well worth enduring the small learning curve it takes to get you there. Dreamweaver MX 2004 has made giant strides in its implementation of CSS. Take advantage of these changes. I guarantee you won’t be sorry!
How Do You Use CSS?
Let’s start at the beginning of the CSS trail and look at the methods available to you when you want to apply a Cascading Style Sheet to your documents. You can use an external style sheet, an embedded style sheet, or inline styles. External style sheets are best because they give you the most control over styles.
Using an External Style Sheet
By using an external (linked) style sheet, you exercise global control over the appearance of every page in your site that is linked to that CSS file. This is a very powerful method of using CSS. By using a linked style sheet, you have the ability to make sitewide changes on untold numbers of pages from a single location. This can be completed in what may amount to no more than a few seconds’ work. Powerful indeed!

Dreamweaver makes setting up an external style sheet just about as easy as it can be. In the first exercise, I’ll review the procedure of creating an external style sheet and how to link it to your web pages:
-
Select File > New or press Control+N to open the New Document dialog box (see Figure 1).
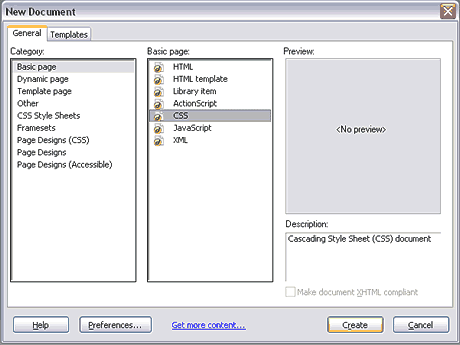
Figure 1. The New Document dialog box
- In the Category column, select Basic Page.
- In the Basic Page column, select CSS.
- Click the Create button.
Your newly created Cascading Style Sheet will open in Dreamweaver. If you are completely unfamiliar with CSS, you will notice that style sheets don’t have a Design view. Your style sheet is little more than a text file that contains your CSS rules and their properties and values.
Alternatively, if you select the CSS Style Sheets option in the Category column of the New Document dialog box, the Basic Page column will show a list of “starter” style sheets that already contain some of the CSS rules you may use. You won’t be using these starter pages at the moment. Instead, you will be building your own style sheet, and I will discuss why you are setting the properties and values you will use.
Now that you have created your first CSS file, use the following steps to save it in a defined site:
- If you haven’t already defined a site, do so now. If you need help defining a site, see “How to Define a Site in Dreamweaver” (TechNote 14028).
- Create a new folder called CssFiles in the root of your site.
- Save the CSS file in the new CssFiles folder and name it external.css.
Note: Normally, I suggest saving CSS files in their own folder just for the sake of good organization. This keeps your site neat and tidy as it grows.
In this section, you will create two pages that will demonstrate the power of using an external style sheet:
- Open the New Document dialog box (File > New).
- Select Basic Page from the Category column.
- Select HTML from the Basic Page column.
- (Optional step) Click the Make Document XHTML Compliant option.
- Click the Create button.
- Save the page to your site root and name it external.html.
- Repeat Steps 1–5 to create a second page.
- Save the second page to your site root and name it external2.html.
You now have all the documents you need to complete the first section of this tutorial.
Linking the Cascading Style Sheet
You should now have Dreamweaver open and have the following three documents displayed, saved, and ready to work on:
- external.css
- external.html
- external2.html
If you don’t have these files open in Dreamweaver, open them now.
The following demo walks you through the process of linking your style sheet to your HTML documents.
Here are the steps reviewed in the demo:
- Open external.html, external2.html, and external.css in Dreamweaver MX 2004.
- Press Shift+F11 to open the CSS Styles panel.
- Make sure external.html is the active document, and click the Attach Style Sheet button in the lower right corner of the CSS Styles panel. The Attach External Style Sheet dialog box opens. Dreamweaver remembers your last selection.
- Select the Link option.
- Click the Browse button.
- The Select Style Sheet File dialog opens.
- Select Document from the Relative To pop-up menu.
- Select the external.css file you created earlier. The path is inserted in the File/URL field.
- Click OK to add your style sheet name to the CSS Styles panel.
- Click the Code view button. You will see that Dreamweaver has inserted the necessary code linking your document to your style sheet.
- Select File > Save to save the file.
- Repeat the process to link external2.html to your style sheet.
Before you begin to add rules into your style sheet, there are one or two things you should cover first. In the next section, you will learn why it is important to use a complete doc type. I will then give a quick introduction to margins and padding before discussing browser default settings and why it is a good practice to zero off these defaults so you start on a level playing field.
Comments