
Deconstructing FreeHand graphics Part 2: Examine the sample image
Examine the sample image
When artists are learning to use an unfamiliar medium such as acrylic paint or an airbrush, they often start by producing a simple image called a “still-life.” Still-life images typically depict an arrangement of simple objects such as blocks, cones, and spheres, and sometimes a few more complex objects or a background.
The sample tutorial image includes seven shapes that vary in complexity from easy to moderately complex. To create your own version of the images in Part 2, you will start with the cone, and then draw the magnifying glass and the wood-grained surface. As you work through the tutorial, you will draw on the provided simple grid to more easily match the perspective of the final wood-grained surface.
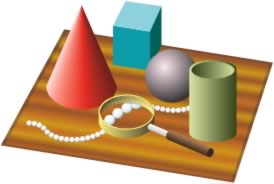
Before you start this part of the tutorial, open the deconstruct_2.fh10 sample file and take a moment to examine the image. The sample image is located on the Sample Image layer, which is locked in the sample file. If you want to select the objects and take them apart to learn how they are made, you can unlock the layer using the padlock icon next to the layer name in the Layers panel. You will find that in most cases, the illusion of depth is not difficult to achieve.
This tutorial picks up where Deconstructing FreeHand Graphics: Part 1 left off. However, you can work through this tutorial without completing Part 1. The sample file included with Part 2 includes all the completed elements from the first tutorial.

Comments