
Deconstructing FreeHand graphics Part 2: Draw a wood-grained surface
Draw a wood-grained surface
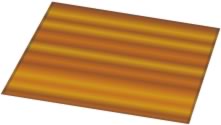
Drawing a wood-grained surface as a background is not complicated, but some of the methods used may not be obvious when you are first learning to use FreeHand. Although there are many ways you could achieve realistic results, this example focuses on the numeric transform capabilities of FreeHand. As you follow the steps, you will learn ways to use the Transform panel to manipulate objects, in addition to other skills.
| 1 | Shift-drag the Rectangle tool to draw a square. |
| 2 | Use the Fill inspector to create and apply a multi-colored linear gradient using the Wood Light, Wood Medium, and Wood Dark swatches. Apply each swatch several times in random order to create a realistic wood effect.
|
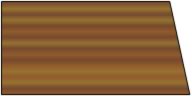
| 3 | Select the square and choose Modify > Transform > Scale. Use the following settings in the Transform panel: |
| Deselect Uniform. | |
| Enter 100 for the horizontal dimension. | |
Enter 55 for the vertical dimension. 
|
|
| 4 | Click Scale to convert the square to a rectangle by scaling disproportionally. |
| 5 | Choose Modify > Ungroup to edit the points of the rectangle. |
| 6 | To distort the rectangle, select the lower right point and Shift-drag it slightly to the right. |
| Note: Distorting the rectangle by increasing the width of the bottom edge produces a more realistic perspective effect in the final image.
|
|
| 7 | To prevent further editing of the points, choose Modify > Group. |
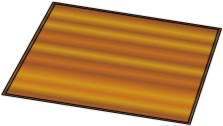
| 8 | To create a copy of the object and make it smaller, select it and choose Modify > Transform > Scale. Use the following settings in the Transform panel: |
| Select Uniform. | |
| Enter 97 for the scale percentage. | |
| Enter 1 for Copies.
|
|
| 9 | Click Scale. |
| 10 | To simulate a beveled edge by lightening the wood tones of the second polygon, choose Xtras > Colors > Color Control. Use the following settings in the Color Control panel: |
| Select the HLS color model button. | |
| Enter 10 for lightness (L).
|
|
| 11 | Select both polygons and group them. |
| 12 | To simulate perspective by skewing the polygons, select the group, and then choose Modify > Transform > Skew. Use the following settings in the Transform panel: |
| Enter 29 for horizontal skew angle (h). | |
| Enter -9 for vertical skew angle (v).
|
|


Note: To help familiarize you with the capabilities of FreeHand, this tutorial demonstrates one way to create a perspective effect manually. FreeHand also has tools to create perspective effects automatically. For more information see, the Perspective Grid and 3D Rotation in Using FreeHand or FreeHand Help.
| 13 | Remove the stroke (if any) from the objects you used to draw the wood-grained surface.
|
Comments