
Customizing the Video
Customizing the Video
The FLVPlayback component displays the video in the template (see Figure 4). You will select the FLVPlayback instance to change the layout and parameters of the video. You can change the following items to customize the display:
- Video file and video parameters
- Size of the video (either automatically or manually)
- Location of the video
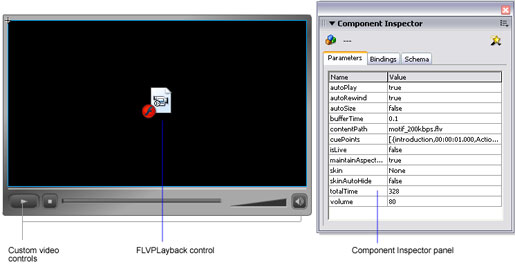
Figure 4. FLVPlayback component instance and its parameters in the Component Inspector panel
The video component in Figure 4 appears as a black rectangle with the Flash video icon in the center. When you select it, it appears with a blue bounding box surrounding the instance. The parameters for the video component can be set in the Property Inspector panel or in the Component Inspector panel. Also notice that the custom video controls (play, stop, seek bar, volume bar, and mute button) are separate controls, which are not attached to the FLVPlayback instance.
Changing the Video and Video Parameters
To change the video and FLVPlayback parameters:
- Open the VideoNavPresentation.fla file in Flash Professional 8.
- Click the Flash video icon in the center of the black rectangle to select the FLVPlayback instance. Notice that the FLV Controls layer is highlighted on the Timeline.
- With the video component still selected, open the Component Inspector panel (Windows > Component Inspector).
-
To change the video, click the
contentPathfield to select it and then click it again to launch the Content Path dialog box (see Figure 5).
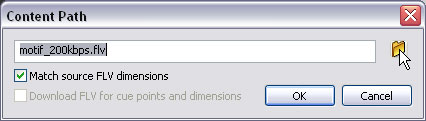
Figure 5. Content Path dialog box
-
Type in the path to the FLV file that you want to view or click the folder icon in the top right of the dialog box to browse for the file. Usually you will store the FLV file in a relative path near the Flash movie that displays it. However, if you are streaming the video using Flash Media Server, you will enter an absolute path to the file on the server.
Notice that you have an option to match the FLV dimensions. This is a great new feature that lets the video component size itself to the target video. If you enter an absolute path into the field, the Download FLV for Cue Points and Dimensions check box becomes active.
- Enter a path in the text box and choose the Match Source FLV Dimensions check box if desired. Click OK when you’re finished.
- Export the SWF file (Control > Test Movie) to play your video.
-
Return to the FLA file and change the other video parameters as desired. Notice that the
totalTimeparameter is set to 328 to mark the length of the video in seconds. The video used in this sample is an older FLV file, where thetotalTimevalue is not embedded in the FLV file’s metadata. Entering the length manually enables the seek bar control to work properly.If you are using a newer FLV file, then you can remove this setting. Feel free to change it to match the correct length of your video in seconds. If you’re streaming the FLV file from Flash Media Server, you will want to turn the
isLiveparameter totrueand adjust thebufferTimeparameter to match an appropriate buffer time for your target bandwidth. In this template theskinandskinAutoHideparameters are not being used.
Note that the FLVPlayback component uses embedded metadata in the FLV file to determine the size and duration of the video for automated features such as “Match source FLV dimensions.” If you are trying to use an older FLV file that does not contain this metadata, you may notice that some of these features may not work.
Changing the Size of the Video
To change the layout of the video component, you can either let the component automatically size itself to the target FLV file or you can manually size the component on the Stage.
If you want the component to size itself automatically, follow the steps in the previous section for assigning the contentPath parameter and make sure you select the Match Source FLV Dimensions check box. Doing so will size the video component appropriately on the Stage so that you can position it visually as desired.
To size the video instance manually, follow these steps:
- Select the video component on the Stage by clicking the Flash video icon. Open the Component Inspector (Window > Component Inspector) if it’s not already open.
- Set the
autoSizeandmaintainAspectRatiofields tofalsein the parameter list. These parameters affect the component when the SWF file is playing. Turning off the parameters enables the video to be displayed at any size you choose. - With the video component still selected, choose the Free Transform tool (Q) and scale the video instance as desired.
- Export the SWF file (Control > Test Movie) to see the results. If you want, you can play with the
maintainAspectRatioparameter to adjust how the video appears in the custom size view.
Moving the Video to a New Location
To move the video to a new location, follow these steps:
- Select the video component on the Stage by clicking on the Flash video icon.
- With the Selection tool (V) you can click on the video instance and drag it to any location on the Stage. Of course, feel free to change the surrounding graphics to accommodate the change in video location.
Comments