
Crop Smart Objects
Crop Smart Objects
After a Smart Object is placed on a page, you may decide you don’t want to use the entire image on the web. A perfect example of this would be when you use an Adobe® Photoshop® image for a print piece in Adobe® InDesign®, but then want to use just a portion of that image on your website. Instead of creating and managing two versions of the same Photoshop file, just use the GoLive crop feature to customize the target file for appropriate web use.
Select the Smart Object in the Layout Editor and choose the Crop tool in the Inspector palette. When you select the Crop tool, a new set of options appears in the toolbar at the top of the screen.
When you crop a Smart Object, you can use the tools in the toolbar to achieve various results, such as trimming transparent pixels from one or more sides
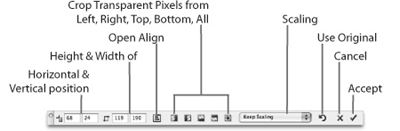
Click and drag over the Smart Object you want to crop just as you would in Photoshop. As you drag, the parts of the image that will be cropped out are dimmed. Click one of the buttons in the toolbar to crop transparent pixels from any or all edges of the image. If you want to align the crop to the image itself, click the Open Align palette button in the toolbar and use the Align palette to line up the edges perfectly. The Scaling pop-up gives some neat options. For example, choose Keep Scaling if you simply want to crop off parts of the image. Select Keep Object Size, and you can then use the Crop tool to select an area that fills the image at its current size. Choose Scale To Source Size to select an area with the crop tool and have only that area render at the image’s original size.
Confirm a crop with the checkmark icon in the toolbar, cancel a crop with the X icon in the toolbar, and revert a crop with the circle arrow icon in the toolbar. Remember that any crop you make here only affects the target file and never the source file.

Comments