
Creating Shape Tweens
Creating Shape Tweens
By tweening shapes, you can create an effect similar to morphing, making one shape appear to change into another shape over time. Flash can also tween the location, size, color, and opacity of shapes.
Tweening one shape at a time usually yields the best results. If you tween multiple shapes at one time, and want them to morph together, all the shapes must be on the same layer. Otherwise, for some effects, you should shape tween each shape on separate layers if you do not want them to affect each other. In Figure 14, each rectangle—the curtain effect in the background and the rectangle on top—tweens on its own separate layer. (See the sample file shape_tween.fla, which is part of the animation_samples.zip archive accompanying this article.)
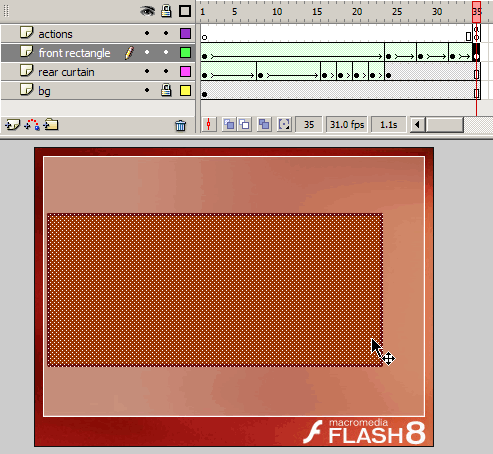
Figure 14. Each shape tween on its own layer so the shapes animate separately
To apply shape tweening to groups, instances, or bitmap images, you must first break these elements apart (Modify > Break Apart). To apply shape tweening to text, you must break the text apart twice to convert the text to objects.
Note: To control more complex or improbable shape changes, you use shape hints, which control how parts of the original shape move into the new shape.

To tween a shape:
- Create a new file and call it shapetween.fla.
- Select Frame 1 of Layer 1. This is where the animation will start.
- Create a graphic with the Pen, Oval, Rectangle, Pencil, or Brush tool. For best results when you’re starting out, the frame should contain only one drawing (such as a single oval shape).
- Select Frame 10 of Layer 1 and create a second keyframe (F6).
-
Select the artwork on the Stage at Frame 10 and do one of the following:
- Modify the shape, color, opacity, or position of the artwork.
- Delete the artwork and place new artwork in the second keyframe (it should be a raw graphic drawing as well).
- Select a frame in Timeline between Frame 1 and Frame 10.
- In the Property inspector (Window > Properties > Properties), select Shape from the Tween pop-up menu.
-
Select an option for Blend:
- Distributive creates an animation in which the intermediate shapes are smoother and more irregular.
- Angular creates an animation that preserves apparent corners and straight lines in the intermediate shapes.
Note: Angular is appropriate only for blending shapes with sharp corners and straight lines. If the shapes you select do not have corners, Flash reverts to distributive shape tweening.
Comments