
Creating Motion Tweens
Creating Motion Tweens
To tween the changes in properties of instances, groups, and type, you use motion tweening (see Figure 10). Flash can tween position, size, rotation, and skew of instances, groups, and type. Additionally, Flash can tween the color of instances and type, creating gradual color shifts or making an instance fade in or out. To tween the color of groups or type, you must make them into symbols.
If you apply a motion tween and then change the number of frames between the two keyframes, or move the group or symbol in either keyframe, Flash automatically tweens the frames again.
You can create a motion tween using one of two methods:
- Create the starting and ending keyframes for the animation and use the Motion Tweening option in the Property inspector.
- Create the first keyframe for the animation, insert the number of frames you want in the Timeline, select Insert > Timeline > Create Motion Tween, and move the object to the new location on the Stage. Flash automatically creates the ending keyframe.
The animation in Figure 10 has several layers. All of the assets of the bee are within a movie clip. Therefore, you can animate the instance on the main Timeline. Inside the instance, some elements (such as the wings) are movie clip instances with nested animations. The wings contain frame-by-frame animations.
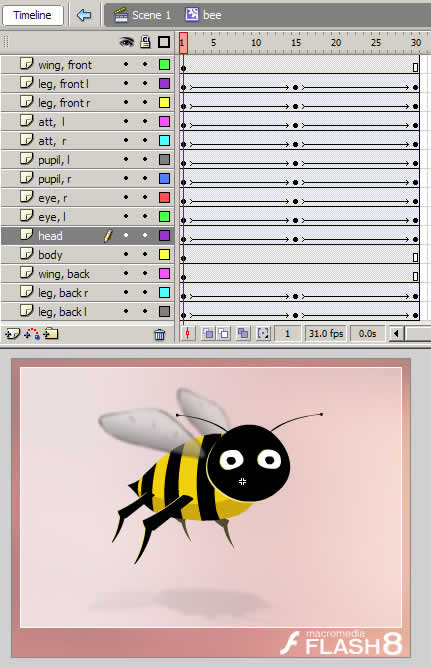

Figure 10. An animation with several layers
When tweening a position, you can make the object move along a nonlinear path.
To create a motion tween using the Motion Tweening option:
- Create a new file and call it motiontween.fla.
- Select Frame 1 of Layer 1. This is where the animation will start.
- Create a graphic with the Pen, Oval, Rectangle, Pencil, or Brush tool. Select it and then choose Modify > Convert to Symbol.
- In the Convert to Symbol dialog box, make sure the Movie Clip option is selected and then click OK. Now the graphic you created is an instance on the Stage (with a symbol in the Library).
- Select Frame 10 on Layer 1 and then press F6 to create a second keyframe. This is where the animation will end.
-
Select your instance on the Stage at Frame 10. Do any of the following to modify the instance:
- Move it to a new position on the Stage.
- Modify the item’s size, rotation, or skew using the Free Transform tool.
- Click any frame in the tween’s frame span (for example, select Frame 5 of Layer 1) and select Motion from the Tween pop-up menu in the Property inspector (Window > Properties > Properties).
-
With the frame still selected, drag the arrow next to the Easing value in the Property inspector (Window > Properties > Properties) or type in a value to adjust the rate of change between tweened frames:
Note: By default, the rate of change between tweened frames is constant. Easing creates a more natural appearance of acceleration or deceleration by gradually adjusting the rate of change.
-
To rotate the selected item while tweening, select an option from the Rotate menu:
- Select None (the default setting) to prevent rotation.
- Select Auto to rotate the object once in the direction requiring the least motion.
- Select Clockwise (CW) or Counterclockwise (CCW) to rotate the object as indicated, and then enter a number to specify the number of rotations.
- Select Control > Test Movie to test the animation.
Note: The rotation in Step 9 is in addition to any rotation you applied to the ending frame in Step 6.
Comments