
Creating and Testing Quizzes
Creating and Testing Quizzes
With Macromedia Captivate users can create complex, interactive quizzes that give instructors and tutors the ability to test a learner’s performance. You can track and score interactions, such as mouse clicks or data entry, and quizzes—all of which can then be sent by e-mail or integrated with a learning management system (LMS). Captivate supports SCORM 1.2 and AICC and offers direct integration with Macromedia Breeze, Macromedia Authorware, and Questionmark Perception.
Creating a Simulated Software Assessment
The first step in creating a scored software simulation is to capture the screen action you want to simulate. When capturing in a simulation mode, Captivate automatically adds scored interactions and instructional feedback.
Click the following link to view a Captivate demonstration of how to create an assessed simulation:
![]() Play the demo: Creating a Simulated Recording Mode for Your Captivate Project
Play the demo: Creating a Simulated Recording Mode for Your Captivate Project
To record a Captivate simulation, follow these steps:
- On the Start page, click the Record or Create a New Movie icon. You can also select File > Record or Create a New Movie.
-
Select from one of the following three recording options and then click OK:

- Application
- Custom Size
- Full Screen
- Specify the window, area, or monitor you want to capture.
-
Click the Options button in the recording window. In the Recording Options dialog box, select the recording mode you want to use from the Recording Mode pop-up menu. There are two simulation modes:
- Assessment Simulation: Captivate automatically adds click boxes with failure captions. By default, there is no limit to the number of times a user can click a click box, and the mouse movement does not appear.
- Training Simulation: Captivate automatically adds click boxes with failure and hint captions. By default, there is no limit to the number of times a user can click a click box, and the mouse movement does not appear.
- Click OK to close the Recording Options dialog box.
- Click the Record button in the recording window to capture your screen action and record any narration.
-
After completing your narration, press the End key to stop recording. Captivate now generates the individual slides that comprise the SWF file and displays them in Storyboard view.
By clicking the Edit Settings button you can make further changes to either of these recording modes.
You can also choose Custom from the Recording Mode pop-up menu and click the Edit Settings button to select individual settings to suit your needs.
In the Sound area of the dialog box, you can specify whether or not you want to include narration in your movie.
Keeping and Sharing Scores
With Captivate you can turn your whole demo into a quiz and track and score any interaction with the following types of objects:
- Click boxes
- Text-entry boxes
- Buttons
- Question slides
You can configure quizzes to show users their final scores at the end of the demo. The score can then be sent through e-mail or integrated with an LMS.
Sending Scores By E-mail
To allow learners to send their quiz scores by e-mail, you have to enable an output option in the Quiz Manager.
The Quiz Manager defines global settings for all quizzes in your Captivate file. In this section I outline the settings in the Quiz Manager that are required to send the score of a simulation by e-mail. Later in the article I cover the Quiz Manager in more detail.
To access the Quiz Manager, follow these steps:
- With a Captivate file open, choose Movie > Quiz Manager.
- Select the Reporting tab and click the Enable Output Options check box.
- Click the E-mail option.
-
Read the message in the Captivate message box and click OK (see Figure 1). The message informs the user that the show score option will be turned on to give the user a button for sending an e-mail. You can change the button text or configure any other results shown to the learner by clicking the Settings button on the Quiz tab.
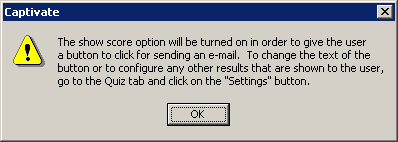
Figure 1. You can modify the text in the Captivate dialog box
- Type an e-mail address in the E-mail text box.
-
From the Reporting Level pop-up menu, choose the type of information that should be reported to learners. Your options are:
- Report interactions and the score
- Only report the score
- In the Quiz Pass/Fail Settings area, enter a percentage or numeric value that students must meet in order to pass the quiz.
- Click OK to close the Quiz Manager.
Testing a Simulated Software Assessment
Now that you have enabled the e-mail output option and entered a valid e-mail address, you can test the quiz. In order to do this, you must either preview the quiz in a web browser or publish it.
Note: You can test the majority of the quiz’s functionality by previewing the file in Captivate. However, when you click the Send E-mail button on the results slide, Captivate displays the dialog box shown in Figure 2.
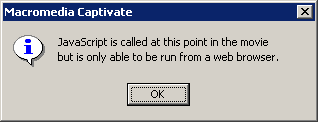
Figure 2. Users see this message box when they preview a file and click the Send E-mail button on the results slide
To preview and test the quiz in your default web browser, follow these steps:
- Click Preview on the main toolbar and select In Web Browser (or press F12).
-
Go through each of the steps required to complete the demo.
-
On the results slide, click the Send E-mail button. This opens a new message in the learner’s e-mail client showing the score data in the body of the e-mail. The learner can then send the e-mail to an instructor or tutor. After receiving the e-mail, the instructor or tutor can save and import the data into a third-party application such as Microsoft Excel (see Figure 3).
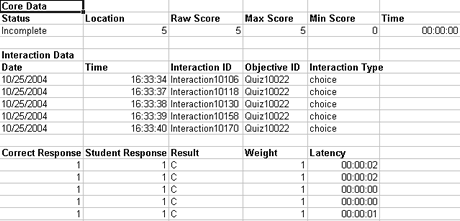
Figure 3. Importing score data from a simulated assessment into Microsoft Excel
Comments