
Creating an FLV File with the Flash 8 Video Encoder
Creating an FLV File with the Flash 8 Video Encoder
The other way of encoding video is to use the Flash 8 Video Encoder, which ships with Flash Professional 8. This stand-alone application does one thing that the Video Import Wizard doesn’t do: It can encode a number of videos at once. Another major difference is that the Flash 8 Video Encoder does not give you the option to “skin” the video. This you must do in Flash. All that the Flash 8 Video Encoder does is produce an FLV file:
-
Launch the Flash 8 Video Encoder. When the main screen opens, drag the video file from Windows Explorer or the Macintosh Finder into the queue area of the dialog box (see Figure 21). You can also click the Add button and navigate to the folder where the video is located to do the same thing. Dragging and droping a video file directly is much quicker.
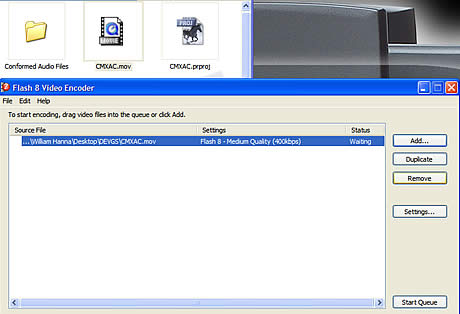
Figure 21. Listing the video files to be encoded
-
Select the video in the queue and click the Settings button to open the Flash Video Encoding Settings dialog box (see Figure 22). The default codec for Flash Professional 8 is the On2 VP6 codec. The dialog box also lists a number of preset profiles. The only codec that permits the alpha channel in the video is the On2 VP6 codec. If you are targeting Flash Player 7 or need to use the the Sorenson codec, which won’t encode an alpha channel, then select one of the Flash 7 profiles. (As in the Video Import Wizard, you need to make another adjustment before you can create an FLV with an alpha channel.)
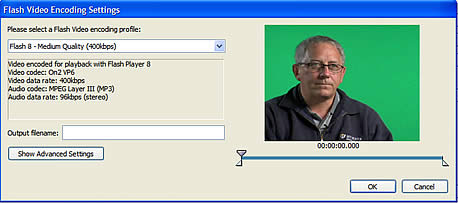

Figure 22. Encoding settings always default to the On2 VP6 codec in Flash Professional 8
-
Click the Show Advanced Settings button to expand the interface (see Figure 23). Click the Encode Alpha Channel option. If you chose the Spark codec from the pop-up menu, this button will be grayed out. Notice that the preset now changes to “Custom Settings.” Click OK to return to the queue view.
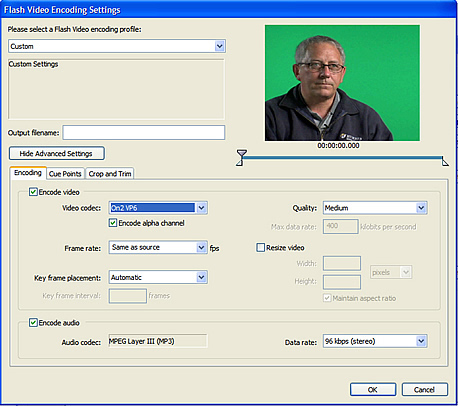
Figure 23. Selecting the Encode Alpha Channel option in the expanded Flash Video Encoding Settings dialog box
By the way, there is a lot of power under the hood in the Advanced Settings area. The three tabs—Encoding, Cue Points, and Crop and Trim—allow you to tweak the video stream, add cue points to the FLV file so that it triggers Flash events, and trim a video image so that it fits the precise physical size of your project.
The encoding options are broken into two areas: Encode Video and Encode Audio. Here you can change such settings as the codec, video frame rate, key frame placement, and video quality. Although you can resize a video here, consider doing it in a video editing application instead. If you reduce a 320 x 240 pixel video to 240 x 180 pixels here, you will not realize any file size reduction. Doing the same thing in a video editing program, however, will make the file size plummet.
Notice the two numbers for the data rate. The real data rate—how fast the information streams into the user’s browser—is calculated by adding the audio and video rates together. In the example shown in Figure 20, the data rate will be 496 kbps (400 kbps video + 96 kbps audio), which is too fast for a dial-up situation.
-
Select the video in the queue and click Start Queue. You will see the progress of the encoding process and be able to see the video slowly play in the progress area as each frame is encoded (see Figure 24). When the encoding process is completed, a check mark will appear in the queue beside the video you just encoded. Now you can quit the Flash Video Encoder.
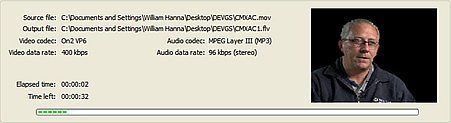
Figure 24. The encoding process in the queue window
A really neat aspect of the Flash Video Encoder is that it remembers the settings you applied to the video. If you ever need to return to the encoder to redo something or tweak a setting, the videos will still be listed in the queue. All you need to do is select the video, click Settings, and make further adjustments before generating another FLV file.
The next section describes how to bring the FLV file you just created into Flash Professional 8 to create a SWF file for playing in Flash Player.
Comments