
Creating a SWF File from the FLV File
Creating a SWF File from the FLV File
Now that you’ve created the FLV file using the Flash 8 Video Encoder, you need to bring it into Flash Professional 8 to create a SWF file to play it in Flash Player. The major difference between using the Wizard and the Encoder is you will need to attach the skin in Flash. Here’s how:
-
Open a new document in Flash Professional and drag the FLVPlayback component from the FLV Playback – Player 8 Components panel on to the Stage. You will see a black rectangle appear with an FLV icon in the middle.
Note: Video containing an alpha channel can play back only through a Flash 8 component. You cannot use the components in the Media – Player 6-7 Components panel for this purpose.
- Click the instance of the component on the Stage and click the Parameters tab in the Property inspector. You use this panel to set the path to the FLV file you just created and add the skin.
- Click contentPath in the Parameters tab and then click the input area to open the Content Path dialog box.
- Click the Browse button and navigate to the FLV you just created. Click OK to accept the selection.
-
Back in the Property inspector, scroll down the list of parameters to the Skin parameter and click the input area to open the Select Skin dialog box (see Figure 25). Click the pop-up menu and select a skin. Each choice you make appears in the Preview area of the dialog box. When you choose your skin, click OK.
Note: One thing to keep in mind about choosing skins is that some of them (with the word “External” in the skin name) hang below the area used by the FLVPlayback component. Be sure to leave about 35 pixels at the bottom of the movie to accommodate the controls if you choose an external skin.

Figure 25. Picking a skin for the player
-
Add a new layer and drag that layer under the component layer. Add a movie clip, another video, or an image to this layer and test the movie.
In Figure 26, I used a photo that I took of the traffic on 42nd Street in New York City. I added it to Layer 1, placed the FLV Playback component Layer 2 (above the image), and set the parameters for the video in the Property inspector.
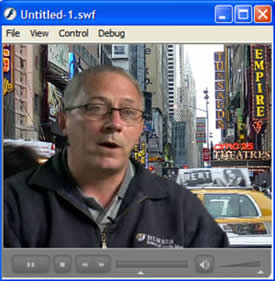
Figure 26. The talking head superimposed on a background thanks to the alpha video channel in the FLV file
Congratulations! You’ve created a Flash video file with an alpha channel that can show whatever image you want behind the talking head.
Where to Go from Here
The ability to make a video with an alpha channel constitutes a significant leap in the ability to incorporate video, talking-head video, and rather spectacular banner ads into web pages. The process in Flash doesn’t require any extra hardware, software, or even advanced web development knowledge. In many respects, if you can click a mouse, you can add video to a web page.
Start playing with this technique both in a video editing application and Flash. Although I used Adobe Premiere for this discussion, both Adobe After Effects and Apple Final Cut Pro contain a number of extremely powerful keying filters. Learn how to use them.
If you have access to a video studio or your local TV station, see if you can be invited to a “green screen” shooting session. Pay careful attention to how the background is lit to reduce shadows. If you want to shoot your own video and add an alpha channel, shoot the subject against a solid—color background—a white wall or other solid color—and start playing with the resulting footage. It may not be “professional grade” but you have to start somewhere.
Comments