
Creating a New Project
Creating a New Project
Creating a new Project in RoboHelp Office X5 is as simple as clicking a few buttons. If you create your documentation from scratch (instead of importing it from another source), take a few minutes to plan the flow of your project. Documentation easily becomes complex, so you need to plan the content and how it links together. You might want to create a flowchart or diagram that outlines the content areas, visual assets, and links for the various parts of your documentation.
After you install RoboHelp, select Start > All Programs > RoboHelp Office > RoboHelp HTML to launch the program. RoboHelp displays a dialog box that lets you create a new project, or open an existing project.
- Select the Create a new project radio button and click OK.
- This opens the New Project dialog box. Select WebHelp.
- Click OK to launch the New Project Wizard dialog box, which you use to name and configure the new project.
- For the FlashFAQ site, type in the title FlashFAQ and RoboHelp auto-populates several of the text fields . You can change the project’s file name and location if you wish or leave them with default values.
- Change the value for the Enter the title for the first topic field to Introduction.
- Click Finish.
Before you get too far into building the site, it is important that you understand what a topic is. Each topic is a single HTML page or entry within the project you create. A topic might have only a small amount of content, or it can be a large body of content that the user scrolls through. For instance, the file that you create in RoboHelp is a single topic.
A couple of seconds later see the first page of your new project!
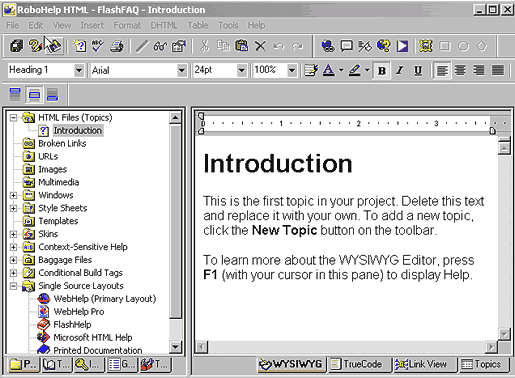
Figure 1. Introducing the RoboHelp interface.

Now that you have set up the project, you are ready to enter your content. RoboHelp Office includes a basic visual HTML editor that you can use to create topic pages. If you prefer to hand code HTML, click the TrueCode tab at the bottom of the screen.
For the purposes of this article, you will modify the content visually. Feel free to delete or modify any of the content on the Introduction page (seen in the previous image) as you see fit by selecting and deleting the text. For example, you might want to enter a generic “welcome to the site” message or include an overview of what the site is used for. Or, if you want to delete pages from the project, you can right-click the HTML page in the Project tab and select Delete from the context menu.
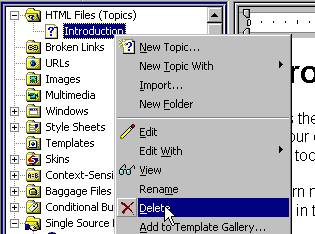
Figure 2. Deleting topics from the Project tab.
When you finish modifying or removing the Introduction page, you can add new HTML files (topics) or folders. Right-click HTML Files (Topics) in the Project tab and select either New Topic or New Folder from the context menu. If you select New Topic, the New Topic dialog box opens and you select a topic title, file name, and template for the current topic. Click the other tabs to select the style sheet, index keywords, “see also” keywords, and other options you want to associate with the template and topic. For now, follow these steps to add a new HTML file to the FlashFAQ project:
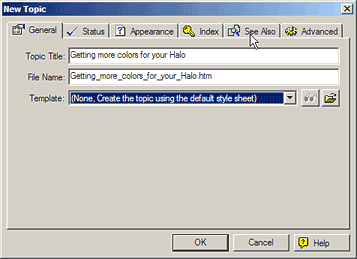
Figure 3. The New Topic dialog box
- Type Getting more colors for your Halo in the Topic Title text field to set the topic name.
- (Optional) Change the default file name to all lower case, limit the file name to a certain number of characters, or change the file extension.
- Leave the template pop-up menu set to None to use the default template.
- Click OK to add the page.
The new topic appears in the WYSIWYG editor with a heading based on the topic title you previously defined. Some default text is also added, which you can modify at your leisure.
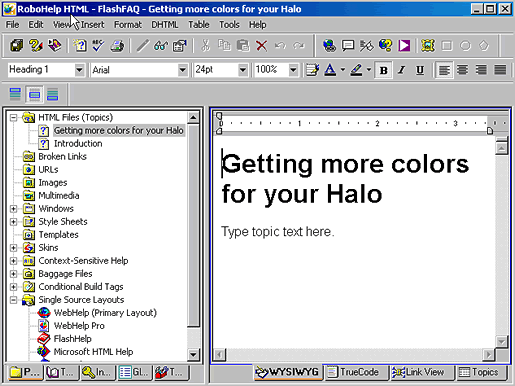
Figure 4. Editing the new topic in WYSIWYG (What You See Is What You Get) editor
After you finish making your changes to the template shown previously, you create a new topic using an external editor. Right-click in the HTML Files (Topics) area again, but this time select New Topic With. A pop-up menu appears with a list of currently installed HTML editors. You might see a list that has choices similar choices to those in the following list:
- RoboHelp WYSIWYG
- RoboHelp TrueCode
- Notepad
- Word 2003
- Dreamweaver MX 2004
- Homesite+
This list reflects what software is installed on your computer. Select your editor of choice from the list, and editor opens. Use the editor to modify the source code yourself. Save your work and return to RoboHelp HTML after you finish. For example, for the newly created topic above, enter the following information:
<p>Have you been working with Halo colors in the MX components?
Then you probably know how to change your Halo themes using the
following ActionScript </p>

  <ol>
 <li>myButton_btn.setStyle ("themeColor", "haloBlue" </li>
</ol>

  <p>However, did you know you could also add different colors instead
of the three halos? You can try entering a hex value instead of the
theme colors. You won't get the semi-transparent look doing this alone,
but despite the lack of transparency it still looks OK on some of
the components.</p>

 <ol>
 <li>myButton_btn.setStyle ("themeColor", 0xFF0000);</li>
 </ol>
If you double-click the modified file with your external editor, RoboHelp displays a dialog box saying that the file associates with a third-party editor, and to close the file before proceeding. Click OK to display the contents of the file in your HTML editor (or in my case Notepad). If you want to edit the file in a specific editor installed on your machine, right-click the file, select Edit With, and choose an editor from the context menu. RoboHelp might display a couple of confirmation dialog boxes before the file opens in your HTML editor. Click OK at each prompt to proceed with editing the file.
Instead of manually creating and entering more pages into the system, you will try importing some existing content into the project. Download the sample files for this article from the beginning of this article, and uncompress the ZIP file. After you unzip the files, return to RoboHelp and follow these steps:
- Right-click the HTML Files folder in the Project tab and select Import. The Import File dialog box appears. You select the file(s) that you want to import into your project.
- Locate the directory where you unzipped the files previously, and select each of the HTML files you want to import. Click and drag the mouse to select multiple files, or press Shift or Control while you select files.
- Click Open to select the files you want to add to your project.
RoboHelp displays a Results dialog box that tells you if you successfully added the files to your project. At this point, the files have been imported to the root folder of the project and are now called topics. Now, if you want, you can create additional folders and/or move topics into the appropriate folders. This helps to organize your project, so it’s easier to find and manage the content that you add.
Create two new folders inside the FlashFAQ project. Right-click the HTML Files (Topics) tree in the Project tab, and choose New Folder from the context menu. Rename the two new folders XML and Components, which describes the help content you will add.
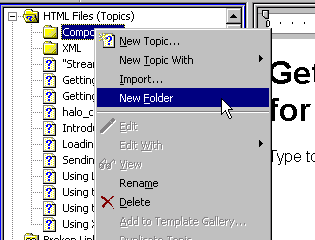
Figure 5. Adding a new folder is accomplished the same way as adding a new topic.
Now that you have imported content for use in the project, you will learn how to edit the documents with RoboHelp.
Comments