
Creating a Masked Video in Adobe Premiere
Creating a Masked Video in Adobe Premiere
Adobe Premiere has been around for well over a decade. In many respects, it has become entrenched as a video editing standard in the PC world. Prior to the introduction of Apple Final Cut Pro on the Macintosh side, Premiere was the de facto cross-platform editor. As Final Cut Pro caught on, however, Adobe gave up on the Mac OS version and made Premiere into a Windows-only application.
Creating a talking-head video in Premiere is rather simple:
-
Open Premiere and select New Project on the splash screen (see Figure 5). Projects are wonderful documents because they keep your work and any effects you may have applied to the project intact. This is very handy when clients start asking you to make changes later on.

Figure 5. Everything you do to a video in Premiere is retained in a project file
-
When the New Project dialog box opens, click the Custom Settings tab and set the following values in the General section of the dialog box (see Figure 6):

- Editing Mode: Video for Windows
- Timebase: 25.00 frames/second
- Frame Size: 320 horizontal and 240 vertical (4:3)
- Pixel Aspect Ratio: Square Pixels (1.0)
-
Sample Rate: 44100 Hz
- When the Premiere workspace opens, select File > Import and import the CMXGS.mov file into your project. When the file appears in the Project panel, select it and click the Play button to preview the video.
-
Drag the video from the Project panel to the Video 1 layer in the Timeline. Notice that the video is now composed of an audio and a video layer and that the Monitor window opens (see Figure 7).
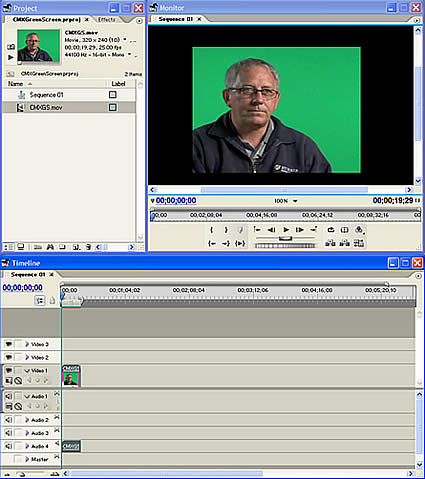
Figure 7. Everything you need to work on in the Premiere workspace
Take a close look at the green background in the Monitor window. Notice that it’s not really solid green; there are color gradations here and there in the background. The time you take to study the background is time well spent because it determines which keying effect to use. The standard Green Screen Key filter won’t be able to “get” the various shades of the green in this particular background.
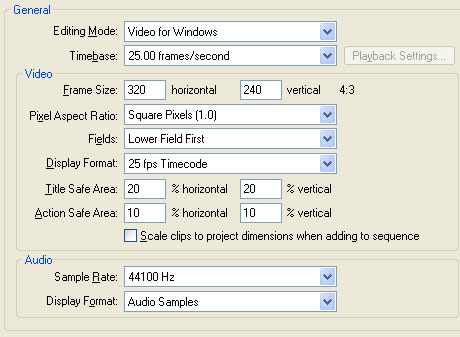
Figure 6. Project’s preset format, location, and name in the New Project dialog box
In the Location field, target the folder to hold the project and all files used in the project. Finally, give the project a name. When you are finished, click OK.
Feel free to use the folder containing the files for this tutorial as your project folder. Regardless of what you do, don’t change the folder’s name or location after you create the project. Because Premiere stores a lot of the files associated with a project in this folder, changing the name or the folder’s location will break all of the links to the files used in the project. If you must ever change a project folder’s location, select Edit > Preferences > Scratch Disks and make the location change in that dialog box.
The direction you take next depends on what version of Adobe Premiere you have: the stand-alone retail (or “tryout”) version or the one that comes bundled with the Adobe Video Collection. The latter version shares a couple of extra filters with Adobe After Effects—one of which is the Color Key filter I like to use. Although the stand-alone version does not contain this filter, you can accomplish most keying with the Chroma Key filter, which comes with Premiere by default.
Keying with the Chroma Key Filter
Follow these steps to key out the green color using the default Chroma Key filter:
- To start the process of keying out the green background, select Window > Effects to open the Effects panel. As you can see, there are a lot of effects that come with Premiere.
-
Navigate to Video Effects > Keying > Chroma Key in the Effects panel (see Figure 8). Drag the Chroma Key plug-in from the Effects panel to the thumbnail in the Video 1 channel.
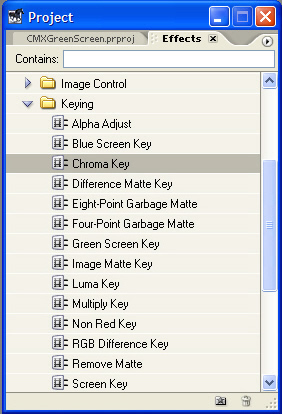
Figure 8. Choosing the Chroma Key plug-in for keying video
-
To adjust the Chroma Key plug-in settings, select Window > Effect Controls. Changes you make are reflected in the image in the Monitor window. The Effect Controls dialog box contains three settings that you can adjust (see Figure 9):
- Color: You can choose which color to remove by selecting it from the Color Picker or using the eyedropper to sample the color for removal.
- Similarity: Similar to the Magic Wand tool in Fireworks 8 or Photoshop CS2, the Similarity value determines how wide a range of the selected color to remove.
- Blend: This control blends the edges of the mask to smooth things out. If you’re thinking of this effect as feathering on the edges of the mask, you are on the right track. In the case of Premiere, you are blending the edges of the mask with an underlying image placed under the video. Although this is not necessary in this instance—because there is nothing behind the talking head—it is a good habit to develop.
-
Smoothing: This is the amount of anti-aliasing that is applied to the edge of the mask: None makes the edge look ragged, Low applies a subtle blend, and High (shown here) applies enough to ensure a smooth edge and any content placed behind the video.
- Drag the Eyedropper tool in the Color setting onto the green area of the clip in the Monitor window. As you drag the eyedropper, some of the green area turns black. This indicates the color to be masked. Release the mouse to sample the color.
- Drag the Similarity slider to the right. As the green disappears, the background turns black behind the talking head. Pay particular attention to the hair and shoulders of the talking head. Try to remove as much green as possible. I found that a value of 54 turned out to be just about right.
- Drag the Blend slider to a value of about 16. This slider adds some feathering to smooth the edge.
-
To preview your efforts so far, click the Mask Only button at the bottom of the Effect Controls dialog box. This turns on the mask. What you are looking for is a solid black background and a solid white talking head (see Figure 10).
Tip: You don’t have to use the sliders to make these adjustments. You can also click the values—the blue numbers—in the percentage area and drag to change them. This is a neat trick but I would suggest using the sliders until you are more comfortable with the interface. You can also double-click the values and enter them manually.
Play around with these values until the apperance looks best to you.
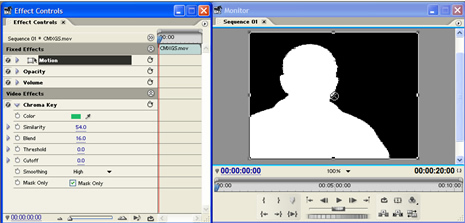
Figure 10. By selecting Mask Only in the Effect Controls, you get a good look at the mask you are creating
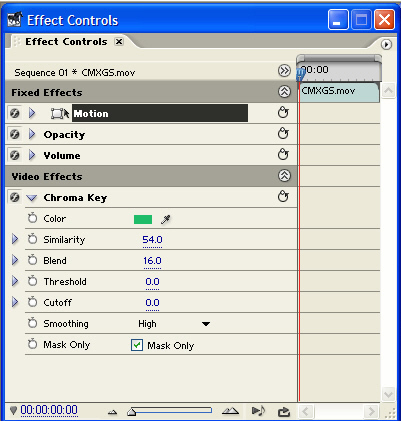
Figure 9. Adjusting the Chroma Key plug-in settings to control the masked area
Keying with the Color Key Filter
Follow these steps to key out the green color using the extra Color Key filter provided with the Adobe Video Collection:
- To start the process of keying out the green background, select Window > Effects to open the Effects panel. As you can see, there are a lot of effects that come with Premiere.
-
Navigate to Video Effects > Keying > Color Key in the Effects panel (see Figure 11). Drag the Color Key plug-in from the Effects panel to the thumbnail in the Video 1 channel.
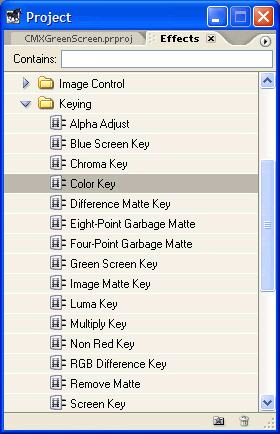
Figure 11. Choosing the Color Key plug-in for keying video
-
To adjust the Color Key plug-in settings, select Window > Effect Controls. Changes you make are reflected in the image in the Monitor window. The Effect Controls dialog box contains four settings that you can adjust (see Figure 12):
- Key Color: You can choose which color to remove by selecting it from the Color Picker or using the eyedropper to sample the color for removal.
- Color Tolerance: Similar to the Magic Wand tool in Fireworks 8 or Photoshop CS2, the Color Tolerance value determines how wide a range of the selected color to remove.
- Edge Thin: This control expands or contacts the mask.
-
Edge Feather: This does exactly what it says. The transition between the edge of the mask and the subject can be rather abrupt sometimes. This control adds a small amount of feathering to the edges of the mask to smooth things out.
- Drag the Eyedropper tool in the Key Color setting onto the green area of the clip in the Monitor window. As you drag the eyedropper, some of the green area turns black. This indicates the color to be masked. Release the mouse to sample the color.
- Drag the Color Tolerance slider to the right. As you drag the slider, the black area expands. Pay particular attention to the hair and shoulders of the talking head. Try to remove as much green as possible. I found that a value of 91 turned out to be just about right.
-
Drag the Edge Feather slider to a value of about 1.6 or 1.8. When you remove the green, you will also notice that the edges of the talking head become pixelated. This slider adds a bit of feather to smooth the edge.
Tip: You don’t have to use the sliders to make these adjustments. You can also click the values—the blue numbers—in the percentage area and drag to change them. This is a neat trick but I would suggest using the sliders until you are more comfortable with the interface. You can also double-click the values and enter them manually.
Play around with these values until the apperance looks best to you (see Figure 13).
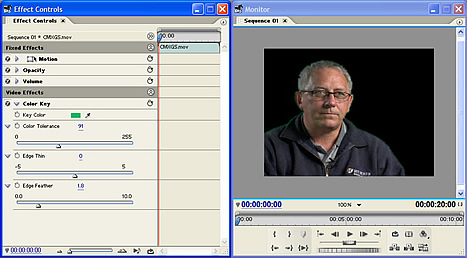
Figure 13. Experiment with the settings to obtain the best results
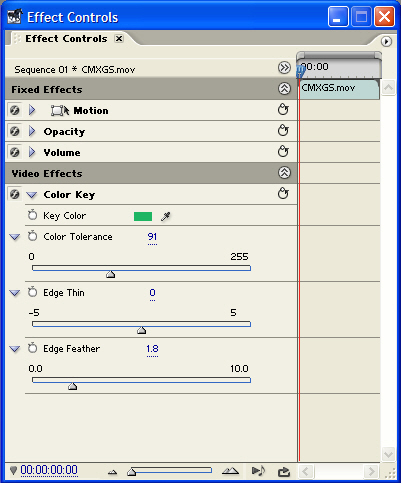
Figure 12. Adjusting the Color Key plug-in settings to control the masked area
The next section discusses exporting the movie with the alpha channel.
Comments