Creating a Custom Skin SWF
Creating a Custom Skin SWF
As you discovered previously, using the Select Skin dialog box and the skin SWF feature is quick and easy. In this section, you will take a tour of the process of creating a custom skin SWF file.
Creating a custom skin SWF will save you a lot of time by combining predesigned custom controls, ActionScript code for extended functionality, and the use of the Select Skins dialog box for applying the skin. In addition, a skin SWF is designed to be scalable using the new Flash 8 movie clip scaling features. See the Flash Help documentation for more details (Using Flash > About 9-Slice Scaling and Movie Clip Symbols).
Getting Started
The easiest way to create a new skin SWF file is to copy an existing one and modify it. Start by creating a copy of one of the prebuilt skin SWF files that comes with Flash Professional 8. The FLA files for the default set of skins are located in the Flash 8 application folder in the <LANGUAGE>ConfigurationSkinFLA folder on your hard drive.
The following steps will get you started:
- Assuming that you have Flash Professional 8 installed, go to the Flash 8 application folder and open the <LANGUAGE>ConfigurationSkinFLA folder.
-
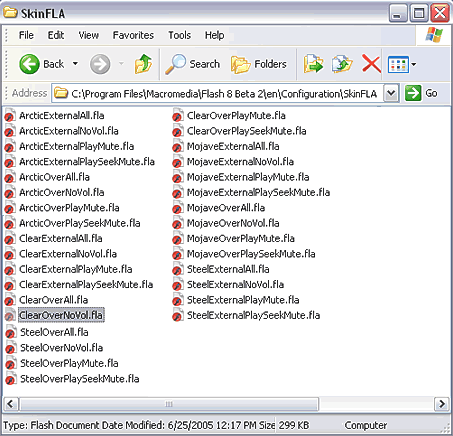
You should be looking at FLA files for each of the prebuilt skin SWF files (see Figure 6). Choose a skin that comes close to what you have in mind and open the skin FLA file in Flash.

Figure 6. This is the view of the SkinFLA folder as seen in Windows XP.
- Save the FLA file in the <LANGUAGE>ConfigurationSkinFLA folder with a new name. Note that you don’t have to save the FLA file in this location. The SWF file produced from this FLA will be placed in the Configuration folder. You can save the FLA anywhere you like on your hard drive.
- Take a few moments to explore the FLA file. Remember that your goal is to keep the supplied instance names and file structure the same.
- Notice right away that all the control graphics are spread out across the Stage. Click the various graphics and view the selected items. The collections of graphics that create each control are grouped in a movie clip. You can edit the graphics in the movie clips as desired, but the movie clip nesting structure and instance names need to remain the same.
That’s it. Your new skin SWF file is ready for customization.
Making Graphic Modifications to the Skin SWF File
Now that you’ve created your own version of an existing skin SWF file, the fastest way to modify it is to edit the graphics that appear in the movie clips on the Stage. Take some time to experiment and make graphic changes.
The skin SWF file uses a new Flash 8 scaling feature called Scale 9. Scale 9 places a grid of guides over a movie clip in the library. The scale guides divide the graphics into nine sections which enable Flash to scale them from instance to instance without distortion. To check it out, open the Chromes folder in the library and double-click its symbol to enter its Timeline. Notice the guides overlaying the rectangular chrome graphic. They are viewable when editing a movie clip or button in the library editing mode. The effects of the Scale 9 feature can be seen only at runtime in the SWF file. Try to scale a few instances on the main Timeline and then export the movie (Control > Test Movie) to see the results.
Simple modifications that change the look of buttons or the chrome (or background) for the buttons without changing the movie clip dimensions will work without further modifications. Simple modifications in the location of the controls will work as well in most cases.
The following steps will get you started with exploring and editing the file:
-
Open the skin SWF FLA that you want to edit in Flash Professional 8.
Notice that the file consists of a number of layers with graphics on Frame 1 of the root Timeline. The layer at the top of the layer stack contains the layout_mc instance (the container for the assembled controls) and the ActionScript code, which initializes various properties in the layout_mc movie clip. You will not need to edit this code, but you may want to take a look and explore the comments and the default property settings.
-
To edit a graphic, you first have to enter the editing area (Timeline) for the movie clip that holds the graphic. Double-click a graphic on the Stage repeatedly until you reach the Timeline that contains the layers and editable images.
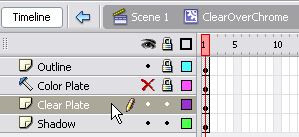
To edit the chrome background graphic, for example, which appears horizontally across the bottom of the screen, double-click it once to enter into the movie clip’s Timeline and editing area. Notice that the movie clip contains the editable graphics distributed across several layers (see Figure 7). The name of the movie clip changes from file to file but it always appears on the bottom layer of the root Timeline, and it contains the same layer structure internally.

Figure 7. This is the view of the chrome graphic’s movie clip Timeline as seen in a skin SWF file copied from the ClearOverNoVol.fla file.
- Unlock the Clear Plate layer and select the fill on the Stage. With the fill selected, change the color in the Fill Color swatch on the toolbar. Notice that the color in the layout_mc movie clip on the root Timeline updates automatically. You can experiment with changing the fill color, outline, and shadow.
- When you’re finished, click the Scene 1 button (Control E) on the edit bar to return to the main Timeline.
- The process is the same for any graphic you want to modify. Double-click the graphic until you reach the editing area. Note that you may have to double-click more than once to get to the editing area. This is the case when buttons are nested two to three levels deep.
- Save your file and export your SWF file. Refer the next section to learn how to load the exported skin SWF file into the FLVPlayback component.
Tip: Modifications to the colors in the chrome graphic and background graphic can really go a long way towards changing the look of the video player without taking a lot of effort to produce.
Loading a Custom Skin Manually
To load a custom skin SWF file into the FLVPlayback component, use the skin parameter and the Select Skin dialog box to browse for the SWF. While you can browse for a SWF file from any location, you’ll probably find it most convenient to place the file in the Flash Configuration folder so that it appears along with the default list of skins. This enables you to preview the skin SWF file among the other default files. It also automatically places a copy of the skin SWF file next to the FLVPlayback SWF file you’re developing.
To make a skin SWF file perpetually available in the Select Skin dialog box, save your custom skin SWF file into the <LANGUAGE>ConfigurationSkins folder in the Flash 8 application folder. Saving the SWF file in this location includes it in the Select Skin dialog box. Your custom skin will now be available to you every time you use the Select Skin dialog box.
To load the skin SWF into an FLVPlayback component:
- Create a FLA file in Flash Professional 8 and drag an instance of the FLVPlayback component from the Components panel to the Stage.
- Save the file.
- Select the FLVPlayback instance and open the Component inspector from the Window menu (File > Window > Component Inspector).
- Click the
skinparameter once to select it and then again to open the Select Skin dialog box. - Scroll down the list of options in the Skin pop-up menu and look for the name under which you saved your skin. You can work with it as you would with the default skins from here on out.
To load a skin SWF file that does not appear in the Select Skin dialog box by default, you can use the Custom Skin URL option. This may be useful if you’re browsing for SWF files located on your company’s server or saving files to your desktop for convenience:
- Open the Select Skin dialog box again from the FLVPlayback parameters.
-
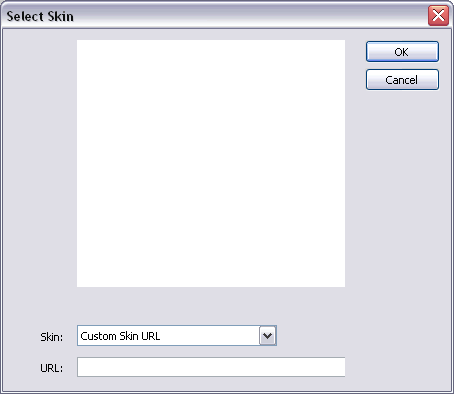
Scroll down to the last option in the Skin pop-up menu: Custom Skin URL (see Figure 8).

Figure 8. This is a view of the Select Skin dialog box updates with the URL text box, which accepts a path to the custom SWF file.
- Enter the path in the URL text box and click OK. The path should be the skin SWF filename, including the .swf extension.
That’s it! You should see the SWF file appear in the Live Preview for the component and in the movie when exported.
Loading a Custom Skin with ActionScript
You can bypass the Component inspector parameters altogether and assign a skin SWF file to the component using ActionScript. This is particularly useful in a dynamic application that initializes during runtime.
To assign a skin SWF file to the component using ActionScript:
- Create a FLA file in Flash Professional 8 and drag an instance of the FLVPlayback component to the Stage from the Components panel.
- Save the file and export the SWF file.
- Create a copy of the skin SWF file you want to use and place it next to the file you just saved.
- Back in the FLA file containing the video component, select the FLVPlayback instance and name its instance (flvPlayback, for example).
- Add a new layer to the Timeline and name it actions. Select the actions layer and open the Actions panel to add a bit of code.
-
Write the following code, replacing flvPlayback with the instance name you’re using and the path with the correct name of the skin SWF file you’re trying to load. The path to the SWF file can be a relative or absolute URL:
// Assign a new skin to my FLVPlayback instance
using ActionScript flvPlayback.skin = "myCustomSkin.swf"; - Export the SWF file to view the update. Note that ActionScript settings cannot be seen until runtime in the SWF file.
Anatomy of a Skin SWF
For those of you who are interested in building your skin SWF files from scratch, you should learn the anatomy of the expected layout for the file. The following section in the Flash Help documentation outlines some key points about the file structure:
Component Language Reference > FLVPlayback Component > Customizing the FLVPlayback Component > Skin Custom FLVPlayback UI Components Individually


Comments