
Creating a Custom Controller
Creating a Custom Controller
Creating skins is easy, but it can be time-consuming. Before you can start assembling the assets it is important that you have all your graphics and symbols organized and placed in the Library panel. Creating a custom controller is a two-step process. The first step involves opening Flash and dragging several movie clip symbols from the Library panel onto the Stage, and then giving them instance names. The second step involves writing a single ActionScript function that defines where you position the assets within the custom skin.
- Open the file farmSkin_large.fla, located in the farmsite/skins directory. The Flash document has two layers: actions and default. The actions layer is locked; you will add ActionScript to it in an upcoming step.
- Select Window > Library to open the Library panel. Inside this document are pre-made graphics that you use to create a custom skin. You can use these graphics, modify them, or replace them with your own custom graphics. To change what each symbol looks like, double-click the symbol in the Library panel and replace or modify the graphics inside.
- Double-click the Frame folder in the Library panel to open it. You see eight movie clip symbols in the folder that make up the background.
-
Select the default layer in the Timeline, and drag one instance of all eight symbols onto the Stage. Organize the symbols in an orderly fashion when you add them to the Stage (see Figure 5 for reference).
Then give the instances the following instance names:
- The top-left symbol requires the instance name nw_mc
- The top-center symbol requires the instance name n_mc
- The top-right symbol requires the instance name ne_mc
- The side-left symbol requires the instance name w_mc
- The side-right symbol requires the instance name e_mc
- The bottom-left symbol requires the instance name sw_mc
- The bottom-center symbol requires the instance name s_mc
- The bottom-right symbol requires the instance name se_mc
-
Select all eight movie clip instances with the Selection tool, and press the F8 key to nest them inside a movie clip. Type the symbol name frame-set into the Name text box and make sure you set the symbol’s behavior to Movie Clip. Click OK to convert the instances into a movie clip. Select the new movie clip, and type the instance name cover_mc into the Property inspector.
- Drag a copy of the buffering animation movie clip symbol from the Library panel onto the Stage. Select the instance and type the instance name buffering_mc into the Property inspector.
-
Open the Play Button > states folder in the Library panel and drag the four movie clip symbols from the states subfolder onto the Stage. Select the play-disabled symbol and type the instance name disabled_mc into the Property inspector. Give the play-up, play-down and play-over symbols the instance names up_mc, down_mc, and over_mc respectively.
Using Figure 2 as a guide, select these four symbols on the main Stage, and press F8 to convert them to a movie clip symbol. In the Convert to Symbol window, type the symbol name play-set and set the behavior to Movie Clip. Click OK when you finish. Select the new instance on the Stage and type the instance name play_mc into the Property inspector.
- Repeat step 7 for the symbols in the Pause Button and Stop Button folders. Use the symbol names pause-set and stop-set. The new instances have the instance names pause_mc and stop_mc.
-
Open the Mute Button > off states folder in the Library panel. Drag instances of the sound off-up, sound off-over, and sound off-down symbols onto the Stage. Give the three symbols instance names of up_mc, over_mc, and down_mc, respectively (see Figure 2).
Select all three instances on the Stage, and press F8 to nest them inside a movie clip. In the Convert to Symbol dialog box, name the new movie clip soundOff-set. Select the new instance on the Stage, and type an instance name of off_mc into the Property inspector.
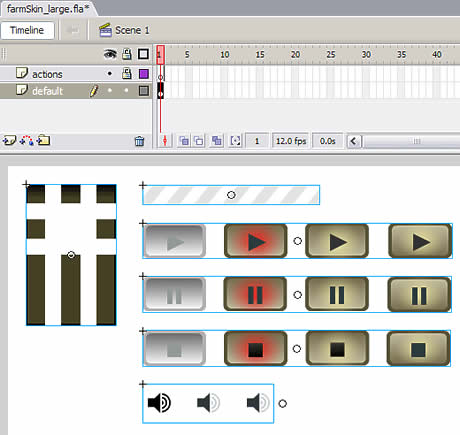
Figure 2. Place symbols in groupings on the Stage
- Open the Mute Button/on states folder and repeat step 9 for the symbols inside the on states folder.
-
Select both the
off_mcinstance (that you created in step 9) and the on_mc instance (created in step 10) on the Stage, and convert them to a movie clip with the symbol name mute-set. Select the new instance on the Stage, and type the instance name volumeMute_mc into the Property inspector. (See Figure 3.) -
Open the Seek Bar folder in the Library panel, and drag instances of seekbar-left, seekbar-middle, and seekbar-right symbols onto the Stage. Select each instance and name the instances left_mc, middle_mc, and right_mc. (These instances will be put together with other elements in step 14.)
-
Open the Volume Slider > thumb states folder in the Library panel and drag an instance of each movie clip symbol onto the Stage, next to the three seek bar instances (see Figure 3).
Figure 3. More symbols appear in groupings on the Stage.
Provide the following instance names: the slider-up symbol use up_mc, for the slider-over symbol use over_mc, and for the slider-down symbol use down_mc. Select all three instances and nest them inside a new movie clip with the symbol name handle-set. Select the new movie clip instance, and type the instance name handle_mc into the Property inspector. Figure 3 shows one clip that includes all of the instances on the Stage.
-
Select the seekbar instances from step 12 and the slider instances from step 13 and convert them all into a movie clip with a symbol name of seekbar-set. Select the new movie clip and give it the instance name seekBar_mc (see Figure 4).
Figure 4. Lay out the seekbar instances on the Stage.
-
Open the Volume Slider folder and drag an instance of the volume track symbol onto the Stage. Select the instance and type the instance name bar_mc into the Property inspector. Drag an instance of the handle-set movie clip onto the Stage and give it the instance name handle_mc.
Select bar_mc and handle_mc and press F8 to nest them inside a new movie clip symbol. Enter the symbol name volumeSlider-set and click OK. Select the new instance on the Stage, and type the instance name volumeBar_mc into the Property inspector.
-
Select frame 1 of the actions layer and open the Actions panel (Window > Actions). Copy and paste the following code into the Script pane:
function getSkinInfo():Object {
     var res:Object = new Object();
     res.video = {x:10, y:10, w:-20, h:-47};
     res.mode = "disable";
     res.playBtn = {x:10, y:-30};
     res.pauseBtn = {x:50, y:-30};
     res.stopBtn = {x:90, y:-30};
     res.seekBar = {x:135, y:-33, w:-229};
     res.buffering = {x:136, y:-27, w:-231};
     res.volumeMute = {x:-88, y:-31};
     res.volumeBar = {x:-66, y:-33, l:51, type:"horizontal"};
     res.autoHide = false;
     res.bgColor = 0xFFFFFF;
     res.uiMode = "stretch";
     return res;
 }
Tip: If you encounter problems when you paste this code, try deleting and replacing the quotation marks in the Actions panel.
The negative values you specify for
x, y, w, h,orlindicate that the value should be the size of the SWF file, minus the value you specify. For example, thevideoproperty in theresobject contains an object with the following properties:x:10, y:10, w:-20,andh:-47. These properties position the video object at an x and y coordinate of 10 pixels. The width of the video object is 20 pixels less than the size of the skin file. Because the x coordinate of the video is set to 10, it centers the video inside the skin. The final property is h (height). The height of the video object is set to-47, which is 47 pixels less than the height of the size of the skin file. Because the y coordinate is set to 10 pixels, this leaves a 37-pixel-wide gap below the video object where the other buttons are displayed.The previous code snippet controls how each of the assets are positioned on the video controller. This particular skin will be used for the playback of the FLV files with larger dimensions (320 x 240 pixels) in the template website. The smaller videos need a special skin, because the smaller dimensions (160 x 120 pixels) mean some of the assets in this skin would overlap if you use it.
-
Save the changes you made to the document, and publish the file (File > Publish). Flash creates a SWF file that you need to copy to the Farm site in an upcoming exercise.
Note: For a complete version of this file, refer to the file farmSkin_large.fla inside the finished folder, which is part of the supplied source files.
At this point your Stage should look similar to Figure 1.
Figure 1. Give the instances these instance names.

Comments