Create Spikey Text
1. Select the text tool and write any text you like. I wrote “TUTORIAL” for this tutorial.
2. Create a new layer (SHIFT+CTRL+N) then CTRL + CLICK on the text layer in the layers panel and goto Select -> Modify -> Expand and expand it by “5” pixels. Now simply fill it in by holding CTRL + BACKSPACE.

3. Create a new layer and then CTRL + CLICK on “Layer 1” and goto Select -> Modify -> Expand for 8 pixels. Fill it in like in step 2 with a different colour this time. The second layer should overlap the first layer, to fix this problem click and hold on Layer 1 in the layers panel and move it above Layer 2.

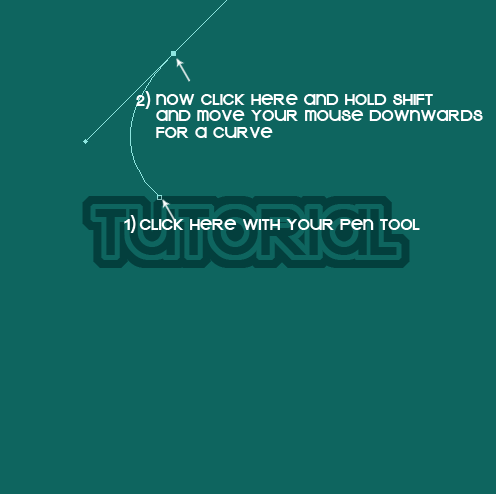
4. Here comes the hard, but fun part 🙂 First create a new layer and then select the pen tool and follow these steps below.


Once you have completed the curve, right click the inside of the curve (while having the pen tool selected) and goto “Make Selection” and enter 0 for the Feathering Radius. Now fill in the selected area with a colour and you’ll have a perfect clean edge.
This is an additional step, CTRL + CLICK on the layer you just created and goto Select -> Modify -> Expand and choose 2 pixels. Now create a new layer and fill that in and change the opacity to 20%

5. Now repeat the step a couple of times all around the image and you’ll have a great result 🙂


Comments