
Create a Version Cue project
Create a Version Cue project
There are several ways to create a Version Cue project, so we cover two of them in this tutorial. First, we show how to create a project in the Adobe Bridge, and then we create a project from inside GoLive CS2. (You can also create a project from Photoshop, Illustrator, InDesign, or in the Advanced Administration area of Version Cue.)
Create a project in Adobe Bridge
A very simple way to create a Version Cue project is to open the Adobe Bridge application and choose Tools > Version Cue > New Project. The New Project dialog box will open with fields in which you can type the project name and info. If you plan to work with others on the project, enable the checkmark next to Share This Project With Others. When you are finished, click OK.
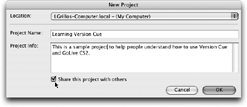
When you create a new project from Adobe Bridge, use a descriptive name. It’s a good practice to put a bit of info about the project in the Project Info box as well.
Once the project has been created, you can click on Version Cue in the Favorites tab of Bridge to see it. Hovering your mouse over the project’s icon will bring up a Tool Tip showing the metadata for the project, including the project info you entered when you created the project.


You can access Version Cue projects and any data about them via Adobe Bridge.
Now that you have a project, you can take an existing GoLive site, convert it to a Version Cue site, and save it into that or any other existing Version Cue project. However, it is not necessary to have a Version Cue project prior to converting a GoLive site into a Version Cue site. In the next part of this tutorial, you’ll learn how to create a new Version Cue project directly from within GoLive.
Create a project in GoLive
You can create a new Version Cue-enabled site or take an existing site and convert it into a Version Cue site directly from within GoLive. To convert an existing site, follow these steps:
Note: To create a new Version Cue-enabled site, create a new site in GoLive and when you get to the Version Cue screen, do following procedure.
-
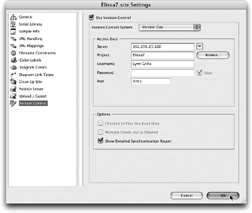
Open the site and then choose Site > Settings from the menu.
-
Select Version Control at the bottom of the list on the left.
-
Enable Use Version Control at the top of the Settings dialog box.
To convert an existing site into a Version Cue site, turn on Version Control in the Site Settings.
-
Choose Version Cue from the Version Control System popup list.
GoLive will automatically fill out the information for Server, Project Username, and Port. If the server IP address is not correct, click the down arrow to the right of the input field to choose the name of the computer on which Version Cue is installed from the list or type in the IP address. You can find the IP address in the login screen of the Advanced Administration page (see “Log into the Advanced Administration area” above). Check to make sure your username is correct and if it is not correct it before continuing.
-
Rename the project if you’d like or click Browse to select a different project to save the site into.
-
Click the options to Show Detailed Synchronization Report and then click OK.
If you are placing the site into an existing project, the synchronization screen will come up next. If you are creating a new project, you’ll first get a dialog box saying that the project does not exist and asking if you’d like to create it. Choose Yes, and then the synchronization screen will appear.
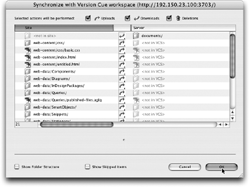
To convert an existing site into a Version Cue site, turn on Version Control in the Site Settings. You can see all of the files that will be uploaded to the Version Cue server and make any changes you deem necessary.
-
To finish the process, click OK. The files will be uploaded to the project, and a report will be displayed.
Note: When converting older GoLive sites into Version Cue sites, you may get an alert saying that the site must be converted to the new site structure. Do so by dismissing the dialog box, and then with the site opened, choose Site > Convert Site To New Structure before proceeding with the steps outlined here.
Comments