
Color Replacement in Photoshop CS
The Color Replacement tool is one of those new tools that doesn’t receive a whole lot of attention in the vast array of new features introduced in Adobe Photoshop CS. It is, nevertheless, a handy little gizmo, one that consolidates several functions found in previous versions of Photoshop and allows you to perform color replacement tasks on your image in a single step. This week we’ll take a look at the tool, its options and some techniques for making it work for your particular colorization project.
Photoshop’s Color Replacement tool is, in some ways, a spinoff of the Healing Brush introduced in version 7. This in the sense that, though it works much the same as a regular paint brush, it does not overwrite all of the data on your image; rather, it manipulates the color on your image while retaining the detail–or underlying texture–of the image. Because it functions as a brush, it can be applied with more precision that other color replacement functions in Photoshop; and because it performs image analysis on the fly, it saves you the step of extracting a mask from your image before applying color changes.
For our example today, we’re going to work on an image that will require some finesse. Our subject, in this case, is a horse over a background that doesn’t afford a whole lot of contrast in some areas, which can make things difficult around the edges. We’re going to take that horse and color it purple, while leaving the background intact.
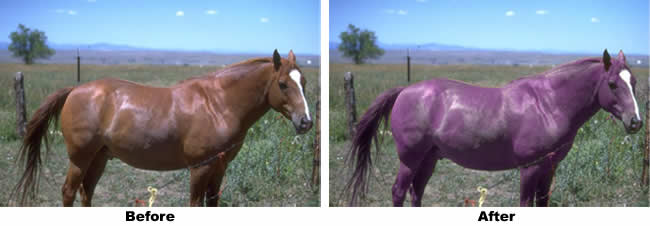
Why are we going to turn a horse purple? Well, let’s pretend that’s what the client wants, and, of course, the client’s never wrong. (Also, the only examples of this tool I’ve previously seen have been applied to pretty simple objects, and I wanted to show it off on a more complex subject.)
But first, a little introduction….

Options for the Replace Color tool
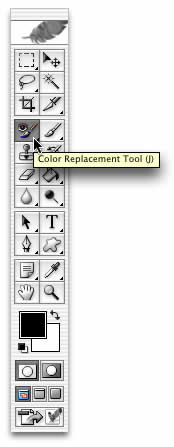
Before we begin on our project, we’ll do an overview of the options available for this tool. So select the Replace Color tool in the Tools palette. (It’s located beneath the Healing Brush.)
You’ll notice immediately that several choices appear in the top Options bar. Among these are Mode, Sampling, Limits, Tolerance and Antialiasing, along with brush-specific options.

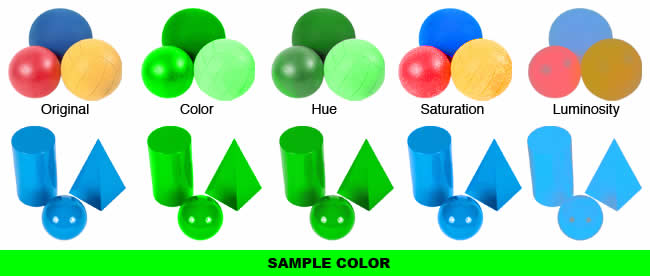
The various Modes define the ways in which the Replace Color tool can be applied. “Color” applies the currently selected foreground color to your image, replacing hue and saturation, while retaining luminosity; “Hue” retains saturation and luminosity but realigns the angle of the image’s hue to that of the foreground color; “Saturation” simply adjusts the saturation of the image to that of the foreground color; and “Luminosity” equalizes the brightness of the image to that of the foreground color while retaining hue and saturation, so it causes the image to lose most of its detail.
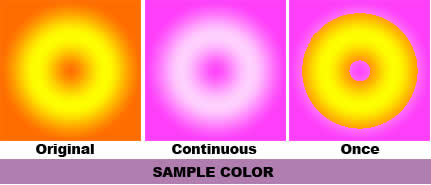
Sampling, on the other hand, simply determines the source for the Replace Color brush. “Continuous” takes a sample as you go, affecting colors and tolerated colors directly beneath the tool’s crosshairs. So it’s continuously sampling. “Once” samples only the color sampled when you click on the image and then only affects that color (and tolerated colors) as you continue your stroke. “Background Swatch” uses the background swatch as a pre-defined sample color. Below you’ll see examples of the “Continuous” and “Once” sample methods. “Continuous” replaces the colors of the entire image because I moved my brush over the entire image. “Once” replaces only the orange colors because I happened to begin the stroke on an orange portion of the layer.
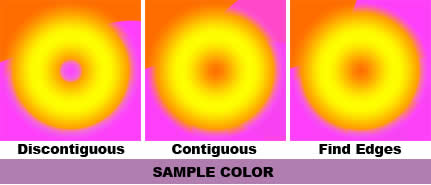
Limits define where the color will be applied in relation to the sampled color within the area of your brush. So let’s say you have a 150-pixel brush, and you’re going to apply it to the gradients seen above. “Discontiguous” will affect all of the areas within your image and within the range of your brush that fall into the sampled color’s range. “Contiguous” will only affect sampled colors that are in direct contact with the portion of your image beneath the tool’s crosshairs. So with the “Contiguous” limit, as you see in the image below, areas that are bounded off by non-tolerated colors will not be affected. The “Find Edges” mode works much like the “Contiguous” mode but also attempts to preserve details at the edges of the sampled section (A fact that may not be readily apparent).
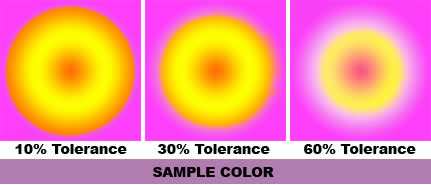
The Tolerance setting behaves just as it does with tools from previous Photoshop releases, such as Paint Bucket and Magic Wand.
And, of course, antialiasing can make your edges softer, though also less precise. If you’re using the “Find Edges” Limit, antialiasing helps. Otherwise it tends to get in the way, especially when you’re using “Continuous” sampling.
There are some other options related specifically to the brush itself, which we’ll get to in the next section.
Comments