
Capture a 3D PDF file from your
Capture a 3D PDF file from your CAD application
From the experts at Adobe
Adobe

® Acrobat® 3D allows engineering and technical professionals to publish and share 3D design information from major CAD applications with virtually any computer user. This tutorial demonstrates the method of capturing 3D data directly from within your CAD application using the Print Screen key, and Acrobat 3D.
Link your CAD application to Acrobat 3D
Before you can capture 3D data directly into Acrobat
3D from your CAD application, you need to complete a one-time setup that links the two applications.
1 Start the CAD application, and then start Acrobat
3D.
2 Click Create PDF on the toolbar in Acrobat 3D, and choose From 3D Capture.
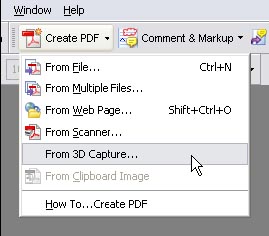
Choose Create PDF > From 3D Capture to link the CAD application to Acrobat 3D.
3 Click OK in the dialog box that appears.
4 Restart both applications.
Capture data from the CAD application
Acrobat 3D can convert CAD files that are already saved, but pressing the Print Screen button within the CAD application allows you to directly embed 3D designs into Adobe PDF files without interrupting your workflow.
1 Start Acrobat 3D.
2 Load any 3D assembly or part file into the CAD application, and remove any elements you don’t want to capture.
3 Press the Print Screen button.
4 In Acrobat 3D, view the 3D design data, which is inserted into a new PDF document.
5 Save the file to your desktop as Capture1.pdf.
Combine models in one PDF document
Instead of sharing multiple files through different e-mails, Acrobat 3D allows you to combine as many models as you like in a single PDF document, by combining captures from the CAD application.
1 Repeat steps 1 through 4 in “Capture data from the CAD application,” using a different assembly or part file. Then save the file to your desktop as Capture2.pdf.
2 Open Capture1.pdf in Acrobat 3D.
3 Choose Document > Insert Pages.
4 In the Select File To Insert dialog box, select Capture2.pdf, and click Select.
You can also select an existing, compatible CAD file to have Acrobat 3D convert the file and insert it in the PDF document.
For more design resources for web, print, digital imaging, and digital video, visit Adobe Design Center at www.adobe.com/designcenter.
Adobe, the Adobe logo, and Acrobat are either registered trademarks or trademarks of Adobe Systems Incorporated in the United States and/or other countries.
© 2006 Adobe Systems Incorporated. All rights reserved.
5 In the Insert Pages dialox box, choose After from the Location menu, click Last in the Page area, and then click OK. Your PDF document now contains both the first and second CAD model captures.
6 Choose File > Save to save the PDF document.
Control and collaborate with Acrobat 3D
Please refer to the tutorial “Get started with intelligent 3D Adobe PDF documents” to learn more about adding security and sending your PDF document for review, feedback, and approval.
Go further with Acrobat 3D
After you capture 3D data in Acrobat 3D, you can explore and manipulate it, and share the document for review and commenting with team members.
Use the Rotate tool , Pan tool , and Zoom tool to explore the model in the PDF document.
Use the Distance tool to interrogate the model in all three dimensions, and create measurements in the PDF document.
Create separate views by moving the model and clicking the New View button in the Model Tree panel, or by clicking the Views button on the toolbar and choosing Manage Views.
Use the Acrobat 3D commenting tools to add comments to the pages of the Capture1.pdf file you created in this tutorial.
• • • •
Comments