
Building a Play All Menu in Adobe Encore DVD
Article Focus:
One of the most frequently asked questions about Adobe Encore DVD is how to create a menu that allows you to play multiple videos either in a series or individually. It’s a simple process, and this tutorial will explain how to set it up.
| Download project menu file | Download project source video files |
A common feature on commercially produced DVDs is a menu that allows you to play a series of videos in a row, or to play only one of them and return to the menu when it is finished. Total Training uses this setup for their DVDs and it is also often used on movie discs for outtakes and deleted scenes. This “Play All” versus “Play One” setup is easy to do in Adobe Encore DVD, although it helps to be familiar with the override function. This tutorial explains how to build a simple “Play All” menu, and we’ll discuss the override function along the way.
|
Ready, Set, Go!
|
- Open Adobe Encore and start a new NTSC project.
- Start by importing the menu file. Choose File > Import as Menu… Choose the cow_menu.psd file included in the Project_Menu.zip download.
- Next import the video assets. Choose File > Import as Asset… Navigate to the Source_Files folder included with the source video files download and import the three MPEG files: 1cow.m2v, 2cows.m2v, and 3cows.m2v.
- Create timelines for each of the video files. Hold down the shift key and select all three of the .m2v files. Then click the Create a new Timeline button at the bottom of the project window. Three new timelines will be created. Close the Monitor and Timeline windows, as we won’t need them.
Creating new timelines from the video using the button in the project window.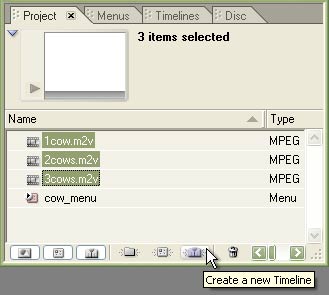
- Setting the button links is the next step, starting with the buttons for the individual chapters. Choose the Selection Tool (keyboard shortcut: V), and click on the One Cow button in the menu. In the Properties palette, drag the pickwhip for the Link field over to the 1cow timeline icon in the Project window (or open the popup menu for the link field and choose 1cow > Chapter 1). Then click on the Two Cows button and link it to the 2cows timeline, and link Three Cows to the 3cows timeline. Last, link the Play All button to the 1cow timeline, since that will be the first timeline in our sequence.
Using the pickwhip to set the link. (Click image for a larger view)
- The end actions for each of the timelines also need to be set. In order for the “Play All” function to work, timeline 1’s end action needs to activate timeline 2, and timeline 2 needs to activate timeline 3. Click on the 1cow timeline icon in the Project window, go to the Properties palette and set the End Action field to the 2cows timeline. Then click on the 2cows timeline icon and set its end action to the 3cows timeline. Since there are no more timelines after the third one, click on the 3cows timeline and set it’s end action to the cow_menu. We’ll have it return there when it’s finished playing.
Setting the End Action by using the popup menu.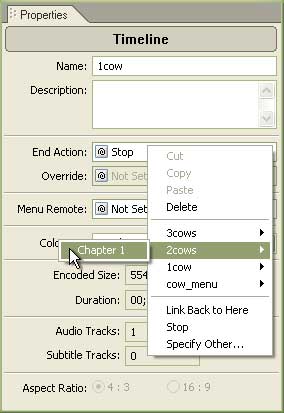

Let’s see how this looks. Choose File > Preview. Click on the Play All button. All three timelines should play in a row, and then return to the menu. Now click on the One Cow button… it also plays all three timelines before returning to the menu! It is supposed to play just the first timeline, so what went wrong? Nothing, actually. Encore is doing exactly what we told it to do. The end action for the first timeline is set to activate the second one when it finishes. It is does that regardless of which button we press to start it.
So how do we fix the problem so that we can keep our Play All function and have each timeline play by itself? Why, with overrides! Setting an override tells the DVD that when a button is pressed, go to the specified link, but when that timeline finishes playing, execute a different end action than what is set there. Overrides will allow us to keep the Play All function, but then also set the One Cow, Two Cow, and Three Cow buttons to return to the menu after the video finishes playing. - To set the overrides, first click on the One Cow button (close the Project Preview window if necessary). In the Properties palette, set the Override field to the cow_menu, either by dragging the pickwhip or choosing cow_menu > Default from the popup menu. Do the same thing for the Two Cow and Three Cow buttons. Choose File > Preview again, and now when the individual timelines are chosen, they return to the menu afterwards.
Setting the Override field with the pickwhip. (Click image for a larger view)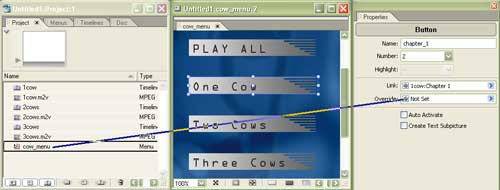
And that’s it. The Play All menu is done!
|
Summary
|
Setting up a menu with “Play All” and “Play One” buttons involves managing the end actions and override settings. In order for the Play All button to work, the end actions for the timelines should be set so that timeline 1 activates timeline 2, timeline 2 activates timeline 3, and so on. To make the buttons for the individual timelines work so that they return to the menu after the video finishes playing, set the override for the buttons to come back to the menu.
A question related to the “Play All” workflow that often comes up is “Can I have the DVD return to the menu when the timeline gets to a chapter point?” Unfortunately, no. Chapter points are no more than identification markers. You can go to a chapter point using a menu or the next/previous chapter buttons on the remote, but there’s no mechanism in Encore to tell the DVD how to stop or do something different when a chapter point is reached during playback. In order for the “Play All” scenario to work, each segment must be in a separate timeline.
Comments