
Building a Forum with Dreamweaver – Part 4: Building the Reply Form
Building the Reply Form
To build the reply form, follow these steps:
- Open the reply_message.php page in Dreamweaver. The page layout is already created.
- To allow only logged-in users to access this page, apply a Restrict Access to Page server behavior by selecting the Server Behaviors tab > Plus (+) > MX Kollection > User Login. Configure it as you did on the page for posting message in Part 3.
- Before building the form, you must create a filtered recordset that retrieves information about the message being replied to. The recordset is filtered by the message ID passed as a URL parameter from the view_message.php page. You will use this information to display the original message title and provide default values for the reply form.
-
To create the recordset, click the Plus (+) button of the Bindings Tab and select Recordset (Query). Configure the recordset as shown in Figure 3:
- Enter rsOldMessage for the recordset name.
- Set the database connection to connForum and select the
message_msgtable. -
In the Filter pop-up menu, select the table’s primary key:
id_msg. This must be equal to theid_msgURL parameter.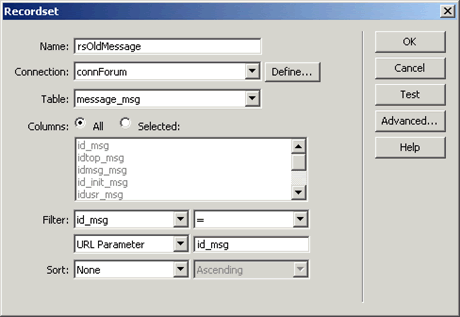
Figure 3. Defining the rsOldMessage recordset
- Click OK to create the recordset.
-
Remove the placeholder text from the main
<div>container (the one with the white background) and type the following text:
Reply to message:
Next, drag the
subject_msgfield from the rsOldMessage recordset in the Bindings tab and drop it on the page, right after the text (see Figure 4).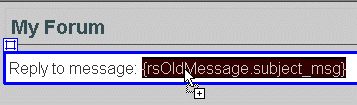
Figure 4. Displaying the page header
- Create a new paragraph after the dynamic text (press the Enter or Return key) and launch the Insert Record Form Wizard. You can access it from the MX Kollection tab of the Insert bar. Because you used the same wizard for the message-posting page, most of the interface fields should already be filled in, thanks to the user interface persistence (provided that this feature is enabled in the InterAKT Control Panel).
-
The first step is already filled in: the connection, table name, primary key, and redirect page are preserved from the last time you applied the wizard in the post_message.php page. Figure 5 shows what the first step should look like.
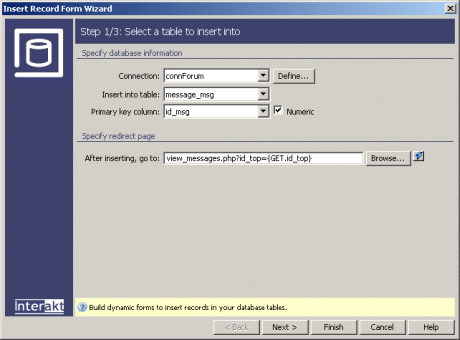
Figure 5. Database information already set up
- Click Next without changing anything. In Step 2 of the wizard, each field still has its default value and field type configured as in the Post Message page. The following fields are already set up:
idtop_msg,idusr_msg,date_msg,subject_msg,content_msg, andsubscribe_msg. -
Because this is the reply page, you will have to change some settings and add the rest of the fields (see Figure 6):
- Set a default value for the message subject. It will display the original message subject, preceded by Re:, to indicate that the current message is a reply.
-
Click the InterAKT Dynamic Data icon (the blue lightning bolt next to the Default value text field) to select the
subject_msgcolumn from the rsOldMessage recordset.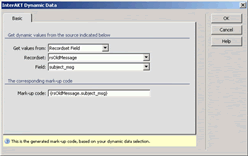
Figure 6. Setting the subject default value
-
After the dynamic value has been added to the Default Value text box, simply enter Re: before the automatically generated mark-up code (see Figure 7).

Figure 7. Adding static text to the default value
-
You need to add two more fields to the insert transaction:
idmsg_msgandid_init_msg. To add them, click the Plus (+) button on top of the grid and select the fields from the list (see Figure 8).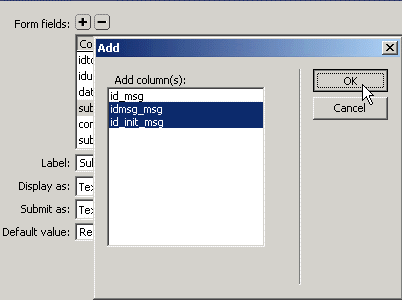
Figure 8. Adding fields to the transaction
- For the
idmsg_msgfield, select Text in the Display As pop-up menu and use theid_msgfield from the rsOldMessage recordset as its default value (again, click the blue lightning bolt icon to select the default value). - For the
id_init_msgfield, select Text in the Display As pop-up menu and use theid_init_msgfield from the rsOldMessage recordset as its default value (using the blue lightning bolt).Figure 9 shows what Step 2 of the Insert Record Form Wizard should look like after all options have been set up.
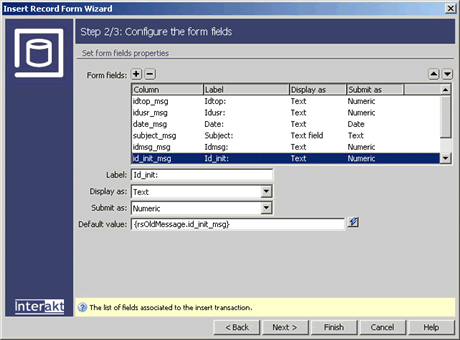
Figure 9. Configured reply form fields
-
In Step 3 of the wizard, apply validation rules on the transaction fields. Make all fields required, except the Subscribe check box. Also, all foreign keys (
idtop_msg,idusr_msg,idmsg_msg, andid_init_msg) must be positive integers. Finally, the date field should have the Datetime format. Figure 10 shows the settings of Step 3.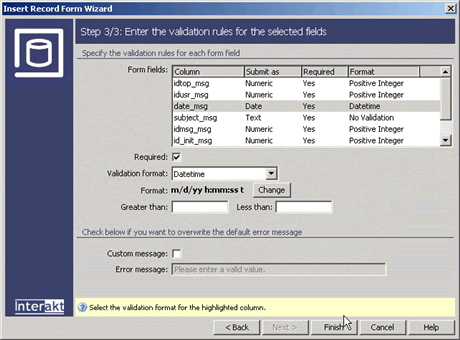
Figure 10. Defining the validation rules for the reply form
- Click Finish to close the wizard and apply the changes.
-
After the form is added to the page, remove the rows containing the Date, Idtop, Idusr, Idmsg, and Id_init fields. These will remain in the insert transaction but should not be visible to the user. Figure 11 shows what the form should look like.
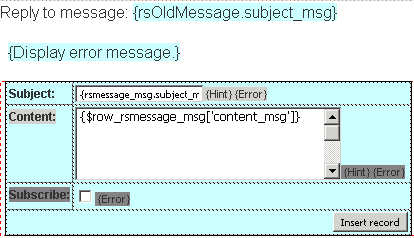
Figure 11. Design view of the reply form
- Rename the Insert record button; it should be labeled Reply.
The page for replying to messages is complete, and you can save it and upload it to the server. You cannot access this page directly unless you are logged in (because of the Restrict Access to Page server behavior). Figure 12 shows an example of a reply to an existing message.
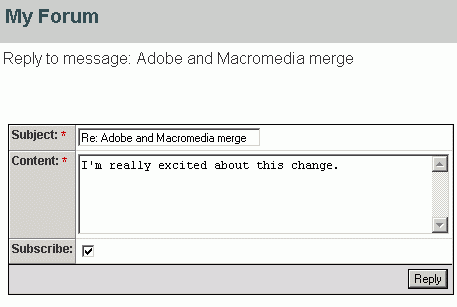
Figure 12. Replying to a message
With this page, the basic forum application is complete. Users can register accounts and view, post, and reply to messages.
In the next section you will enhance the forum application by keeping users informed about replies to their messages.
Comments