
Building a Forum with Dreamweaver – Part 2: Building the User Registration Page
Building the User Registration Page
To post messages, a user must have an active account. In this section, you will build the page that enables users to register to the forum by filling in a user name, password, and valid e-mail address, and by uploading a profile photo—all without writing a single line of code.
The page you will work on is register.php. The page layout is already created and is similar to the other forum pages (see Figure 9)

Figure 9. Layout for the register.php page
You will build the registration form with the User Registration Wizard and then add a file upload feature with the Upload and Resize Image server behavior from ImpAKT.
Using the User Registration Wizard
To build the registration form, follow these steps:

- Delete the placeholder text (“Register form here”) from the main
<div>tag. -
Go to the MX Kollection tab of the Insert bar and click the User Registration Wizard icon to open the wizard (see Figure 10).

Figure 10. User Registration Wizard icon
Step 1 of the wizard displays the connection and table settings you made in the InterAKT Control Panel (see Figure 11).
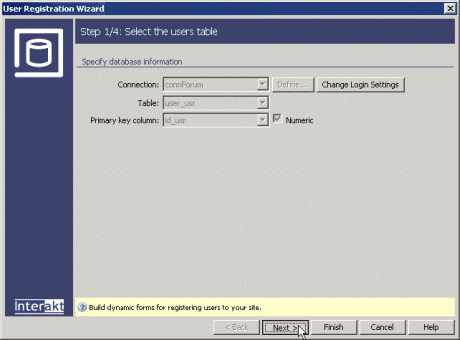
Figure 11. Verifying that the settings are correct
-
Click Next to proceed to Step 2, where you can define the form fields to display. The Form fields grid displays all the table columns that can be displayed as form elements. You can add or remove fields from the grid by clicking the Plus (+) and Minus (–) buttons on top of the grid (see Figure 12).

Figure 12. Removing a form field
Remove the
active_usrandrandomkey_usrfields from the grid. Select each of them and click the Minus (–) button. -
Now do the following:
- The
name_usrfield is already configured. It will be displayed as a text box labeled “Name”. - Select the
email_usrfield, and change its label from Email to E-mail. -
From the Display As pop-up menu, select the
photo_usrfield and change it to a File Field control to allow users to upload their avatar image (see Figure 14).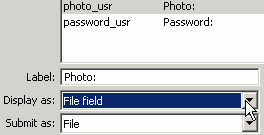
Figure 13. Setting the form element to use
-
In Step 3, you will define the validation rules for each form field. Because you configured the login settings in the InterAKT Control Panel, the validation rules for the user name, e-mail, and password fields are already in place (see Figure 14). All three fields are required. The validity of the e-mail address is verified (which means users can’t type bogus text that is not an e-mail address). You do not need to change any settings in this step.
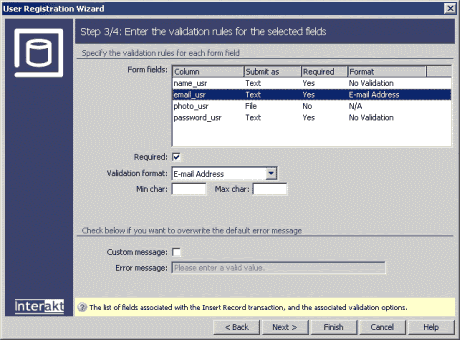
Figure 14. Checking validation options
-
In Step 4, you can define extra features for the registration (see Figure 15):
- To send a welcome message to a new user, check the Send Welcome E-mail option.
-
To enable account activation, check the Use Account Activation option. The wizard will handle all the necessary details such as generating random keys, creating the activation page, and sending the activation e-mail message.
- Click Finish to complete the wizard and apply the changes.
The password_usr field is already configured to be displayed as a password field, so you can move on to the next step of the wizard by clicking Next.
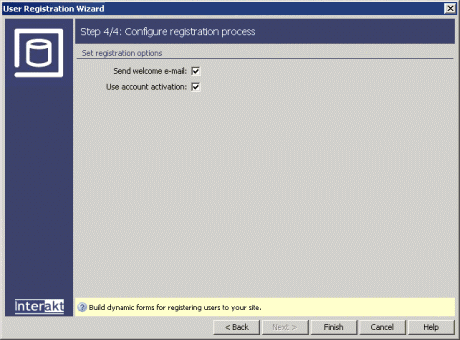
Figure 15. Configuring the registration options
The wizard generates the registration form with two password fields, creates the activate.php page that handles account activations, and adds the server behaviors that verify whether the user name is unique, the e-mail address is valid, and the two passwords match (see Figure 16).
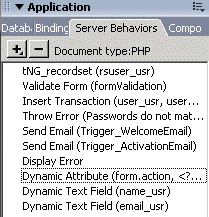
Figure 16. Server behaviors generated by the User Registration Wizard
Save your page and upload all files to your testing server. If you preview the page in a browser, the form should look similar to the one shown in Figure 17.
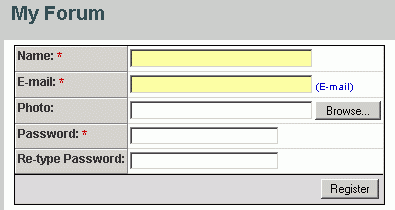
Figure 17. Completed registration form
Notice that required fields are marked with an asterisk (*) and the E-mail field has a hint indicating the correct format. Put your form to the test to see how it works. Try to register an account using an incorrect e-mail address. An error message will be displayed next to the e-mail field, but the data you entered is not lost (see Figure 18).
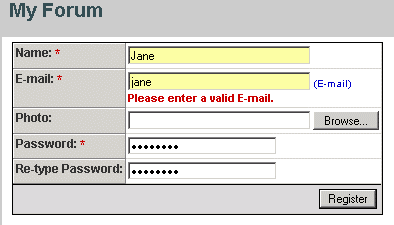
Figure 18. Validating e-mail addresses
You can also test the form to see what happens if you type two different passwords or if you try to register an account using a user name that already exists in the database.
Adding a File Upload Feature
Although you can choose a file in the Photo field, the image is not uploaded to the server. To build a functional file upload, you will use the Upload and Resize Image server behavior:
- Open the register.php page in Dreamweaver, go to Server Behaviors tab, and select Plus (+) > MX Kollection > File Upload > Upload and Resize Image.
-
In the Basic tab, define where to get the images from and what to do with them (see Figure 19):
- From the Form Field pop-up menu, select the form control for uploading files. You can only select
form1.photo_usrbecause this is the only file field on your page. - From the Table Column pop-up menu, select the column that will store the filename:
photo_usr -
From the Upload Folder pop-up menu, enter the path where the uploaded images will be saved. Click Browse and select the profiles folder.
- In order to save space on your server, resize the photos while keeping their aspect ratios. Choose Proportional – Fit to Box and make them 80 pixels wide by 80 pixels high. Before moving to the next tab, verify that your interface is configured as shown in Figure 20.
-
In the File tab, you can specify various security settings: the maximum file size allowed and the list of permitted file extensions (see Figure 20). Use the default values for these options. You can also specify the preferred overwriting conflict resolution. Leave the default Automatic Renaming method. (If a user uploads a file having the same name as another photo on the server, say angel.gif, it will be automatically renamed to angel_1.gif.)
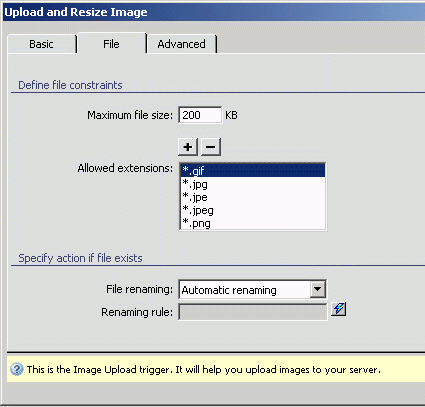
Figure 20. Configuring the File tab of the Upload and Resize Image server behavior
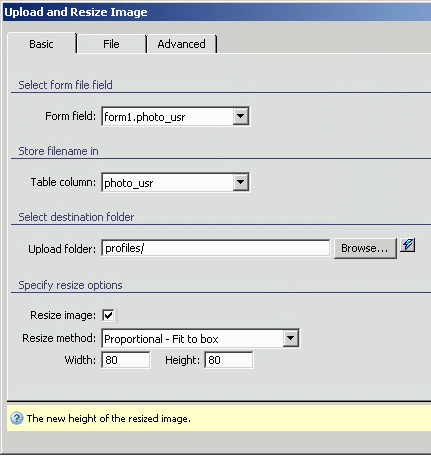
Figure 19. Configuring the Basic tab of the Upload and Resize Image server behavior
You don’t need to configure anything in the Advanced tab (this is where you can register the file upload action to more transactions and assign it a priority). Click OK to apply the changes.
The image upload feature now works. Try registering a new account and uploading a photo. The photo is displayed when the user posts a message.
After registration, you will also receive two e-mail messages—one asking to activate your account and a welcome message (see Figure 21).
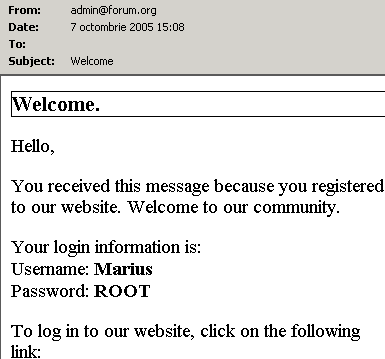
Figure 21. Welcome message
You can edit the contents of the two e-mail messages by editing the corresponding HTML files located in the includesmailtemplates folder.
In the next section, you will create the login form.
Comments