
Building a Forum with Dreamweaver – Part 1: Displaying the Forum Topics
Displaying the Forum Topics
The forum home page displays all topic titles and descriptions. Beside these values, which are extracted from the database, you will have to display links to enable users to set up an account or log in.
All the information will be displayed in the index.php page. The page layout is already designed with CSS, and has areas (
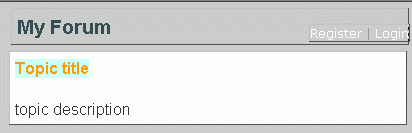
Figure 9. Predesigned page layout to show the forum topics
To see the

Notice that the
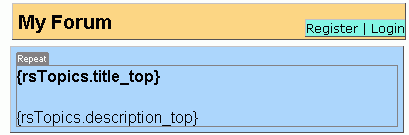
Figure 10. CSS Layout Backgrounds option adds a different color to every
Turning on the CSS Layout Backgrounds option does not display the real color of the
Note: CSS stands for Cascading Style Sheets—a standard that enables you to separate content from presentation. You can create styles that define the font characteristics, colors, and even positioning of your content. You can then apply these styles to the desired elements. The CSS styles are already defined in the forum.css style sheet that comes with the tutorial sample files.
The topic is a link to the page displaying the corresponding messages. To create the topic list, you have to do the following:
- Open the index.php page in Dreamweaver.
- Create the recordset that retrieves topic information: the ID, title, and description.
- Display the recordset contents on the page.
To create the recordset that retrieves the forum topics, follow these steps:
-
Click the Plus (+) button on the Bindings tab in the Application panel. From the pop-up menu select Recordset (Query) (see Figure 11).
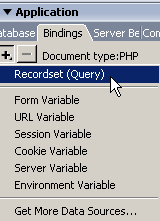
Figure 11. Creating a new Recordset (Query)
-
Configure the recordset dialog box options (see Figure 12):
- For the recordset name enter rsTopics.
- In the Connection pop-up menu, select connForum.
- Select the
topic_toptable in the Table pop-up menu. -
To sort the topics alphabetically, select the
title_topcolumn in the Sort pop-up menu; for the method (the next pop-up menu), select Ascending. -
Click OK to close the dialog box and add the recordset. The recordset appears in the Bindings tab (see Figure 13).
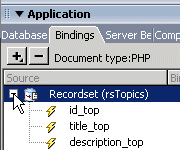
Figure 13. Bindings tab showing the recordset
-
After having created the recordset, you must use its fields to build the home page:
- With the index.php page open, expand the
rsTopicsrecordset in the Bindings tab. - Clear all content from the second container (the white one).
-
Drag and drop the
title_topfield on the Bindings tab in the secondcontainer (see Figure 14). - Place the cursor after the added topic title and press Enter (Return) to create a new paragraph.
- To distinguish the topic title from its description better, format it as Heading 3 by selecting the dynamic text and then choosing Heading 3 from the Format pop-up menu in the Property inspector.
-
The topic title must be linked to the messages page. This page displays all messages from the selected topic. The messages are filtered by the topic ID, which is passed from the home page as a URL parameter. With the topic title selected, click the Folder icon in the Property inspector to define the link (see Figure 15).

Figure 15. Folder icon in the Property inspector
-
In the dialog box that opens, select the view_message.php page, and then click the Parameters button to define the URL variable that will filter the messages:
- In the Parameters dialog box, click the Plus (+) button to add a new URL parameter.
- In the Name field enter id_top.
-
For the Value, click the Dynamic Data icon (the yellow lightning bolt), and then select the
id_topfield of thersTopicsrecordset (see Figure 16).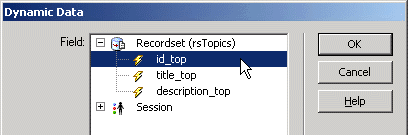
Figure 16. Selecting the
id_topfield in the Dynamic Data dialog box - Click OK to define the parameter value.
- Click OK twice to create the link.
-
Drag and drop the
description_toprecordset field in the Bindings tab in the paragraph below the link (see Figure 17).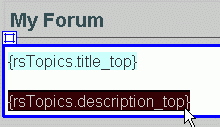
Figure 17. Adding the
description_toprecordset field in the paragraph below the link -
Select the topic title and description and apply a Repeated Region server behavior. You can access it from the Application tab of the Insert bar (see Figure 18).
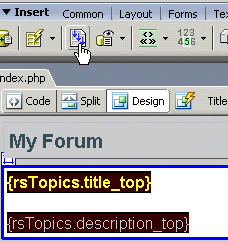
Figure 18. Accessing the Repeated Region server behavior from the Application tab of the Insert bar
Note: Make sure you select just the dynamic text, not the
container. -
In the Repeat Region dialog box, configure the repeat region to use the
rsTopicsrecordset and click All Records to display all records. -
Click the OK button to close the dialog box and apply the server behavior. You’ll notice that a gray border labeled Repeat is displayed around the topic information.
-
Save the page and upload it to the testing server. Press F12 (Windows) or Option+F12 (Macintosh) to load the page in your web browser. The page should look similar to what appears in Figure 19.
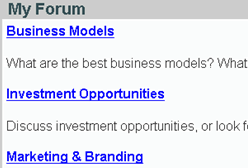
Figure 19. Forums topic page so far
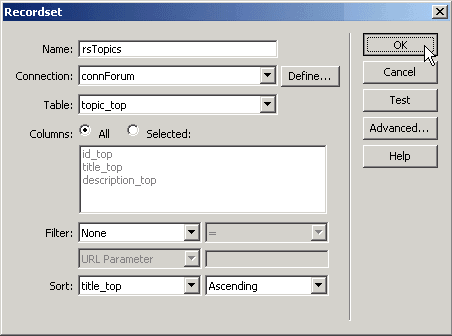
Figure 12. Configured Recordset dialog box
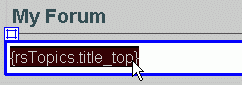
Figure 14. The title_top field in the second
At this point, if you try to preview your page in the browser, you’ll notice that only the first topic is displayed. You need to loop through all records in order to display all the topics:
In the next section, you’ll change the way links look using CSS styles.
Comments