
Automating Your Work – Creating Booklet Brochures
Creating Booklet Brochures
Using the setup specifications listed here will result in a booklet-style brochure with two panels on each side of the page that can be used for text and/or graphics. Two setups are provided. The two-page booklet uses columns to separate the “pages”. The four-page booklet uses the Build Booklet feature to assist with layout.
 Two-Page Booklet
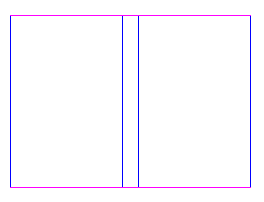
The document and column setups given here result in a grid like the one shown. Columns divide a standard 8.5″ X 11″ sheet into two “pages.” The Space between columns measurement gives sufficient room for folding.
Document Setup
-
From the File menu, select New…
The Document Setup dialog box appears.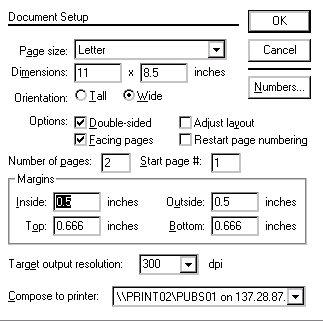
-
From the Page size pull-down menu, select Letter
-
By Orientation, select Wide

-
By Options, make sure Double-sided and Facing are selected
-
In the Number of Pages text box, type 2
-
Under Margins, in the Inside and Outside text boxes, type 0.5
-
Under Margins, in the Top and Bottom text boxes, type 0.666
-
Click OK
Column Guide Setup
-
From the Layout menu, select Column Guides…
The Column Guides dialog box appears.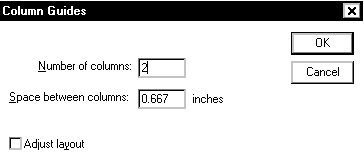
-
In the Number of Columns text box, type 2
-
In the Space between columns text box, type 0.667
-
Click OK
Your brochure is now ready for text and graphics.
Four-Page Booklet
The document setup given here results in a grid like the one shown. The setup provides four individual pages and allows you options that the two-page booklet does not. For example, you can use master pages to format specific pages. This setup also allows you to easily expand the booklet, if needed, by one or more pages.

Document Setup
-
From the File menu, select New…
The Document Setup dialog box appears.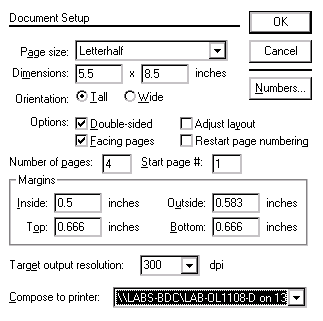
-
From the Page size pull-down menu, select Letterhalf
-
By Orientation, select Tall
-
By Options, make sure Double-sided and Facing are selected
-
In the Number of Pages text box, type 4
-
Under Margins, in the Inside text box, type 0.5
-
Under Margins, in the Outside text box, type 0.583
-
Under Margins, in the Top and Bottom text boxes, type 0.666
-
Click OK
Your booklet is now ready for text and graphics.
Using Build Booklet
Use the Build Booklet plug-in once you have completed the layout of your text and graphics. When you print front to back on your paper, the pages of the booklet will be ordered correctly.
Small changes can be made to the publication once you have run Build Booklet. However, be careful of making changes that may alter the flow of text and therefore the organization of your pages. If you need to make substantial changes after you have run Build Booklet, make them in the original publication and then re-run Build Booklet.
NOTE: Build Booklet creates a new publication so be sure that you have sufficient drive or disk space to accommodate it.
Macintosh: This Build Booklet feature is not available on Macintosh versions of PageMaker.
To run Build Booklet
-
From the Utilities menu, select Plug-ins » Build Booklet...
The Build Booklet dialog box appears.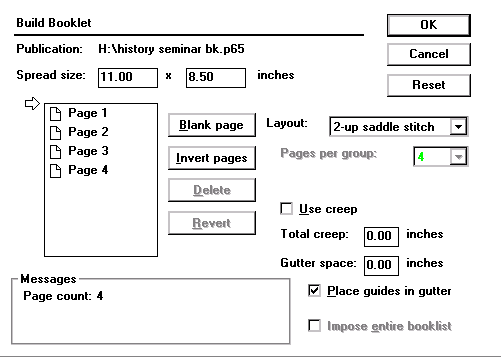
-
From the Layout pull-down list, select 2-up saddle stitch
-
Click OK
A dialog box appears asking if you want to save your original publication before it is closed. -
Click YES
A new, untitled publication is created. You are now ready to print. You may also want to save this new layout of your publication, giving it a different name than your original publication.
Comments