
Apply effects efficiently with scripting and batch processing
Apply effects efficiently with scripting and batch processing
Working with digital audio often involves working with multiple files of similar nature. Applying an effect to a single file does not take very much time, while applying the same effect to 50 individual files is a time-consuming process. Scripting in Adobe® Audition® allows you to apply effects to many files in a few easy steps.
In this tutorial, you’ll first create a script and run it on individual files. Later, you’ll learn how to use the Batch Processor to run on the script on multiple files.
Create and run a script
-
Open a session (*.ses file) that contains several sound files.
-
Double-click on a sound file (*.cel) in order to open it in Edit View. Scripting can only occur in the Edit View.
-
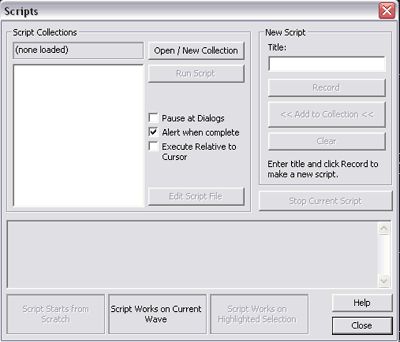
Choose Options > Scripts. The Scripts window opens. We will be applying an effect to this window and using it as a template to apply to other sound files.

-
In the Scripts window, click the Open/New Collection button. A window opens asking you to Choose a new Script file or enter a new name. The default Scripts folder, which is a subfolder in the main Audition 1.5 folder, is displayed, revealing the default scripts that are included with Audition. If the Scripts folder is not displayed, navigate through your hard drive to the Scripts subfolder located within the Audition 1.5 folder.
Note: A Script collection may include either one script or a number of different scripts.
-
Enter myCIBscripts.scp in the File name field and click Open. This saves your new script collection into the default Scripts folder. A script collection file uses the file extension of .scp.
-
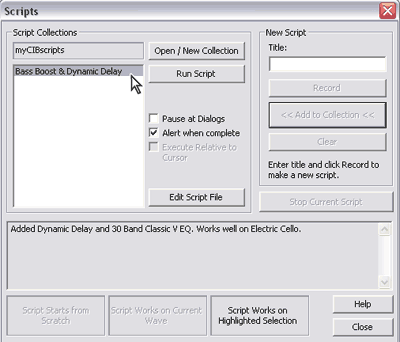
In the New Script section of the Scripts window, enter the name Bass Boost & Dynamic Delay in the Title field, and then press the Record button. When recording, any effects you apply to the waveform are monitored and saved, so they can be applied to other files in the future. The recording only keeps track of the options selected, not the time it takes to select the options.
-
Choose Effects > Delay Effects > Dynamic Delay. The Dynamic Delay window opens. Choose Spacey from the list of presets. Press the Preview button to hear the effect of the Dynamic Delay. Click OK when done previewing. Dynamic Delay changes the amount of delay over the length of a waveform.
-
Choose Effects > Filters > Graphic Equalizer. The Graphic Equalizer effect boosts or cuts specific frequency bands and provides a visual representation of the resulting EQ curve. In the bottom left corner of the Graphic Equalizer window, choose the Simple Bass Lift preset. This preset primarily boosts the lowest frequencies and is similar to turning up the bass on a stereo system. Click the Preview button to hear the bass lift. Click the bypass option to hear the difference between the two settings. Click OK after previewing the edited clip.
-
Choose Options > Scripts to reopen the Scripts window. Click the Stop Current Script button to stop recording. Keep the Scripts window open.
Note: Had you applied additional effects to the waveform, the Script would have continued to record the additional effects.
-
In the blank text field at the bottom of the window enter Added Dynamic Delay and boosted Bass as a reminder for the next time you use this script.
-
Click the Add to Collection button and the Bass Boost & Delay loads into the Script Collection window on the left side of the application window. Note the description field is now locked. Anyone using this script will now see this description. Additionally, this provides a helpful reminder of which effects are used and in what order they are applied.
-
Click the Close button. You will now run this script on another file.
-
In the Organizer window double-click another *.cel file to view its waveform. If you do not see other sound files in the Organizer window, you need to import some. Click the Import File button located in the Files tab, locate the sound files, and then shift-click several sound files to import them.
-
Choose Options > Scripts from the menu. Click on the Bass Boost & Dynamic Delay script and click the Run Script button. The two effects are applied automatically and a confirmation window appears when the script is complete. Click the OK button to close the window.
-
Press the spacebar on your keyboard to play the clip. The same effects added to the clip you opened in step 2 have automatically been added to this clip.
-
Double-click the first sound file you ran the script on. Choose File > Save As, click the New Folder button, and then create a file with the name Batch_Process_Output. In the Batch_Prcoess_Output folder, click the New Folder button again to create a folder named Tutorialfiles_Space. Name the file you are saving Testfile01_Space.cel and open the Tutorialfiles_Space folder, then click the Save button. By naming the file with a unique name, the original file is retained.
-
Double-click the file you opened in step 13 and choose File > Save As. Navigate to the Tutorialfiles_Space folder if needed. Name the file you are saving Testfile02_Space.cel and click the Save button.
Use the Batch Processor to apply your script to multiple files
Running scripts on individual files is a quick way to apply multiple effects to a single waveform. When you need to apply a script to more than two or three files at a time, it is more efficient to use Audition’s Batch Processing feature.
-
If necessary, switch to the Edit View by clicking on the Edit View tab. It is necessary to use the Edit View because Batch Processing is not available in the Multitrack View.
-
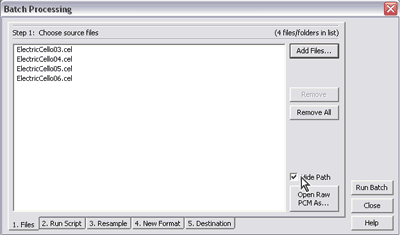
Choose File > Batch Processing and the Batch Processing window opens. Note at the bottom of the window there are 5 tabs; Files, Run Script, Resample, New Format, and Destination. These tabs represent the five steps you need to follow in order to successfully complete a Batch Process.
-
Click the Add Files button to open the Choose Source Files window. Navigate to the folder containing the sound files you want to run the script on. Shift-click to select the files you want to load into the Batch Processing window, and then click Add. Click the Hide Path option to see the short names of the files.
-
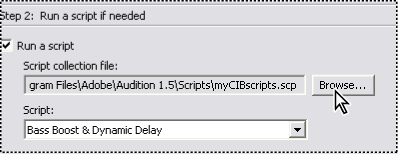
At the bottom of the Batch Processing window, click the second tab, Run Script. If necessary, select the Run a Script option. The first field points to a Script collection file. You created a script collection file named myCIBscripts.scp earlier in this tutorial. If you do not see this script collection file click the browse button and locate the Scripts folder in your Audition 1.5 folder.
-
Along the bottom of the window, click the Resample tab. In the Resample tab, confirm the Conversion Settings checkbox is not selected. The conversion settings would allow you to convert files with different sample rates, bit depth and number of channels into one consistent setting, however you will not be converting in this tutorial.
-
Click the New Format tab along the bottom of the window. Click on the Output Format drop-down menu to open it and choose Audition Loop (*.cel). Using this option you can convert all the files into a new format when using the Batch Processing command.
-
Click on the Destination tab along the bottom of the window. If necessary, select the Other Folder option and then click the Browse button. Navigate to the Batch_Process_Output folder. Click the plus sign and then click to select the TutorialFiles_Space folder. Click OK to confirm the destination.
-
In the Output Filename Template type *_Space.cel. When creating a template, pay attention to the placement of the asterisk, as the asterisk will append the corresponding section of the filename. For example, Filename01.cel will become Filename01_Space.cel, and Filename02.cel will become Filename02_Space.cel.
-
Click the Run Batch button. The Bass Boost & Dynamic Delay script is run and applied to all of the selected files. The files are exported to the specified folder, in the file format you selected. Audition displays a window to confirm it is done.
-
To open the modified files and confirm the changes, choose File > Open and select the TutorialFiles_Space folder. Shift-click to select the *.cel files in this folder, and then click Open to import the selected files into the Organizer window.
-
Double-click one of the sound files in the Organizer window and press the spacebar. As you listen to the file you should note the dynamic delay effect and the bass lift that was applied using the batch process.
-
Choose File > Close All to close the session and its media.
Comments