
Appearances Are Everything
Appearances Are Everything
Now, go back to the editor and decide how you want to display the data returned in the Recordset. I like to keep things simple, so I merely created a bulleted list of users,
<ul>
<li></li>
</ul>
and then dragged columns from the Recordset object in the “Application” panel to the appropriate place on the page where I’d like the data displayed (Dreamweaver wrote the code for me).
<ul>
<li><?php echo $row_Recordset1['username']; ?></li>
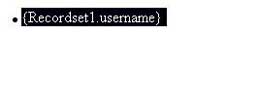
</ul>
And when you preview it in the browser, you should see something like this:


Cool, huh? I managed all that using simple point-and-click actions, with no requirement to know anything about PHP’s MySQL API or remember complex function syntax.
Of course, the example’s still somewhat incomplete – all it does is display the first record. What we really need is the entire recordset returned by the SQL query. In order to meet this and other requirements, Dreamweaver includes a variety of different “server behaviors”, which can be used to add extra functionality to your application.
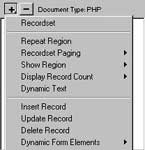
In order to see how this works, select the first item of your newly-created list in the editor,
pop open the “Server Behavior” tab of the “Application” panel, and select the “Repeat Region” behavior from the drop-down option list, and tell it to loop for as many times as there are records.
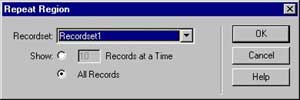
Dreamweaver will automatically insert PHP code that iterates over the returned Recordset object and print the entire set of records returned. Here’s the code,
<ul>
 <?php do { ?>
 <li><?php echo $row_Recordset1['username']; ?></li>
 <?php } while ($row_Recordset1 = mysql_fetch_assoc($Recordset1)); ?> </ul>
and here’s the output:
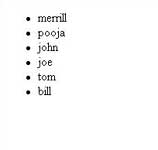
Dreamweaver comes with a whole bunch of other, similar behaviors to meet most common requirements – you can just as easily (for example) display the total number of records found, implement paging with next and previous links, or dynamically show sections of a page based on the current position of the recordset pointer.
In And Out
OK, so that took care of displaying the records – now how about inserting and deleting records?
First, use the Dreamweaver editor to create an HTML form that maps to the columns of the “user” table.

Once the form has been prepared, apply the “Insert Record” server behavior, and you’ll see a dialog box like this:
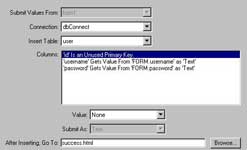
This dialog box makes it very easy to map form fields to the table in which data is to be inserted. Once you select the appropriate database connection and table, the fields of the table are displayed; these fields can be mapped to specific fields in the form via the “Value” drop-down list. Dreamweaver takes care of writing the SQL query needed to insert the data entered by the user in each field into the appropriate column in the table.
After you’ve finished mapping form fields to table columns, remember to specify the URL to which the browser should be redirected once the data has been successfully inserted into the database.
Once you’re done, save the PHP script and access it via your browser. You should see the HTML form you created:

Enter some values and submit the form. The code generated by Dreamweaver MX will insert the values into the “user” table and then redirect the browser to the URL selected… all without the developer writing a single line of code!
It’s just as simple to delete records – create a new PHP script and use the “Delete Record” server behavior. You’ll see the following dialog box, which asks you to specify the variables that the script should use when identifying which record to delete.
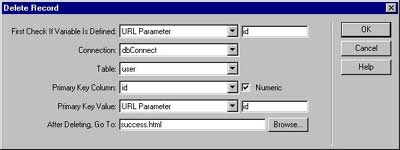
As you can see, in the example above, I’ve told Dreamweaver to look for the “id” variable in the URL string, and to delete the record corresponding to that ID in the “user” table. Save the script (I’ll assume it’s called “delete.php”), and access it via your browser (remember to add the “id” variable-value pair to the URL string, like thus: http://your.server/delete.php?id=15), and the record corresponding to the ID provided should get deleted from the database.
Obviously, it’s pretty easy to now link the three scripts above with each other, so as to build a primitive, yet fully-functional, user administration module (in case you’re wondering, yes, Dreamweaver also comes with an “Update Record” behavior – I’ll leave that to you to experiment with.)
Comments