
Animation in Macromedia Flash – Squash and Stretch
Animation in Macromedia Flash: Squash and Stretch
Squash and stretch is a traditional animation technique that animators commonly use to give animations more realism and weight. In the real world, when a moving object comes into contact with another object, it deforms upon impact unless it is completely rigid.
As you animate objects to show realistic impacts and collisions, one thing that is important to remember is that no matter how much an object squashes or stretches, it always maintains the same volume. The amount of squash and stretch depends on how much flexibility you give your object.
Traditional animation usually contains very exaggerated amounts of squash and stretch. A good example of this is a bouncing ball. When it hits the ground it actually deforms and gets squashed. It will then stretch out again as it propels itself upwards. With a little motion tweening and frame-by-frame animation in the Macromedia Flash authoring tool, you can achieve convincing realism with relatively little effort.
Requirements
To complete this tutorial you will need to install the following software and files:
Flash MX 2004
Tutorials and sample files:
- squash_stretch.zip (ZIP, 5K)
Squashing and Stretching a Bouncing Ball
In this tutorial, you give a simple bouncing ball some squash and stretch. First, take a look at what the animation would look like without this effect:

Pretty lame huh? It’s dull, boring, lifeless, and has absolutely no personality or character. You can fix this by adding some “weight” to the animation.
-
On Layer 1, draw a ball and convert it to a symbol. I usually start with the ball at its highest point in the bounce. I set the frame rate of the Flash file to 24 fps. Feel free to use a different frame rate. 24 fps is fast enough for relatively smooth animation without pushing the limits of most of today’s computers.
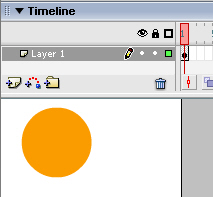
Figure 1. Draw a ball on the Stage and convert it to a symbol.
- Create a second keyframe somewhere on the Timeline. It doesn’t matter exactly which frame you choose—you can adjust this later.
- Create a second layer and add a simple horizontal line as your “landing” area for the ball. (You can see the line in Figure 2 below.)
-
Select the ball symbol on the Stage, hold down the Shift key, and use the arrow keys to nudge the ball down to the bottom of the Stage. Place the ball slightly above its landing area as I have done in the example (Figure 2).
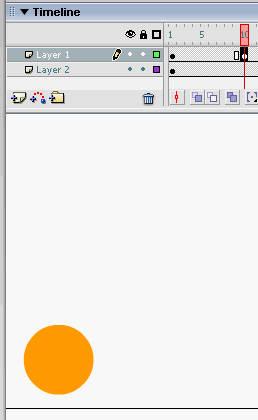
Figure 2. The ball positioned near the “landing” line at the bottom of the Stage
-
Simply right-click anywhere over the frames between your two keyframes containing the ball and select Create Motion Tween.
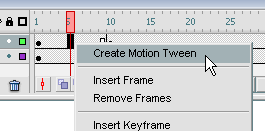
Figure 3. Right-click to create a motion tween.
-
What goes up must come down, but not at a consistent rate of speed. Due to the gravitational pull on Earth, when you throw a ball up in the air, its speed will decrease as its altitude increases. When it begins to return down to the ground, it starts off slow and increases in speed. To simulate this, you can use the Flash Ease In/Out feature. Select Frame 1 and in the Property inspector adjust the Ease value to -100, which makes the ball ease in. This creates smaller increments between frames initially, and gradually increases towards the second keyframe, causing the ball to start off slowly and then gradually gain speed.
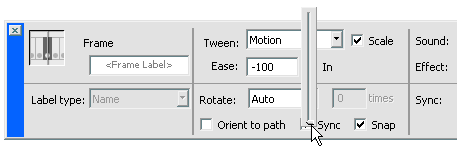
Figure 4. Set the Ease value to -100 to make the ball ease in.
- Now it’s time for you to actually squash something. Create a new keyframe after the second keyframe in your tween.
- Select the ball on the Stage and grab the Free Transform tool. Use the handles on the left and right sides to stretch the ball wider, then squash it from the top and bottom.
-
Use the arrow keys to nudge the ball down so its bottom edge touches the landing surface. This is your first step in deforming the object.
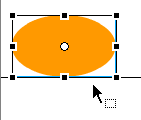
Figure 5. Using the Free Transform tool
-
Repeat the same procedure by continuing to the right in the Timeline frame by frame, creating keyframes on each frame and increasing the amount of squash and stretch. I turned on the Onion Skin tool to show you what my animation looks like with three keyframes of squash and stretch (see Figure 6).
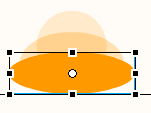
Figure 6. Three keyframes of squash and stretch revealed by the Onion Skin tool
-
After creating three keyframes of “squash,” start creating the upward motion of the ball. I like to exaggerate this first frame after the tightest squash frame a little more than normal by making it very tall and thin. This exaggerates the “spring” effect of the ball launching back up from the ground.
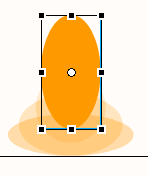
Figure 7. The “spring” frame
- Now make the animation loop. Select Frame 1 and then select Edit > Copy Frames. Then select a frame a few frames after your last keyframe and select Edit > Paste frames. This gives the ball the exact shape and position in the last frame as it has in Frame 1, giving you a seamless, looping animation.
-
All you need to do now is apply a motion tween between the final two keyframes. Once you do that, select the next to last keyframe and in the Property inspector apply an ease out, setting the Ease value all the way to 100.
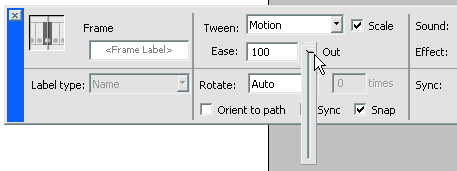
Figure 8. Setting the Ease value to ease out the animation
This will make the ball start off quickly and gradually decrease speed as it reaches the top (opposite the behavior of your first tween).
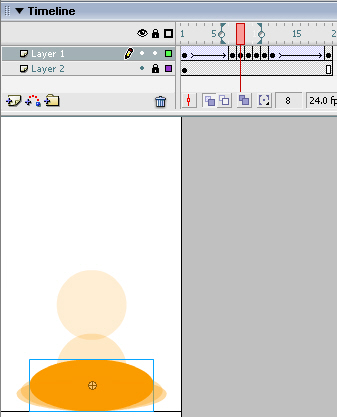
Figure 9. The final FLA file
You’re done! Your bouncing ball animation should now look like the SWF below (okay, I already gave you a peek at it above), and your FLA should look like it does in Figure 9. Pretty slick huh? See how much more life and weight you have given your otherwise static image? It’s got a little more personality to it, and it didn’t take a whole lot of blood and sweat to achieve.
Comments