
An Overview of CSS in Dreamweaver 8 – Setting CSS While Adding Content to the Page
Setting CSS While Adding Content to the Page
In the following scenarios, I intend to show you different ways to quickly define simple properties.
Defining a Class Style
- Type: This is the way highlighted text will appear. Click Enter/Return to move to the next paragraph. This also ensures that the text you just typed is also set within a paragraph tag.
- Select the text of the previous paragraph (make sure to select the entire paragraph).
- In the Property inspector, notice the text color is already set to #333333. Click the color box and choose #CC3366 (a lovely dark pink).
- With your cursor still within that newly-pink paragraph, note that the Tag Selector (the tags listed in the lower left corner of the Document window) shows
<p.style1>. - In the Property inspector, click the Style pop-up menu and choose Rename.
- In the Rename Style dialog box, verify Style1 is selected in the Rename pop-up menu, then type
hilite_textin the New Name text field. - Click OK. Notice the Results panel appears with the Search tab showing the class style name was changed in the body of the document. Clicking the paragraph again will now show
<p.hilite_text>in the Tag Selector.
Defining a New Style for All Paragraphs
The previous steps succeeded in creating a class style. Class styles, which are the only styles you will see listed in the Property inspector’s Style pop-up menu, are style rules that you can apply to any tag. The next set of instructions explain how to redefine a tag.
- Click in the empty paragraph below the pink paragraph. Since you created this paragraph at the beginning of the instructions, this paragraph will not use the
hilite_textclass style. - Type: THIS is how all bare paragraphs will appear.
- In the CSS panel group, click the New CSS Rule button in the bottom right corner.
-
In the New CSS Rule dialog box, select the Tag option from the Selector Types. Then choose P from the pop-up menu of tags. Leave the Define in choice to This document only.
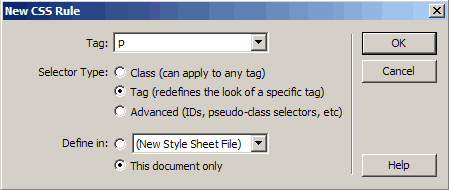
Figure 14. The New CSS Rule dialog box
- Click OK.
-
In the CSS Rule definition for P dialog box, specify the following settings:

- (Type category) Font: Geneva, Arial, Helvetica
- (Type category) Color: #0000CC
- Click OK. The paragraph (and any other paragraph unless a conflicting class style affects it) is now be blue.
Defining a New Style That Includes Positioning
This particular workflow takes advantage of a new menu command that I have not otherwise described.
- Press Enter/Return to move to the next line.
-
Select Insert > Layout Objects > Div Tag.
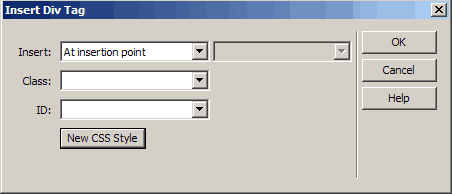
Figure 15. The Insert Div Tag dialog box
- In the Insert Div Tag dialog box, choose At insertion point from the Insert pop-up menu.
- Click the New CSS Style button. The New CSS Rule dialog box opens.
- Leave the Selector Type set to Class and the Define in set to This document only. Type layer1 in the Name text field.
- Click OK.
- In the CSS Rule Definition for the .layer1 dialog box, specify the following settings:
- (Box category) Width: 250 pixels
- (Box category) Padding: 10 pixels (leave the Same for all option checked)
- (Box category) Margin: 10 pixels (leave the Same for all option checked)
- (Border category) Style: Dashed (leave the Same for all option checked)
- (Border category) Width: medium (leave the Same for all option checked)
- (Border category) Color: #000000 (leave the Same for all option checked)
- (Positioning category) Type: relative
- (Positioning category) Placement: Left: 50 pixels
- Click OK. This creates the rule for .layer1.
- The Insert Div Tag inspector is still available, but the Class field now reads layer1. Click OK.
Until you click OK, the DIV tag will not be written to the code of the page.
These simple workflow recommendations can help you get started, but you may be left wondering how these rules all work together. Let’s use Dreamweaver to find out.
Comments