
Adobe Premiere As seen on TV
Even at the Highest Quality setting, the image in the program view is inferior to video output to an actual television monitor. When you’re editing DV in Adobe® Premiere® Pro 1.5, you can output the video signal through your DV camera or deck to a television monitor. This allows you to see (and evaluate) the video as your audience will see it.
The DV playback settings let you specify whether to play video and audio through your DV device. You can also specify whether you want real-time playback in the program view, on a television monitor, or both.
To use these options, your IEEE 1394 interface must be connected to a DV camcorder (set to VTR mode) or DV deck, which in turn must be connected to an NTSC (television) monitor.
Play back to a DV device
To play back via a DV device:
-
Make sure a DV camera or deck is connected to your computer’s Adobe Premiere Pro–certified IEEE 1394 controller card and to a television monitor. Also make sure the DV device is on and set to receive a signal.
-
Click either view’s Output button and choose Playback Settings (Figure 1). The DV Playback Settings dialog box appears.

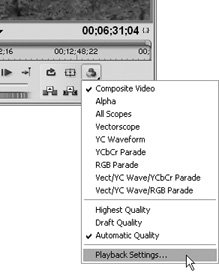
Figure 1: Click the Output button and choose Playback Settings from the menu.
-
In the DV Playback Settings dialog box, select Play Video on DV Hardware (Figure 2).
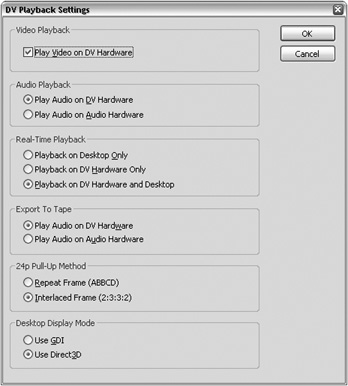
Figure 2: In the DV Playback Settings dialog box, select Play Video on DV Hardware.
Other options become highlighted and available. Leaving the option unselected prevents the signal from being sent to the DV device for playback.
-
Choose a Real-Time Playback option (Figure 3):
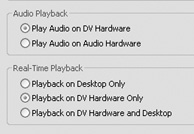
Figure 3: For Real-Time Playback, specify where you want real-time rendering to appear. For Audio Playback, choose the device you want to use to play the audio.
Playback on Desktop Only: Plays back sequences in the program view.
Playback on DV Hardware Only: Plays back sequences on a television, via a DV device.
Playback on DV Hardware and Desktop: Plays back sequences in the program view and on a television. This option requires the most processing power from your system.
If you choose a DV option, the Audio Playback options become available.
-
Choose an Audio Playback option:
Play Audio on DV Hardware: Plays audio through your DV device.
Play Audio on Audio Hardware: Plays audio through your computer’s sound card. The Export to Tape options let you specify audio output during export.
-
Click OK to close the dialog box. The video and audio play back according to your selections. If you choose Playback on DV Hardware Only, the program view displays a “playing on DV hardware” message during playback (Figure 4).
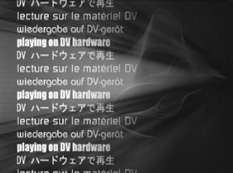
Figure 4: When you play back through the DV device only, the program view displays this message instead of video.
Play audio while scrubbing
To play audio while scrubbing:
-
Choose Edit > Preferences > Audio (Figure 5). The Audio panel of the Preferences dialog box appears.

Figure 5: Choose Edit > Preferences > Audio.
-
Select Play Audio While Scrubbing (Figure 6). When this option is selected, you can hear audio as you drag the CTI in the time ruler of the source view, program view, or Timeline window.
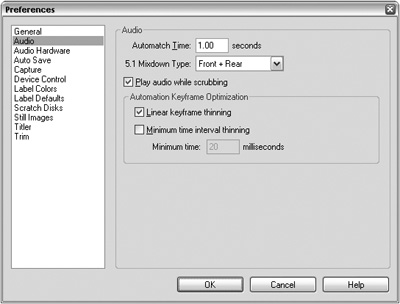
Figure 6: On the Audio panel of the Preferences dialog box, select Play Audio While Scrubbing.
Tip
You can also access the Playback Settings dialog box by choosing Project > Project Settings > General and then clicking the Playback Settings button.
Excerpted from “Adobe Premiere Pro 1.5 for Windows Visual QuickPro Guide” by Antony Bolante.
Comments