Adobe Photoshop Elements Basics
Elements Basics
This is a broad overview of the Photoshop Elements window and its main features, with a few helpful tips.
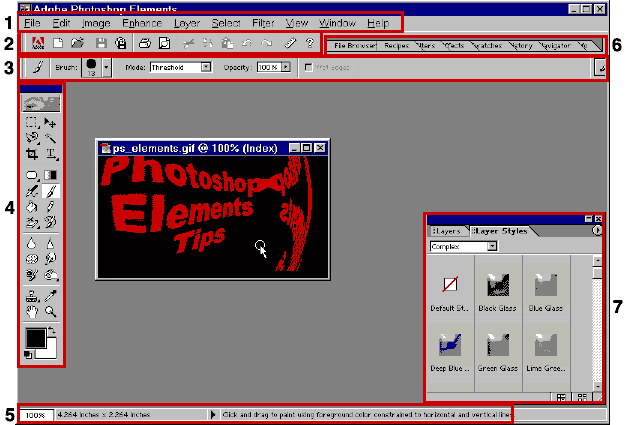
Shown below is the opening screen in a typical configuration. I reduced my monitor’s resolution to 800 x 600 to squeeze everything into a smaller screen shot. Such a low resolution is ridiculous when you have so many toolbars and palettes on screen. I keep my 19″ monitor at 1152 x 864, and there’s barely enough room to work.
Numbers have been added to identify the main features. They are:
menu bar
- shortcuts bar
- options bar
- toolbar
- status bar
- palette well
- an open palette
The menubar (1) is where you find Element’s commands. The View and Help menus will be discussed on the next pages. The other menus will be learned as you use Elements. The meaning of the various commands can best be understood in context.
The Shortcuts bar (2) is basically the same as that which you find in most Windows programs. It contains buttons for New, Open, Copy, Save, Print, etc. The Undo, Redo, and Show/Hide Rulers buttons are particularly handy.![]()
The options bar (3) shows the options of whichever tool is currently selected in the toolbox. When you select a tool in the toolbar, it’s very important to remember that you need to set the proper options before using the tool.

The toolbar (4) contains all the Elements tools. Some are not visible, but are hidden under another tool. For example, the magnetic lasso is hidden under the (regular)lasso tool. To choose the magnetic lasso, click on the lasso tool and pick the magnetic lasso from the pop-up menu that appears.
The status bar (5) shows the image’s current magnification in the extreme left corner. You can change the magnification by typing in a value and pressing Enter.
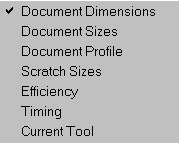
By clicking the little black arrow about a third of the way along the status bar, you can find a menu from which you can pick which image data you would like displayed in the status bar.
Note that the title bar of your image contains color mode, and magnification information, and indicates what layer is currently selected. (And, yes, I do have an image named “aa_exampleFile” which I use for trying out program features when writing these tutorials)![]()
Towards the center of the status bar, you will see tips related to whatever tool you are currently using.![]()
The palettes (7) either open, or stored in the palette well (6), are where Layers are managed, and Swatches, Layer Styles, Effects, Recipes, and Files can be chosen.
The Navigator palette is for changing the view of an image. The Info palette is for acquiring specific location, distance, and color data about the image. The History palette keeps track of almost every change made to an image, and allows multiple undo by clicking on whichever step a user would like to return to.
And the Hints palette is there to help you learn how to use Elements by providing descriptions and tips about the selected tool or palette. It also contains a button that will take you directly to the pages relevant to that tool or palette in the Help section.
Clicking on the title tab of a palette in the well will open it temporarily. It will close again as soon as you change focus.
To bring a palette out of the palette well in order to have it open at all times, drag it by its title tab. I would especially recommend dragging the Info palette out of the well so you can see its data at all times.
The Elements tools, found in the toolbar, fall roughly into the following categories:
Selection tools – used for creating closed boundaries. Once a selection has been made, editing can only occur within the selection outline. To remove a selection, or make it inactive, choose Select > Deselect from the menubar, or press Ctrl-D.
Tools in this category include the marquee tools, lassos, and the magic wand.
Painting tools – used for adding color by using the mouse like a brush, or by simply filling areas with a selected color. These include the paintbrush, Impressionist brush, airbrush, gradients, paint bucket, and pencil tool.
Retouching tool – used for editing existing colors and image details. These include the clone stamp (formerly known as the rubber stamp), red eye brush, erasers, dodge, burn, sponge, blur, sharpen, and smudge tools.
Vector tools – used for creating, and editing vector shapes. These include the shape selection tool, shape tools, and line tool.
Change view tools – used for moving and magnifying the view of an image, without affecting the image, itself. The hand, and zoom tools are workhorses you’ll be using constantly.
And, then there’s the type tool, with warp text abilities, the crop tool for chopping images down to size, the move tool for moving selection contents or layers, the eyedropper for collecting color, size, and location data, and the big foreground/background color squares you see near the bottom of the toolbox that are where you can make your color choices.
When you are learning to use Elements, it can be very helpful to keep an accurate record of all the steps you use when editing an image, or trying to create an effect. I have a “step log” which you can download, and print out. The pages include spaces for all steps used, as well as those tried and undone. You can record all tools, filters, and effects as well as their settings, and dialog box entries. The pages can be saved in a three ring binder. Note that these forms are also very handy for making notes about the steps and tools used in tutorials that you find on the Internet. Find them at Step Log.
There are two menus, View, and Help, that have basic commands that you need to be aware of any time you use Photoshop.


Comments