The first Pre-Beginner tutorial walked you through a very simple image edit sequence and skimmed over other important features. This lesson will expand a bit on how to make selections, introduce you to layers, show you how to use the clone stamp, and explain the difference between vector objects and raster images. As you work through my demonstrations, try to understand why and how the process is working on your picture. It’s not enough to know how to follow my instructions. You need to think about what’s going on if you want to be able to use these tools on your own.
We’ll start with selections. If you want to do anything to your pictures that affects only a part of the image, you must use a selection. Do you want to change the picture’s background? Take a person from one picture and put him into another? Change the color of an object? Add layer styles to just the border of your picture? You have to make a selection before you can do any of those things.
Start by making a new white document. Choose File > New and then pick Default Photoshop Size from the Preset Sizes menu. Make sure Mode is set to RGB color and the White radio button is clicked under Contents. Click OK.
In your toolbox, click on the lasso tool to select it.

Click and hold your left mouse button on your document and drag roughly in a circle until you end up where you started. Release the left mouse button. You’ll see an animated dotted line, usually referred to as the ‘marching ants.’ That is your selection boundary.
With the selection active, choose Edit > Fill. In the Fill dialog, from the Use menu, choose Pattern. Next, click on the small square thumbnail to the right of where it says “Custom Pattern.”
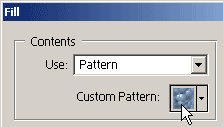
A pop-up palette of pattern choices will appear.
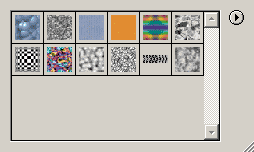
The default Elements patterns palette is awful, but there are some excellent alternate palettes. To find them, click on the little right-pointing arrowhead in the upper right corner of the patterns pop-up palette.

From the menu that appears, choose Rock Patterns.

Once the rock patterns are loaded, click on the Rock Wall thumbnail to choose it. You can find the name of a pattern by hovering your cursor over the thumbnails, or you can go back to the palette menu and choose Large List to view the pattern names with their thumbnails.
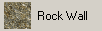
Once you have chosen the rock wall pattern, click OK to exit the Fill dialog and fill your selection with the pattern. Only the selected area is filled. The rest of the document remains white.
Choose Select > Deselect to end the selection. Go back to Edit > Fill and click OK to use the same settings as before. Your entire document will fill with the rock pattern.
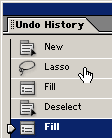
Use the Undo History palette to go back to before you used the Fill command. Do this by choosing Window > Undo History to open the palette. Then click on the state called “Lasso” which will be before the two Fill states. You’ll be back with your circular selection.
Choose Select > Inverse. Notice that there are now marching ants around the perimeter of your document as well as around your circled spot. Choose Edit > Fill and click OK to fill with the same pattern. You’ll see that the fill goes everywhere except into the original selection. That’s because you have ‘inversed’ the selection. Many times it is easier to select what you don’t want and then inverse the selection.
Choose Select > Deselect to end the selection. Go back to Edit > Fill one more time. From the Use menu, choose White. Click OK.
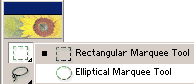
In the toolbox, choose the elliptical marquee tool. It’s under the rectangular marquee in the upper left corner of the toolbox. Click and hold on the rectangular marquee icon to get a flyout menu. Then click on the elliptical marquee’s icon to choose it. Or you can click on the rectangular marquee and then choose the elliptical button on the options bar.
On the options bar, make sure Feather is set to zero and Style is set to Normal.
Play with the elliptical marquee tool for a few minutes. Drag a selection on your document. Do this by pressing and holding the left mouse button and then dragging diagonally across the area that you want to select. Dragging sideways makes the ellipse wider but not taller. Dragging downward makes the shape taller but not wider. Dragging diagonally does both at once. It takes a while to get the hang of it.
Use Select > Deselect to end your selection. With no selection active, press and hold the Shift key before you start to drag your selection. Notice that this causes your selection to be a perfect circle. Don’t release the Shift key until you have released the left mouse button or the circle will turn into an ellipse.
Use Select > Deselect again to end the selection. Try pressing and holding the Alt key before you drag your selection. Notice that the selection now draws outward from your initial click point. While you are dragging your selection (the left mouse button is still pressed down), try pressing the spacebar on your keyboard. Now, with the left mouse button still pressed, continue to drag the mouse. The selection outline will be repositioned, not resized, for as long as you have the spacebar pressed.
Choose Select > Deselect to end any active selection. This time, press and hold the Alt key and click in the center of your document. Drag outward until there is only about half an inch left between the selection and the edge of the document. Remember, you can press the spacebar to reposition (just be sure to keep pressing the Alt key and the left mouse button).
Choose Select > Inverse. Go to Edit > Fill and choose Pattern from the Use menu. Choose one of the rock patterns and then click OK. You’ve got a quick and dirty frame effect.
Undo the pattern fill by choosing Edit > Undo, or by using the Undo History palette (or Ctrl-Z). Then deselect by choosing Select > Deselect (or pressing Ctrl-D).
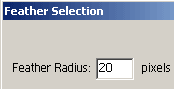
Use Edit > Fill and click OK to fill the document with the last used setting which were your rock pattern. Create another elliptical selection just like the previous one by pressing and holding the Alt key and dragging from the center of your document. Choose Select > Feather. In the Feather dialog, enter 20.
Click OK. Next, choose Select > Inverse. The go to Edit > Fill and in the Use menu, choose White. Click OK. You should see a vignette effect that is popular for portraits. Please notice the difference that the feathering made with this fill versus the previous unfeathered fill.
You can set feathering on the marquee tool’s options bar before making your selection. However, this does not allow you to undo only the feathering if you find that you entered the wrong amount. By choosing Select > Feather after you have created your selection, you can use Undo History to undo and redo the feathering amount (without deselecting) until you get it just right. If you enter a feather amount on the tool’s options bar, using Undo would also undo the selection outline and you would have to redraw the selection in order to change the feathering amount.
Use Select > Deselect to remove any active selection, then choose Edit > Fill. Use a pattern of your choice to fill the entire document.
Please note that use of the Alt and Shift keys when creating selections works as described above when making new selections. If you already have a selection active, pressing the Shift key as you drag another overlapping selection will cause the new selection to be added to the first once you release the left mouse button.
Pressing the Alt key while dragging a second selection will cause the areas where the new selection overlaps the old to be subtracted from the selection when you release the left mouse button.
If you want to constrain an added selection (use the Shift key for both functions) you need to press Shift as you start the drag, release the Shift key, and then press it again. Very tricky and I don’t expect you to want or need to use the technique. I’ve mentioned it only so you can have it tucked away in the back of your mind. Soon you’ll be an expert and this stuff will mean something…
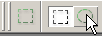
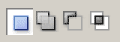
Switch back to the lasso tool by clicking on it in the toolbox. Make sure its options bar is set to New Selection (the first button in the group of boxy icons shown below).
Make a selection of any shape, as long as it contains more than half of your document (you want to select enough to see the effect of what happens next).
With the lasso tool still selected in the toolbox, place your cursor within the selection outline.You will see the selection move cursor.

Press and hold the left mouse button and drag a little ways. The selection outline will be moved. Next, press the left arrow key on your keyboard ten times. You’ll see your selection outline move ten pixels to the left. Now press the Shift key as you press the right arrow key once. The outline will move ten pixels to the right.
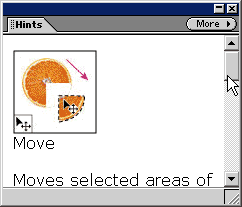
In the toolbox, click on the move tool to select it. It’s in the upper right corner of the toolbox.

Position your cursor within the selection outline and drag. You’ll see the selected chunk of the pattern fill moved and the “hole” filled with white (or whatever your current background color is). If the selection that you are moving is on a layer (not the background) a transparent hole will be created in the layer (without fill).
With the move tool still selected in the toolbox, press any of the arrow keys on your keyboard. You’ll see the selection contents moving with the selection outline. It’s important to notice that the move tool will always cause the selection contents to be moved.
Use Undo History to undo all of the move tool edits so you won’t have a hole in your pattern. Or, you can leave it, if you like.
With the selection active (if you accidentally deselect, use Select > Reselect), choose Enhance > Adjust Color > Color Variations. In the Color Variations dialog, notice that the preview is limited to the selected area. Click any of the color thumbnails at the bottom of the dialog to alter the colors of the selection. Click OK to exit. Notice that the color changes applied only to the selected area.
With the selection still active, choose Filter > Artistic > Watercolor. Click OK to apply the filter. Again, you will find that only the selected area was affected by the filter.
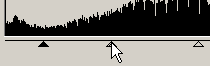
Keep the selection active. Choose Layer > New Adjustment Layer > Levels. Click OK in the New Layer dialog. Once the Levels dialog opens, move the little sliders around under the histogram (the black mountain peaks) while watching your document.
Make some dramatic changes by dragging the end sliders in toward the center and moving the center slider toward either end, then click OK to add the Levels adjustment layer. You’ll notice that you have lost your selection in the process of creating the adjustment layer.
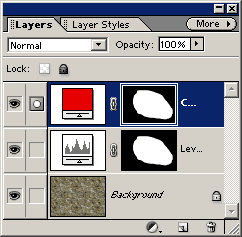
Choose Window > Layers to open the Layers palette. Take a look at the new adjustment layer that was added. You’ll see a black and white thumbnail was created in the shape of your selection.

That is the adjustment layer’s mask. I won’t try to confuse you by getting into what you can do with a mask, but I can tell you that they are wonderful, powerful things. As you rummage around this Web site, you should find out more about how they work.
Choose Select > Reselect to get your selection back. Then choose Layer > New Fill Layer > Solid Color. In the New Layer dialog that appears first, from the Mode menu, choose Color (the Color mode is way down at the bottom of the menu). Click OK and the color picker will open. Pick any color you like, then click OK. The selected area has now been recolored or tinted with the color that you chose.
The marquee tools are best for geometric selections. The lassos are fine for making loose, feathered selections to do mild corrections. If you want to precisely cut an irregular shaped object out of its background, or, conversely, if you want to select all of a multicolored background in order to change its content, I would strongly recommend that you paint on a separate layer and then Ctrl-click that layer to load your selection. This technique is described at length in the Simulated Alpha Channels tutorial. You can make intricate selections with the lasso by using the Add and Subtract buttons or keyboard shortcuts, but why do it that way when painting on a layer is so much easier and better?
The new selection brush in Elements 2 is a great tool for beginners to use since it allows you to stop and start without losing your selection. However, it makes very imprecise selections. Once you have learned how to use other, better tools, I don’t recommend that you use the selection brush.
Related tutorials and information on selections can be found in the Selections tutorial in the Photoshop section as well as on the Feathering and Anti-aliasing pages.
Layers. You’ll love them once you understand them. Look at your Layers palette(Window > Layers if it’s not open). You should see the background layer at the bottom, your added Levels adjustment layer, and the solid fill layer.
Double-click on the Levels thumbnail at the left end of its layer (not the mask thumbnail).

The Levels dialog will reopen right where you left it. Move the sliders around some more. You can edit an adjustment layer at any time. The underlying image has not been altered and can be ‘reclaimed’ at any time by deleting the adjustment layer.
Try double-clicking on the solid color fill layer’s thumbnail and choosing a new color. Finally, delete both the fill layer and the Levels layer by clicking on them in the Layers palette and then clicking the garbage pail icon in the bottom right corner of the palette. You should be left with just the background layer.
Fill your document with a pattern, once again. Try something new if you’re getting sick of the rocks. Load the Nature Patterns palette and then choose the Spiky Bush pattern. Click OK to add the fill. Notice that the pattern details are small. Maybe you’d like to make them bigger.
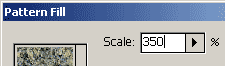
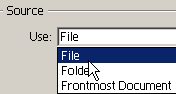
Use Undo to get rid of the pattern fill. Then choose Layer > New Fill Layer > Pattern. Click OK in the New Layer dialog. Then the Pattern Fill dialog will open. You’ll find a Scale slider there. Try setting it to 350 %.
You’ll see a very blurry bunch of spiky bushes. Move your cursor over your document. Click and drag to reposition the pattern. Click OK to add this remarkably ugly pattern to the document. Then choose Layer > Merge Down to merge the pattern into the background (you can’t copy pattern content from a fill layer which is what I’m going to do next).
Make an odd shaped selection with the lasso tool. Were this an image, you might be selecting an object or person that you want to cut from the background. With that selection active, choose Layer > New > Layer via Copy. Look at your Layers palette. You’ll see a new layer with the copied selection contents. You can’t see it in the document because it hasn’t been moved and therefore matches perfectly with its original background.
To see just your copied layer, turn off visibility for the background layer. Do this by clicking the eyeball icon at the left end of its layer.

You’ll see the contents of your copied layer surrounded by a gray and white checkerboard pattern. That checkerboard indicates transparency (no content) on the layer. It is there for display purposes only. It will not print or show up anywhere outside of Elements. It is very useful when you need to see where a layer does not have content.

Click on the background layer. Turn visibility back on by clicking on the box where the eyeball was. The eyeball will reappear along with the background. Choose Edit > Fill and fill with anything you like so long as it’s not the Spiky Bush pattern. You’ll see your copied object over a new background. Those are the basic steps to creating new or different backgrounds or for moving an object around on a picture.
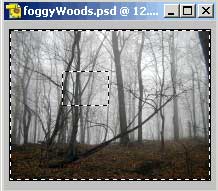
To move the copied object onto an entirely different picture, first, open the second image (File > Open). Click on the blue title bar of the first picture to make it active (the layers visible in the Layers palette are always only for the currently active document). In the Layers palette, click directly on the copied layer and drag it onto the second picture (not the Layers palette).
Use the move tool to get the object where you want it on the second image. When using the move tool, first be sure you have the layer that you want to move selected in the Layers palette. Click on a layer to select it. When nothing is selected, the move tool will move the entire layer. If you have an active selection, the move tool will move whatever is within that selection on the current layer. The move tool will not move anything that is not on the currently selected layer (unless you have linked another layer to that layer by clicking the link box to the right of the eyeball icon; don’t worry about that for now).
The steps listed above are very crude; for better instruction on compositing pictures, see the Combining Images tutorials in the Photoshop section.
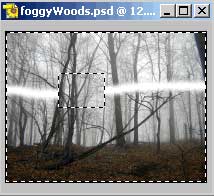
Back on our demonstration document, click on the copied layer to select it. Then choose Filter > Artistic > Watercolor. Notice that the filter only affects the currently selected layer. This is true for most of the commands and tools. If you paint or erase or fill or move or filter, it will affect only the currently selected layer in the Layers palette. Think of the control this give you.
Selections made with the selection tools (lassos, marquees, selection brush, magic wand) apply only to the currently selected layer though you can use the same selection outline on different layers by clicking on a different layer in the Layers palette while the selection is still active. For example, if you make a selection and then apply a filter, only the content within the selection on the current layer will receive the filter effect. Likewise, if you make a selection and then choose Layer > New > Layer via Copy, the new layer will be created from copied material on the current layer, only.
Open the Layer Styles palette (Window > Layer Styles) and apply a few styles to the copied layer. To apply a style, click on its thumbnail in the Layer Styles palette. Layer styles apply to the layer that is currently selected in the Layers palette. They affect only areas on that layer that contain content. If your layer is entirely opaque, the style will cover the layer. If the layer contains a shape or object surrounded by transparency, the style will appear only on that shape or object. Layer styles apply only to opaque areas of a layer. A glow or shadow may radiate outward from the shape or object, but the shape or object defines the base from which the glow or shadow is generated.
Note that layer styles are cumulative. If you don’t want them piled on top of each other, use the Clear Style button in the upper right corner of the Layer Styles palette.


Comments


Comments