
Adobe Photoshop Elements 2.0 Pre-Beginner I.I
If you barely know how to turn on your computer, are nervous and unhappy the entire time you’re using it, break out in a cold sweat every time you get one of those blue error messages, have meekly spent hours on hold waiting for tech support—and aren’t ashamed to admit all of the above, this tutorial is for you.
Before you even open Elements 2, be sure that you have run Adobe Gamma to calibrate your monitor (except if you have an LCD display—Adobe Gamma doesn’t work well for flat panel displays). What calibration does is cause your monitor to more accurately display the colors and tones in your pictures. That way, there’s a much better chance that your prints will look the same as what you see on screen. Find Adobe Gamma by clicking Start > Settings > Control Panel.
Look for the Adobe Gamma icon and double-click it. Once it opens, choose the Step by Step (Wizard) option.
After you’ve calibrated your monitor, start Elements 2. If you get an alert about your scratch disk once Elements finishes loading, choose Edit > Preferences > Plug-Ins & Scratch Disks. In that dialog, below where it says Scratch Disks, click in the First menu and pick one of your hard drives. They will all be listed. If you have more than one, pick the fastest one. If you only have ‘Startup’ and ‘C’ listed, pick C. Click OK to exit Preferences.
I’m guessing that you want to edit photos uploaded from your digital camera. When moved from the camera to the computer, the files will have numerical names such as “IMG_0434.jpg”.
If you have a folder with 200 pictures in it, you’ll want to preview the files in order to pick one that looks nice. Those of you with Windows XP can get thumbnail previews, but the File Browser in Elements is much better. Find it by clicking the button on the shortcuts bar, or by choosing File > Browse, or Window > File Browser.
Navigate to the folder that contains your pictures. If you don’t know how to navigate or browse to find files, you need to get over to Amazon and buy one of the basic books on how to use your particular operating system such as the ‘Learn [your OS] Visually’ series. (Windows XP, Windows ME, Jaguar 10.2, etc.). I can’t teach you everything.
Once the proper folder has loaded its thumbnails in the File Browser window, you can pick the picture that you want to edit by double-clicking on it. Then close the File Browser by clicking the X box in its upper right corner.
The first thing you need to do with a fresh file is give it a proper, descriptive name and save it to a non-lossy format. The .jpg format is great for compressing files to very small sizes (ideal for fitting many pictures on your memory card) but it is “lossy” which means that each time you us Save, it compresses your image, which means that it selectively throws away data. This causes loss of quality.
Elements’ native .psd (Photoshop) format or the .tif format are “lossless” which means you can save to them as many times as you like without causing any harm to your picture. The title bar (blue bar at the top) of your image shows the current name, format, color mode, and absence or mismatch of the profile associated with your picture vs the current working space. Ignore the mode and profile for now.![]()
The file above is named “DSCN0167,” and its format is .jpg. The @ 66.7 means that my display is zoomed out, i.e. not at 100 %. You can zoom in and out in order to get a different view of your picture; it has no bearing on the size of your file or prints made from your picture. That’s strictly an onscreen sizing for your editing convenience.
To save to a different format, choose File > Save As.
In the Save As dialog, from the Format menu, scroll to the very top to find Photoshop (*.PSD, *.PDD) and choose that.
Think up a descriptive name for the picture and type it into the File Name box. You don’t have to type the file extension at the end of the name, though you can if you like. So, you can type in either My_Dog or My_Dog.psd. Then click OK to save.![]()
You need to use Save As instead of the regular Save command in order to get the dialog where you can change the name and format. Now that the file has been named and converted to .psd format, you can go back to using Save when you do your editing on this picture.
Now before you do any editing or printing, it’s time to check and probably reset your picture’s resolution. Many digital cameras create images at low resolutions—which is fine. Pixel dimensions and not resolution are all that matter until it’s time to print your pictures—but when you make prints, resolution matters a lot.
Choose Image > Resize > Image Size.
Once in the Image Size dialog, uncheck (deselect) the Resample checkbox. This is very important. Be sure that Resample is not checked.
After you have unchecked Resample, change the Resolution setting to 200. Then look at the Document Size. Does it look like the size that you’re after? If not, change the resolution again. Higher resolutions will make smaller sizes. Lower resolutions make larger sizes. For printing, you want to try for at least 150 ppi (pixels per inch). For photographic prints, anything higher than 300 ppi is usually unnecessary, and anything higher than 600 ppi is probably going to choke your printer. (Note that the dpi setting in your printer dialog is a different kettle of fish—there, you may want to use the highest setting. Dpi is not the same as ppi.)
Compare the width and height that you get at 300 ppi, shown above, to the width and height that you see at 72 ppi, shown below. But please notice that the Pixel Dimensions, shown at the top of both illustrations, remain the same. You are only changing the pixel density of your image when printed.
Once you’ve chosen a new Resolution, click OK to exit the Image Size dialog. Notice anything different about your picture? No? Exactly. What you see on your monitor has not changed at all—it looks the same as it did before you changed the resolution. On screen, the only thing that matters is pixel dimensions. Your printer responds to the resolution but the monitor always uses pixel dimensions.
If you want to email pictures to friends and they will only be viewing them on screen, you may want to resize a copy with Resample checked in order to reduce the pixel dimensions. Be very sure to do this to a copy and not your original. Use Save As to make a copy, or click the Attach to Email button on the shortcuts bar (or use File > Attach to Email) and Elements will resize and attach the picture to your email for you, without harming the original.
If you’re thoroughly confused, you can check out my page on resolution, or just don’t worry about it for now. You’ll figure it all out eventually. Everybody finds resolution confusing at first.
If you want to crop your picture, you can do it now. Choose the crop tool in the toolbox. It’s the icon third from the top on the right side.![]()
After you’ve chosen the tool by clicking on its icon in the toolbox, look at the top of your screen below the shortcuts bar. You’ll see the options bar, which shows options specific to the tool that you currently have selected. On the options bar, make sure that the Width, Height and Resolution boxes are empty. You do not want to use those. They don’t do what you think they do. They can be useful but don’t use them until you understand what they do to your picture.
If you want to find out how those settings work, you can look on my page about the crop tool. Scroll to the bottom to find a paragraph explaining what happens when you enter settings to get a fixed size crop box. If you are sure you understand how it works, then go ahead and use the feature. If you aren’t sure, don’t.![]()
With the crop tool, click where you think the upper left corner of your cropped picture should be. Keep the left mouse button pressed and drag the cursor down and to the right to where you think the bottom right corner of your cropped image should be. Release the left mouse button. Your picture will now contain a ‘bounding box’ that indicates your intended crop. Don’t worry—the crop doesn’t happen until you click the big checkmark at the far right end of the options bar.
To fine tune your crop box, drag on its handles. Handles are the little tiny square boxes that you see on each corner and in the middle of each side of the box. When you hover your cursor over one of the handles, you’ll get an indication of what it will do. This one widens.
And this one on corner handles (below) scales the box. Press the Shift key as you use this one to scale the box in proportion.
If you put the cursor within the bounding box, you’ll see this cursor and you can move the entire box without changing its dimensions.
Once you have the crop box that you want, click the big checkmark on the options bar or press the Enter key on your keyboard to do the crop. If you change your mind and don’t want to crop the picture, click the Cancel icon next to the big checkmark or press the Esc key in the upper left corner of your keyboard.
If you are preparing graphics for a Web site and want to crop to specific dimensions, you can use the rectangular marquee tool, to instantly generate the correct size crop. If you use this for pictures that you intend to print, be sure you have set your resolution to an appropriate setting before using this method (as described in the previous section).
Choose the rectangular marquee in the toolbox (it’s in the upper left corner). On its options bar, from the Style menu, choose Fixed Size.
Then enter your desired dimensions in the Width and Height text boxes at the right end of the options bar. If the units showing are not what you want, you can type in the units you want (px for pixels or in for inches).
With the correct dimensions entered in the tool’s options bar, click on your image. A selection box of the desired size will appear where you clicked .Check on the options bar to make sure the New Selection button is chosen from the four little boxy icons at the left end of the options bar. You need to have that option chosen in order to be able to move your selection outline.![]()
Place your cursor within the selection box outline. The cursor will look like this:
Drag the box to be where you want to crop your picture. You can also use the arrow keys on your keyboard to nudge the selection outline into place in one pixel increments.
Once it’s where you want it to be, choose Image > Crop and the picture will be cropped to the selection dimensions.
Be sure to reset the rectangular marquee tool’s Style to Normal on its options bar. Otherwise you’ll be going nuts wondering why you can’t drag selection boxes.
Now, to start editing your picture, choose Enhance > Quick Fix.
Note that when I say “choose” throughout all of my tutorials, that means go to the menu bar at the top of the Elements window and work through the menus as instructed. In this case that means that you want to click on the Enhance button, and then, from the menu that appears, choose Quick Fix.
Adobe® created this feature just for you. You can do anything you like within this dialog, and if you don’t like the end results, click either the Cancel or the Reset Image button and get your original picture back, unharmed—no matter how many steps you’ve applied within the dialog.
As you use the features in Quick Fix, you can not only watch the Before and After versions at the top of the window, you can also see the effects on your full-size picture in the background. If Quick Fix is obscuring your view, grab the dialog box by its blue title bar and drag it out of the way.
Follow the sequence of editing steps on the left side of the window, from top to bottom. As each option is chosen, you will see a description, above, next to the yellow light bulb. Be sure and read the those tips. They’re good.![]()
Click the Brightness radio button (a radio button is the little white dot next to that item).
You’ll then get to choose from five options in the #2 panel. Of those, I would recommend that you stick with Auto Contrast. Auto Levels can do funny things to your color. Brightness/Contrast allows you to use sliders to alter the image, but can be destructive. Use Fill Flash or Adjust Backlighting if your picture needs them. Read the tips next to the light bulb for a description of what they do, or click the Apply button and see for yourself. If you don’t like the result, use the Undo button to remove the last step that you applied. Note that you can apply as many of the options in panel #2 as you like and you can apply the same option more than once. Just click the Apply button for what you want as many times as you want it.![]()
If you realize, many steps later, that you hate everything that you’ve done, use the Cancel button to get out of the dialog, or use the Reset Image button to go back to the beginning and try again.![]()
After you’re finished with Brightness, click the Color Correction radio button. Then, from the #2 panel I would recommend that you try the Auto Color feature.
If you know enough to use the controls in Hue/Saturation, you’re not a pre-beginner and you’d be much wiser to apply it via an adjustment layer, and not from Quick Fix.
Finally, click the Focus radio button. In this #2 panel, use the Auto Focus choice (unless you want to blur your picture). Auto Focus uses a small application of the Unsharp Mask filter which is the method of choice for image sharpening. It applies only a 50% Amount, so you can probably apply it twice without overdoing it.
Unless you want to rotate your picture, you’re now done and can click OK to apply all of your edits to your picture. Afterwards, choose File > Save, or use the keyboard shortcut of Ctrl-S to save your picture with the new edits
Even after exiting Quick Fix, you can still undo it by using History (or Undo History as it is called in Elements 2). Find it by choosing Window > Undo History, or, if it’s in the palette well, click on its name tab to open it. If you want it to stay open, grab it by its name tab and drag it out of the well.![]()
Once open, click on the edit panel that precedes whatever state or states that you want to undo (a ‘state’ is any one of the listed edit steps).
After you step back in History, the steps that you have removed will be grayed out. You can still get them back by clicking back on the end state, but once you do any new edits, they are removed forever.
By default, Elements keeps track of the last twenty edits in Undo History. Therefore, you have the ability to go back twenty steps. If you have plenty of RAM, you can tell Elements to keep track of more steps by choosing Edit > Preferences > General and entering a larger number in the History States text box.
If your picture looks nice but seems a bit dark or light, and/or has a color cast (blue, red, green…) click on the Color Variations shortcut button on the shortcuts bar. It looks like this:
until you hover the cursor over it whereupon it looks like this:![]()
Once the Variations dialog opens, I’d recommend moving the Amount slider two notches to the left (the slider will jump as if notched). This will allow you to make smaller changes per click.
Click on the thumbnail that does what you want. Watch the before/after display at the top of the dialog. The image behind the dialog won’t update, so you’ll have to depend on the smallish one within the dialog to make up your mind.
As in Quick Fix, there is an Undo and a Reset Image button in case you don’t like what you get.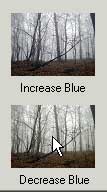
When you’re happy with what you have, click OK to apply the changes. Choose File > Save or press Ctrl-S to save your edits.
If you are like how your picture looks and are ready to print a picture, choose File > Print Preview.
In that dialog, you have the option of causing your picture to print somewhere other than the very middle of the page. To do that, uncheck (deselect) the Center Image checkbox![]()
and make sure Show Bounding Box is selected.![]()
You can now place your cursor within the bounding box on the page proxy at the left side of the dialog and drag it around. Your cursor will look like a four-headed arrow.
If, in spite of using Image > Resize Image, your picture doesn’t fit on the page, you can use the Scale to Fit checkbox, but make very sure you are not scaling to anything greater than 100%. Downscaling is okay, but upscaling is not.![]()
When the preview looks good, click the Print button. Your printer dialog will open. From here on, you’re on your own, though I will remind you to check that the proper paper is selected under Media and that you are choosing the Quality setting that you want.
That’s it for the most basic picture edit. On the next page, I’ll go into a some slightly more complicated features such as batch renaming, and Picture Package.

Comments