
Adobe PageMaker 7.0 – Working with Columns
Working with Columns
Working with newsletters and brochures often requires the use of columns. While you can create columns manually by setting your text block’s width, this process can be made easier by creating columns. As you create columns with PageMaker, a set of guides (like the page margins) are added to the page.
When you first create your document, its default is one column per page. PageMaker provides the option of creating up to 20 columns on a single page. Between each column will be a “gutter.” The gutter adds some white space between each column so text will not appear on top of the next column. If you are using the columns for a brochure, these gutters should be larger to add space for folding.
NOTE: If you want to set columns for all pages of your document, set them on the master pages.
 Creating Columns
-
Move to the page on which you want the columns to appear (this can be one of the master pages if you want them to appear on all the left or right pages)
-
From the Layout menu, select Column Guides…
The Column Guides dialog box appears. -
In the Column Guides dialog box, type the number of columns that you want for the page
HINT: If you have facing pages, you can set different columns for each page by clicking Set left and right pages separately.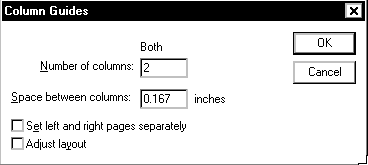

-
OPTIONAL: Adjust the Space between columns:
-
Click OK
Adjusting Column Placement
If you need to adjust the placement of the column guides, which appear as light blue dividers, use your mouse to drag the column guide to the proper position.
-
From the Toolbox, select the Pointer tool
-
Click the column guide
Do not release the mouse button.
NOTE: Click the guide over an empty space to make sure you do not include text or graphics in the selection. -
Drag the guide to where you want it and release the mouse button
Locking Column Guides
If you want to lock your guides in place so that you do not accidentally shift them while you are working on pages, you can freeze them in their current position.
-
From the View menu, select Lock Guides
Comments