Adding Your Own Video, Playback Controls, and Cue Points
Adding Your Own Video, Playback Controls, and Cue Points
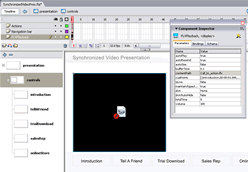
When you open the SynchronizedVideoPres.fla file, you see that the video is placed on the controls screen, which contains the video and navigation buttons along the bottom. This screen contains all the elements that appear onscreen during the presentation. It’s similar to the background screen—because it always appears—but this one is specifically set aside to contain the video and navigation controls for the presentation (see Figure 2).
You can customize the video on this screen in several ways:
- Change the video
- Change the video’s size
- Change the video’s location
- Add and remove cue points as synchronization markers
- Add FLVPlayback custom UI components for additional video controls

Figure 2. View of the template from the controls screen
Changing the Video That Plays
Here’s how to make the presentation play your own video instead of the supplied video example:
- Click the controls screen in the Screen Outline pane to select it.
- Click the FLVPlayback component in the left center of the controls screen to select it.
- Open the Component Inspector panel (Window > Component Inspector). You may have to reselect the video display on the Stage.
-
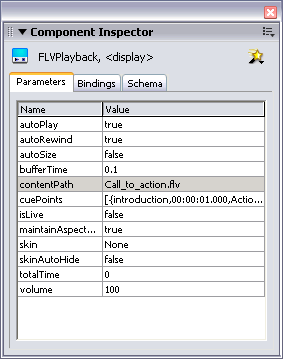
In the Component Inspector panel, click the contentPath field to enter the path to the Flash video file (see Figure 3). This is a relative path to the FLV file on the server. Note that if you are using Flash Media Server for streaming video downloads, you will need to enter an absolute path name to trigger the server.

Figure 3. FLVPlayback parameters in the Component Inspector panel
Changing the Size and Location of the Video
If the size of your video differs from what the template anticipates, or if you want to expand your video, you can change the video display size easily.
Place the video anywhere in the presentation. The video appears on the left center of the Stage by default. Keep in mind that if you change the position of the video, other screens that appear later in the presentation might overlay the video if you don’t adjust the content on each child screen accordingly:
- Select the FLVPlayback instance on the controls screen.
- In the Property inspector at the bottom of the screen, change the W and H values so they correspond to the width and height (in pixels) of your video. You can also right-click (Control-click on the Mac) the FLVPlayback instance and select Free Transform from the pop-up menu to display handles on the video so you can resize it.
- To reposition the video on the controls screen, drag the video to your preferred location.
Adding, Removing, and Disabling Cue Points
Cue points are a driving factor when it comes to synchronizing video with content in a Flash movie. Flash Professional 8 gives you an easy-to-use cue point editing tool located in the cuePoint parameter of the FLVPlayback component.
To view the cue points in the supplied file:
-
Select the FLVPlayback instance on the controls screen.
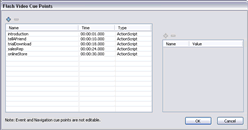
Open the Component Inspector panel and double-click the cuePoint parameter to launch the editing Flash Video Cue Points dialog box (see Figure 4).

Figure 4. Cue points entered into the working template file
- To edit an existing cue point, click in the name or time fields and type in a new value.
- To add a cue point, click the plus (+) button at the top left of the dialog box. Edit the new fields as desired.
- To remove a cue point, select the cue point and click the minus (–) button.
I explore cue points further in the “Adding Your Own Text, Graphics, and Animations” section of this article.
Adding FLVPlayback Custom User Interface Components to the Display
Adding playback controls is easy. All you have to do is add any of the FLVPlayback custom user interface components from the Components panel in Flash Professional 8. These components offer a range of functional controls that can be added individually or in combination to an FLVPlayback instance. The components are designed to be easy to use and easy to customize graphically.
For example, if you wanted to add a seek bar, you would follow these steps:
- Open the presentation FLA file in Flash Professional 8.
- Select the controls screen in the Screens Outline pane.
- Select the FLVPlayback component and reduce its height so that you can place the seek bar below it. Or change the layout to fit the bar elsewhere on the screen.
- Open the Components panel and drag the SeekBar component from the FLV Playback Custom UI folder to the Stage.
- Name the instance seek_mc.
-
Select the keyframe on the Actions layer and open the Actions panel. Add two lines of code to activate the bar with the video component:
display.totalTime = 48; // Account for older FLV encoding
display.seekBar = seek_mc; - That’s it. Double-click the seek bar instance if you want to edit the graphics. Edit as you would normally edit inside a movie clip symbol.
The process is pretty easy. You will need to assign an instance name to the custom user interface component and associate that name with the video component using a bit of ActionScript.
Note that the FLVPlayback instance is named display in the supplied template. The code snippet display.seekBar refers to the seekBar property on the display instance. Each custom user interface component has a similarly named property on the FLVPlayback component. Please see my article Customizing the FLVPlayback Component for more information on skinning the FLVPlayback component and using the custom user interface components.
Tip: The seek bar requires that a totalTime value be present in the currently playing FLV. In older FLV files this value may not be generated automatically by the FLV encoding. In this case, you will need to set the totalTime property manually using ActionScript.


Comments