
Adding Your Own User Interface
Adding Your Own User Interface
By now, you might be wondering, that’s great, I can remove all the user interface elements from my document. Now the reader can only see the first page. Why would I want to do something like that?
You wouldn’t, of course. You need to provide some way for the reader to move through the document, either by leaving some navigation features enabled or by creating your own navigation interface using the FlashPaper API.
For example, you could create a counter that keeps track of the current page and add your own “Next” and “Prev” buttons that increase or decrease the counter by one and then use FlashPaper’s setCurrentPage() method to move to the next or previous page.
Rather than creating our own navigation device from scratch, you can borrow one from Flash. The Macromedia Flash MX Professional 2004 version includes a Photo Slideshow template that has a clever “floating orb” navigation controller.
If you have Flash MX Professional 2004, you can cut-and-paste the navigation controller into your project. The downloadable code sample also contain a copy. Use the following steps to insert the controller into your file.
-
While leaving open the Flash file you’re working on, either open a new a Flash file based on the Photo Slideshow template in MX 2004 Professional or open the downloadable sample code file.

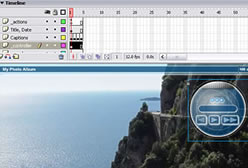
Figure 4. The Photo Slideshow template
- Select the navigation controller, select Edit > Copy, switch back to your project, and select Edit > Paste in Center to place a copy in your Flash file.
-
In your Flash file, move the navigation orb to the upper-right corner of the Stage as shown in Figure 5 below.
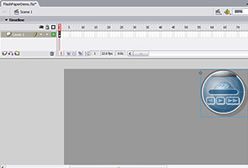
Figure 5. The navigation orb selected on the Stage
- In the Property inspector, give the controller movie clip an instance name of
control_mcas shown in Figure 6 below.
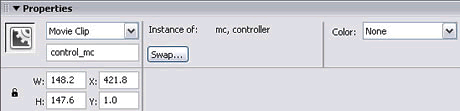
Figure 6. The Property inspector showing the instance name of the movie clip
Although the controller orb looks great, if you copied the controller from the Photo Slideshow template, it doesn’t do anything yet, because the code behind the controller is designed for the Slideshow. If you copied the controller orb from the file in the sample files, all the code is in place.
For the controller orb to work with your project, you must modify some of the code in the control_mc movie clip. Most of the navigation functionality is in Frame 1 of control_mc. You simply modify this code to use the FlashPaper API calls to move to the next and previous page. Rather than going through each modification, simply replace the controller code with the following (Again, if you copied the controller orb from the file in the sample files for this article, the code is already modified.)
// ** Decrease delay to 1 second:
 delay = 1;

 function updateFrame (inc) {
  // ** Remove old updateFrame code:
  /*
  // send slides to new frame
  newFrame = _root._currentFrame + inc;
  _root.gotoAndStop(newFrame);

  updateStatus();

   if (_root._currentFrame == 1) {
   prevBtn.gotoAndStop(2);
 } else {
   prevBtn.gotoAndStop(1);
  }
  if (_root._currentFrame == _root._totalFrames) {
   nextBtn.gotoAndStop(2);
  } else {
   nextBtn.gotoAndStop(1);
  }
 */

   // ** Add new updateFrame code to control FlashPaper API:
 var totalPages = _root.theDocMC_mc.getNumberOfPages();
 var currPage = _root.theDocMC_mc.getCurrentPage();
 var nextPage = currPage + inc;
 if (nextPage > totalPages) {
   nextPage = 1;
  } else if (nextPage <= 0) {
  nextPage = totalPages;
 }
  _root.theDocMC_mc.setCurrentPage(nextPage);
 }
// ** Remove updateStatus() (since we didn't copy statusField into our project):
 /*
function updateStatus () {
  _root.statusField = _root._currentFrame + " of " + _root._totalFrames;
 }
 */

  function autoplayInit () {
  startTime = getTimer();
 hideControls();
 // ** Remove extraneous reference to updateStatus():
 // updateStatus();
}

 function autoplay () {
 if (autoplayStatus != 0) {
   // get the current time and elapsed time
   curTime = getTimer();
  elapsedTime = curTime-startTime;

   // update timer indicator
   indicatorFrame = int(4/(delay/(elapsedTime/1000)));
  indicator.gotoAndStop(indicatorFrame+1);

   // if delay time if met, goto next photo
  if (elapsedTime >= (delay*1000)) {
   // ** Remove previous navigation code:
   /*
   if (_root._currentframe == _root._totalframes) {
     _root.gotoAndStop(1);
    } else {
    _root.nextFrame();
    }

   */
    // ** Add our own navigation code to move through
    //**FlashPaper document:
    updateFrame(1);
   autoplayInit();
   }
  }
}

  function hideControls () {
 nextBtn.gotoAndStop(2);
 prevBtn.gotoAndStop(2);
}

  // ** Add an unHideControls() function:
 function unHideControls() {
 nextBtn.gotoAndPlay(1);
 prevBtn.gotoAndPlay(1);
}

  updateFrame();
autoplayStatus = 0;
Note: To access the controller code, select the navigation orb on the Stage, open the Actions panel, and select the actions in the ActionScript code navigator in Figure 7 below.
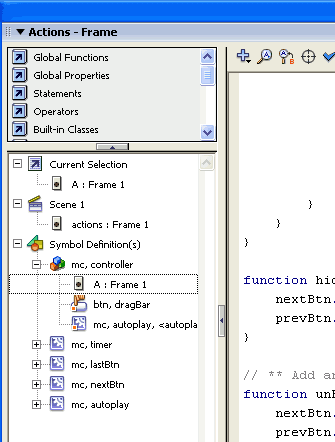
Figure 7. Accessing the controller orb’s ActionScript using the ActionScript code navigator
Some of the changes in the code are as follows. I updated the code in the updateFrame()function:
newFrame = _root._currentFrame + inc;
_root.gotoAndStop(newFrame);
with:
var currPage = _root.theDocMC_mc.getCurrentPage();
_root.theDocMC_mc.setCurrentPage(currPage + inc);
I commented out references to the updateStatus() function, which updates a field in the Photoshow template not included in this file.
I also entered the following code to decrease the value of the delay variable to speed up the rate of the page display:
// ** Decrease delay to 1 second:
delay = 1;
In addition, I’ve also made a few other changes to accommodate the new functionality. I marked all the changes in the code of the controller with comments that begin with “**”. To see the additional modifications to the code, use Find and Replace (or select Edit > Find and Replace) to find all instances of “**”.
You also need to make a few changes to the code on Layer 1, Frame 1 to control the behavior of the navigation controller movie clip. Start by hiding the controller and then show it once the FlashPaper document has completed loading.
Also notice that the controller is initially behind the document, but you want it in front. The “stacking order” depth of movie clips placed on the stage at authoring time, like the controller, ranges from -16384 to -1048575. The depths of dynamically-generated content (like movie clip holding the imported FlashPaper document) range from 0 to 1048575.
Make sure the controller’s depth is higher than the document. You can do this by creating a second empty movie clip with a depth of 200:
var ctrlHolder_mc = this.createEmptyMovieClip("ctrlHolder",200);
Before showing the controller, swap its depth with that of the movie clip you created:
ctrlHolder_mc.swapDepths(_root.control_mc);
The code on Layer 1, Frame 1 of the file now looks like this:
// function: loadFlashPaper
 // ------------------------
// Load FlashPaper document, size it,
 // Parameters:
 //   path_s: Path of SWF to load
 //  dest_mc: Movie clip to hold the imported SWF
 //  width_i: New size of the dest MC
 // height_i: New size of the dest MC
 // loaded_o: (optional) Object to be notified that loading is complete
function loadFlashPaper(path_s, dest_mc, width_i, height_i, loaded_o) {
  var intervalID = 0;
  var loadFunc = function(){
   dest_mc._visible = false;
  var fp = dest_mc.getIFlashPaper();
  if (!fp) {
    return;
   } else if (fp.setSize(width_i, height_i) == false) {
   return;
   } else {
    clearInterval(intervalID);
    var pages_i = fp.getNumberOfPages();
   ctrlHolder_mc.swapDepths(_root.control_mc);
    dest_mc._visible = true;   // Now show the document
    _root.control_mc._visible = true; // Now show the controller
    loaded_o.onLoaded(fp);
  }
  }
  intervalID = setInterval(loadFunc, 100);
  dest_mc.loadMovie(path_s);
 }

  // function: onLoaded()
 // ------------------------
 // Called once loading is complete
// Parameters:
 //   fp: FlashPaper interface (returned by getIFlashPaper())
 function onLoaded(fp) {
  // We can now call the FlashPaper API functions.
  // Remove the standard user interface features:
  fp.showUIElement("PrevNext", false);
 fp.showUIElement("Print", false);
  fp.showUIElement("Find", false);
  fp.showUIElement("Tool", false);
 fp.showUIElement("Pop", false);
  fp.showUIElement("Zoom", false);
  fp.showUIElement("Page", false);
  fp.showUIElement("Overflow", false);
  fp.enableScrolling(false);
  // Some additional API features (here commented out):
  // Go to page:
  // fp.setCurrentPage(8);
  // Change the magnification to 50%:
 // fp.setCurrentZoom(50);
 }
 // Hide the navigation controller until after the document is loaded:
 _root.control_mc._visible = false;

  // Create movie clip to hold the document:
var theDocMC_mc = this.createEmptyMovieClip("theDocMC",100);
// Create movie clip to exchange the depth with the navigation controller clip:
 var ctrlHolder_mc = this.createEmptyMovieClip("ctrlHolder",200);

  // Position the document clip on the stage:
theDocMC_mc._x = 16;
theDocMC_mc._y = 10;

 // Load the FlashPaper document:
loadFlashPaper("WhartonCentury.swf", theDocMC_mc, 462, 604, this);
Where to Go From Here
FlashPaper provides a quick and easy way to convert documents to Macromedia’s SWF file format. Due to the flexibility of the SWF file format, you can do much more with these files than simply publish them on the web.
If you’re a Flash developer, you can include FlashPaper SWF files in your Flash projects to create a customized viewing experience for web-based document viewing.
The sample code included here is just a starting point. Import your own documents into Flash and experiment with the FlashPaper API methods to create your own online experience.
Comments